
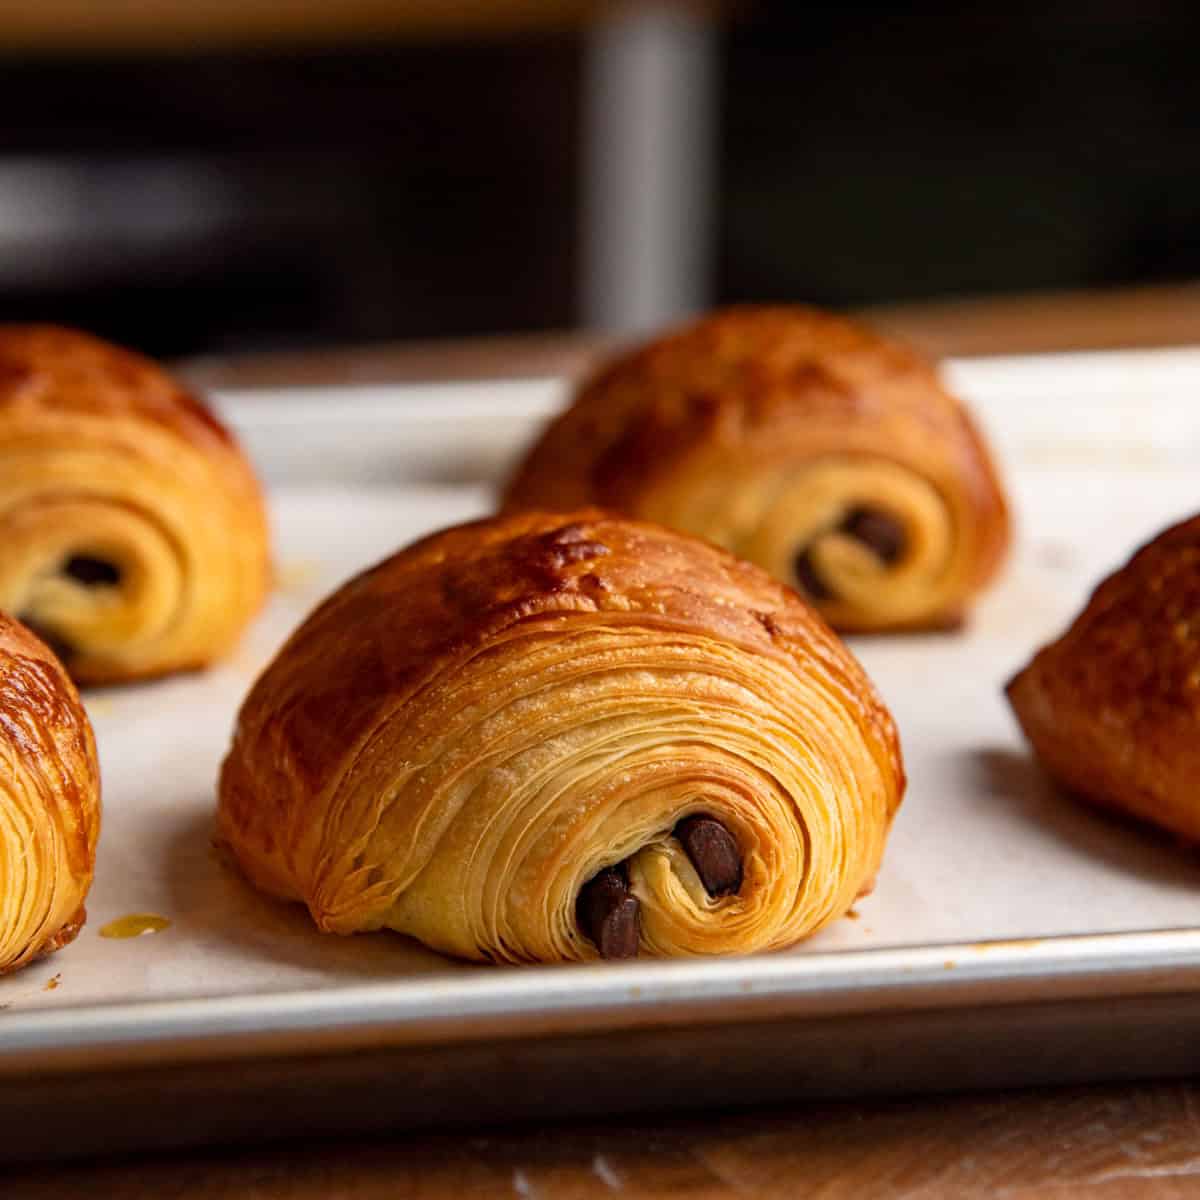
Here’s ALL you need to know about making foolproof, authentic pain au chocolat (chocolate croissants)! These are made with buttery, homemade croissant dough, and if you like regular French croissants, you’ll LOVE these too.
I share detailed, step by step instructions, pictures, and a recipe video to help you achieve PERFECT results!

- Recipe highlights
- What is pain au chocolat?
- How to make pain au chocolat (ingredients and equipment)
- Things to consider before you begin the process
- How to make chocolate croissants (step by step overview)
- The most important advice I can give to get the best results
- Variations of chocolatine / pain au chocolat
- Storage instructions
- Frequently asked questions
Recipe highlights
- You’ll be able to make authentic pain au chocolat pastry that is incredibly buttery, flaky, and delicious!
- I share easy to follow step by step instructions on how to make these French pastries.
- My classic croissants recipe (adapted from a Le Cordon Bleu viennoiserie course recipe) is very popular with my readers, and this recipe is just as extensively tested too.
- This recipe is for a small batch, which makes it easier to handle, AND allows you to focus on the techniques to get the recipe right.
- But I also provide information on how to make a full batch once you’re comfortable with the techniques.
- This is not a shortcut recipe, because I want to show you how to make flaky, soft, buttery, authentic croissant dough. Shortcuts like puff pastry pain au chocolat simply does not produce the same results.

What is pain au chocolat?
Pain au chocolat (also known as chocolate croissants or chocolatine) is made with croissant dough, which is a yeasted laminated dough.
Unlike traditional croissants, chocolate croissants are cut into rectangles and shaped as a rectangle pastry with chocolate in the middle. These are one of my favorite French pastries to make.
Puff pastry vs croissant dough
A lot of chocolate croissant recipes online are not authentic French chocolate croissants. Instead, they are made with store-bought puff pastry, which is obviously not the same as croissant dough.
Puff pastry is also a laminated dough, but there is no yeast in this dough. Whereas croissant dough is a yeasted laminated dough. The result is flaky and crisp layers, with lofty, soft, bread-like interior with croissant dough, as opposed to crisp, flaky interior with puff pastry, but no bread-like texture.

How to make pain au chocolat (ingredients and equipment)

For the dough (detrempe)
- AP flour or bread flour (I use AP flour, as Canadian AP flour has higher gluten content)
- Yeast – Active dry yeast or instant yeast
- Honey / sugar – To sweeten the dough and to help activate the yeast
- Water – To hydrate the dough
- Milk – To hydrate and enrich the dough
- Butter – To enrich the dough
- Salt – Brings out the flavor of the dough and the pastries
Butter block
- Higher fat unsalted butter – A crucial ingredient for perfect laminated layers. Butter that contains at least 82% fat is desirable for making chocolate croissants. And 84% (or higher) is optimal.
- Flour (optional) – Only if you’re using 80% fat butter. Adding 10% flour to the butter can help the butter be more pliable, but it’s not a guarantee.
For the filling
Couverture chocolate – A good quality chocolate. Ideally semisweet or bittersweet chocolate (40 – 70% cocoa content).
Equipment
- Stand mixer (optional) – I like to use a stand mixer to make double the amount of dough, and then make two smaller batches. A small batch can also be made in the stand mixer, but it’s easier to knead a smaller amount of dough by hand.
- Heavy rolling pin – To roll out the dough.
- Large sharp knife (with straight edge blade) – To cut and trim the dough.
- Small sharp paring knife – To mark the dough and to cut edges to release the tension.
- Flour duster – You can also sprinkle flour by hand. So this is optional.
- Pastry brushes (with soft bristles) – To brush off flour and to brush on egg wash.
What type of butter do I use to make croissant dough for chocolate croissants?
Ideally, you should be using unsalted butter with a minimum of 82% milk fat content. I try to use 84% MF butter, as the higher fat content makes the butter more pliable for making croissant dough.
Usually European butter has a higher milk fat content, so look for a good quality European butter for best results. Here in Canada, it’s harder to find European butter. But there are local butter companies that do make 84% MF butter.
- Gay Lea 84% bakers gold butter
- Stirling creamery 84% butter
- Cows creamery 84% butter
In addition to this, I also like to use butter made with organic, grass-fed cows’ milk. This also yields a more pliable butter.
My absolute favorite butter to use is St Brigid’s creamery unsalted butter. But I have also had luck with organic butter imported from New Zealand.
What type of chocolate to use for pain au chocolat
Traditionally, chocolate croissants are made with chocolate batons that you can get from specialty stores. These are usually made with good quality chocolate that is either semisweet chocolate or bittersweet chocolate. The ones I use here are Valrhona 48% chocolate batons.
However, you can also make these with good quality chocolate from the supermarket! I have used Whittaker’s chocolate, but you can use any other kind of couverture chocolate bars as well.
The key is to cut the chocolate with a sharp knife, so that the width is narrow enough to fit inside a chocolate croissant – about 1 cm wide.
If you’re wondering whether you can use chocolate ganache instead of chocolate, yes you can, but I don’t recommend it. Chocolate ganache will melt in the oven and leak out too much. The ganache would need to be really thick and smooth, so that it stays inside the dough, and taste good.

Things to consider before you begin the process
I’ve made croissants on the blog before, and it’s such a popular recipe! This chocolate croissant recipe is the same as the original, but there are some extra tips that I’ve developed over time after making croissants 100s of times!
To make this recipe easy to follow, let’s understand some of the terminology and conditions for making perfect chocolate croissants.
- Detrempe – The dough that’s used to make the croissants / pain au chocolat.
- Tourrage / beurre de tourrage – The butter block.
- Beurrage – The dough, once the butter block has been laminated. Beurrage actually means dough that is made with a lot of butter. This includes croissant dough, puff pastry, brioche, Danish pastry, and many of the viennoisserie doughs that use a lot of butter.
- Conditioning the butter / dough – Butter, when cold, can break or crumble when pressure is applied on it. So the butter is conditioned by hitting and rolling it with a rolling pin to make it more pliable, while still remaining cold.
- French fold – The method of encasing the butter with dough. This method will have the butter layer in the middle and two layers of dough on either side. There are other methods to lock in butter in the dough that will create more layers too.
- Dough is too elastic – This is when the dough springs back when rolling it out. Like elastic, the dough wants to spring back to a smaller shape. This is a sign that the gluten is overworked, and the dough MUST be returned to the fridge to rest for 30 – 60 mins. Once the gluten has sufficiently rested, it’ll be easier to roll out.
- Ideal temperature – The butter and dough (beurrage) should be between 50 – 60°F OR 10 – 15°C. If the beurrage is too warm, then the butter layers will be too soft and mix in with the dough layers, and you’ll lose the lamination. If the beurrage is too cold, the butter can’t be conditioned properly and will break and tear through the dough.
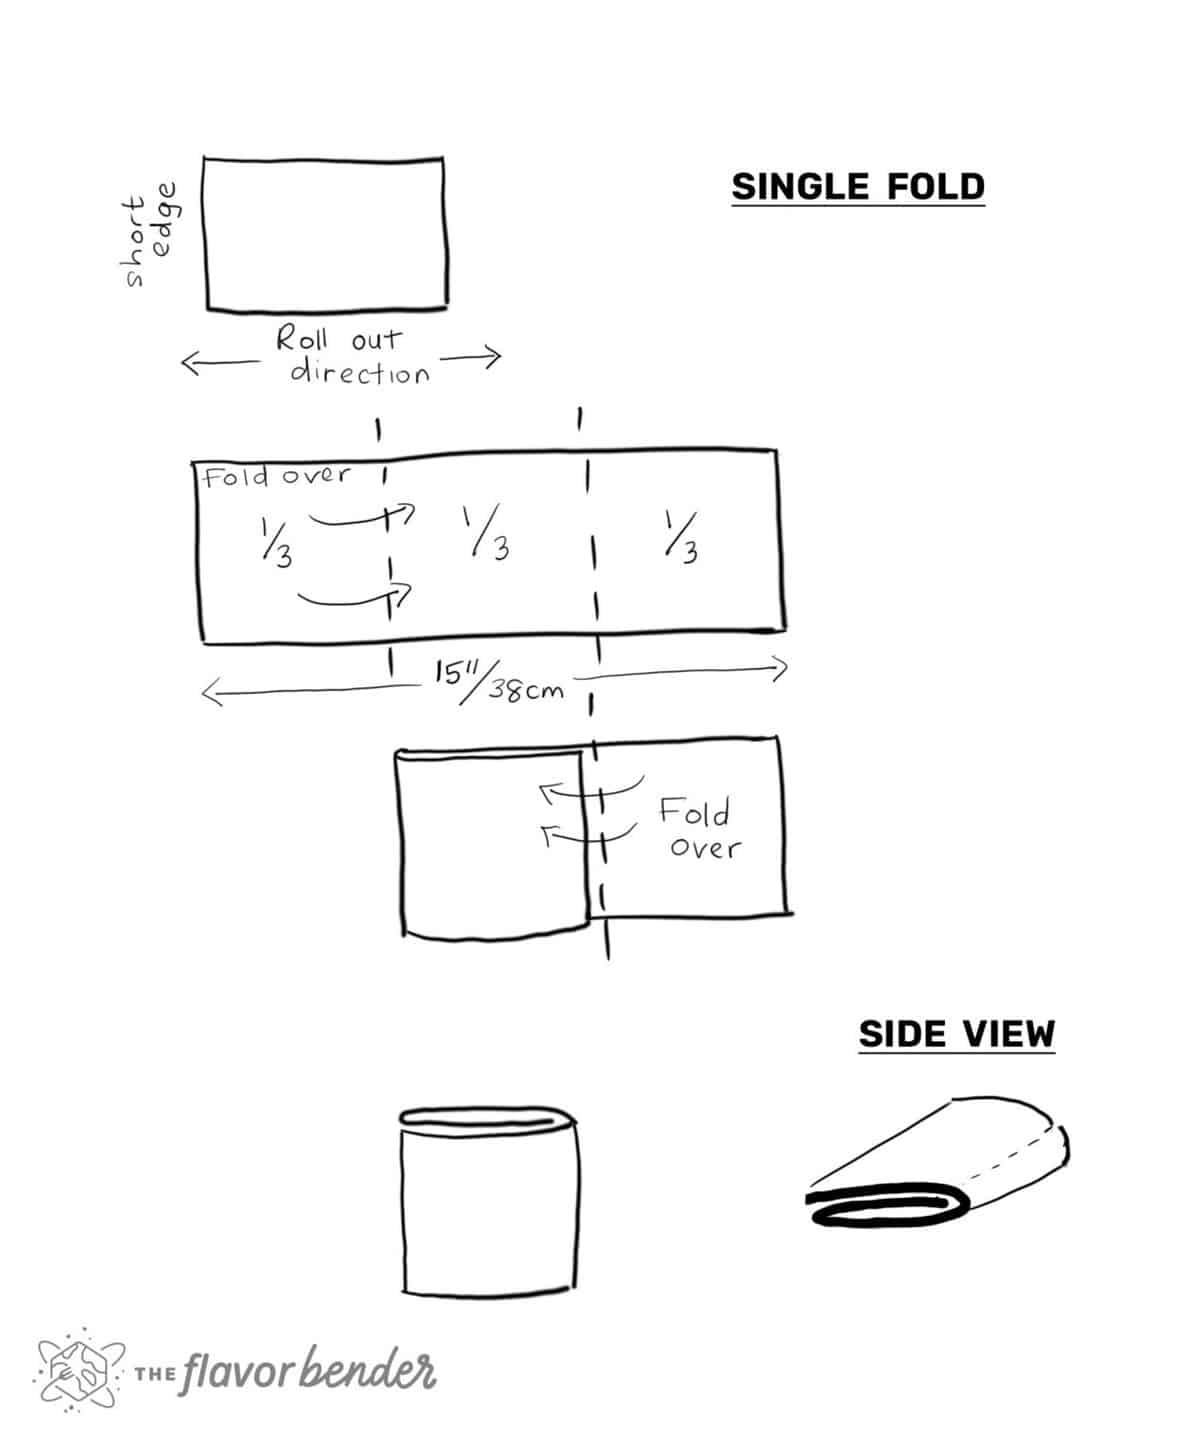
What is a single fold or letter fold?
This is one of the folds that we will use to create the lamination in pain au chocolat dough. The dough is folded over itself to create 3 layers of dough.
The dough is first rolled out and then 1/3rd is folded towards the middle third, and the remaining third is folded over this middle portion again to create 3 layers on top of each other.

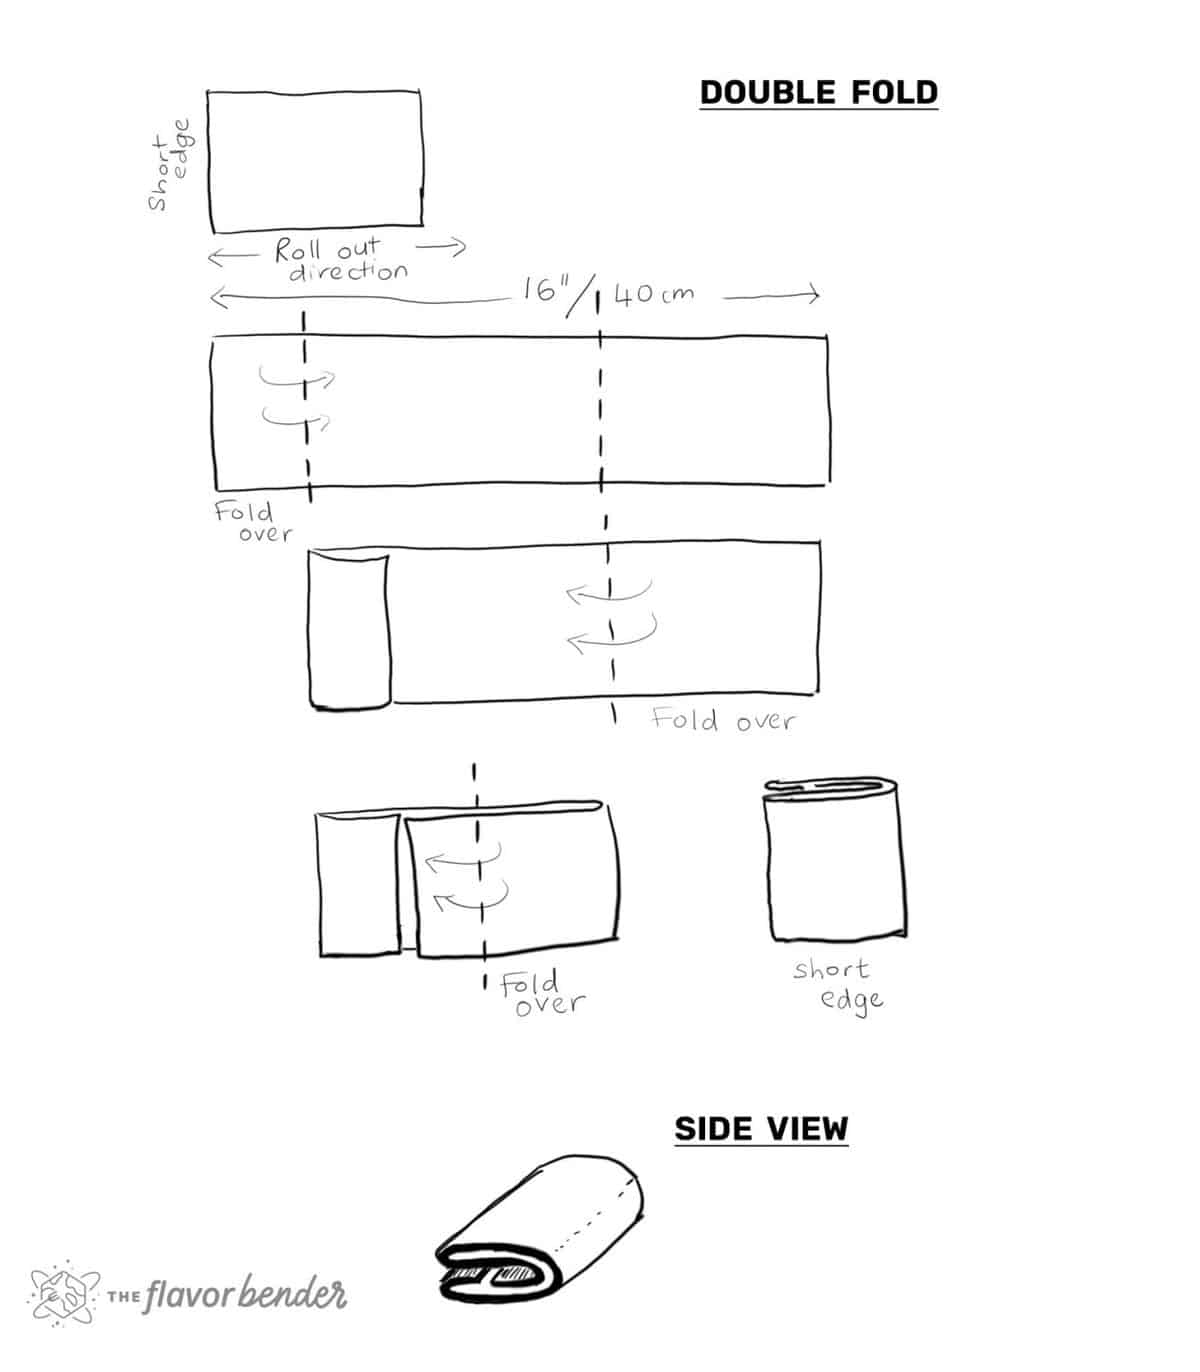
What is a double fold or book fold?
This is another type of fold that creates further lamination in croissant dough. A double fold creates 4 layers of dough. What I do here is specifically called an “offset” double fold or book fold, because the seam is offset from the center.
The dough is rolled out and then roughly 1/8th of the dough is folded inwards. Then the other end of the dough is folded to meet the seam of the previous folded edge. The seam here is offset from the middle of the dough.
Then the dough is folded in half to create four dough layers on top of each other. Since the dough is folded more, the dough is usually rolled out to be longer for this technique than the single fold.

How many layers for a croissant or pain au chocolat?
With this recipe, we will do 1 x book fold and 1 x single fold, and this will create 25 layers (dough and butter). This is less than a classic croissant, but easier for a beginner. And a great place to start if you’ve never made croissant dough before.
Can I make more layers?
Absolutely! When you’re more confident with handling croissant dough, you can create more layers.
Instead of doing a French fold to encase the butter, you can start with an English fold which involves creating two blocks of butter encased between three layers of dough. This will increase the number of layers up to 49!
You can also do 3 x single folds which can also increase the lamination layers.
How to make chocolate croissants (step by step overview)
Day 1 – Make the detrempe (dough)
Step 1 – Activate the yeast
Mix the lukewarm water and milk with the honey (or sugar). Add the yeast and leave it aside until the yeast activates (image 1).
I like to activate the yeast regardless of whether I use active dry or instant yeast. This lets me double check if the yeast is still active.

Step 2 – Make the dough
Once the yeast is active (frothy bubbles forming), add all the ingredients for the dough into the bowl (image 2).
Mix to form a scraggly dough (image 3). Next, knead the dough until it’s fairly smooth. There should some gluten formation in the dough, but not pass the window pane test (image 4).
Step 3 – Shape the dough and proof

Shape the dough into a square or rectangle. With the short side at about 6 – 6.5 inches if possible (image 5). Place the dough in parchment paper and then wrap the dough with plastic wrap completely, but a little loosely, and let it chill in the fridge overnight (image 6). This process will allow the dough to proof slowly in the fridge as well.
Step 4 – Prepare the butter block

Form a parchment paper pocket of 5 x 6 inches. Place the cold butter inside the parchment paper and use a rolling pin to flatten the butter block (images 7 – 8). Make sure to contain the butter within the block that you folded with the parchment paper, so that the butter block ends up being 5 x 6 inches as well (image 9).
Use the rolling pin to flatten and roll out the butter to fill the 5 x 6 inch pocket (image 10). This process helps to condition the butter, in order to make it more pliable. The butter block should have an even thickness throughout. Keep the butter block in the fridge until you need it.
Day 2
Step 5 – Encase the butter
Remove the butter block from the fridge and use a rolling pin to roll on the butter (or to lightly pound it), while it’s still in the parchment paper packet. This is to make the butter flexible / malleable. You can use your fingers to press on the butter to see if it’s malleable. This will help to recondition the butter to make it more malleable and flexible while still being very cold.
Place the butter block against the dough to check if the dough is double the size of the block (image 11). If not, roll out the dough in to a rectangle that’s about 6 inches in width (same height as the butter block), and about 10 inches in length (twice the length of the butter block) (image 12).

Place the butter block (without the parchment paper), on top of the dough (image 13), and fold the excess dough over to encase the butter block with the dough (images 14 – 15).
You can keep the butter block at the edge and fold the dough like a book, OR place the butter block in the middle and fold the two dough ends over to meet in the middle (image 15). Either method works.
Just make sure the dough edges are pinched together to seal along the 6 inch edge.

Step 6 – The lamination process
First fold – Book fold
The dough and butter should still be cold at this stage. If it’s warm, return the dough to the fridge for about 30 minutes before doing the first fold. But if the dough and butter are still cold, let’s complete the first fold.
With the shorter edge facing you, gently roll out the dough on your work surface (image 16). The dough should maintain a width of about 5 – 5.5 inches, and be 20 – 22 inches long (four times as long as the width to maintain a square shape at the end, once folded) (image 17).

Maintain a rectangle shape with straight edges, as this will help with even rolling. Trim edges a little if needed (image 18). Fold the dough with the offset book fold (4 layers of dough stacked) (images 19 – 22).
Wrap the dough and chill it for 30 – 60 minutes.
Step 7 – Second fold (single fold / letter fold)
Once the dough has rested and chilled, remove it from the fridge. Let it rest for a few minutes if needed – ONLY if the dough is too cold. Then we condition the dough by lightly hitting it with a rolling pin to make the butter inside more pliable to roll out.

The dough will be rolled out in the opposite direction from before. The side with the visible folds should be facing you. Roll out the dough (gently), while maintaining the width, until the dough is three times as long as the width.
If the width is 5 – 5.5 inches, the final length will be 15 – 16.5 inches (after trimming the edges) (image 23). Fold the dough in a single fold / letter fold (three layers on top of each other) (images 24 – 25).
Wrap the dough with plastic wrap and chill for another 30 – 60 minutes (image 25).
Lamination advice
You can change the lamination folds to suit your needs. You can do 2 x book folds. Or 3 x single folds.
This combination of folds is just great for beginners because it’s easier to roll out, and faster (with just two folds vs 3 folds). The more experience you gain, the more confident you’ll be to do more folds.
If the dough is elastic, AT ANY POINT, please wrap the dough and place it in the fridge. The more heavy handed you are with rolling out the dough, the more likely you are to break the butter or make the butter layers disappear into the dough.
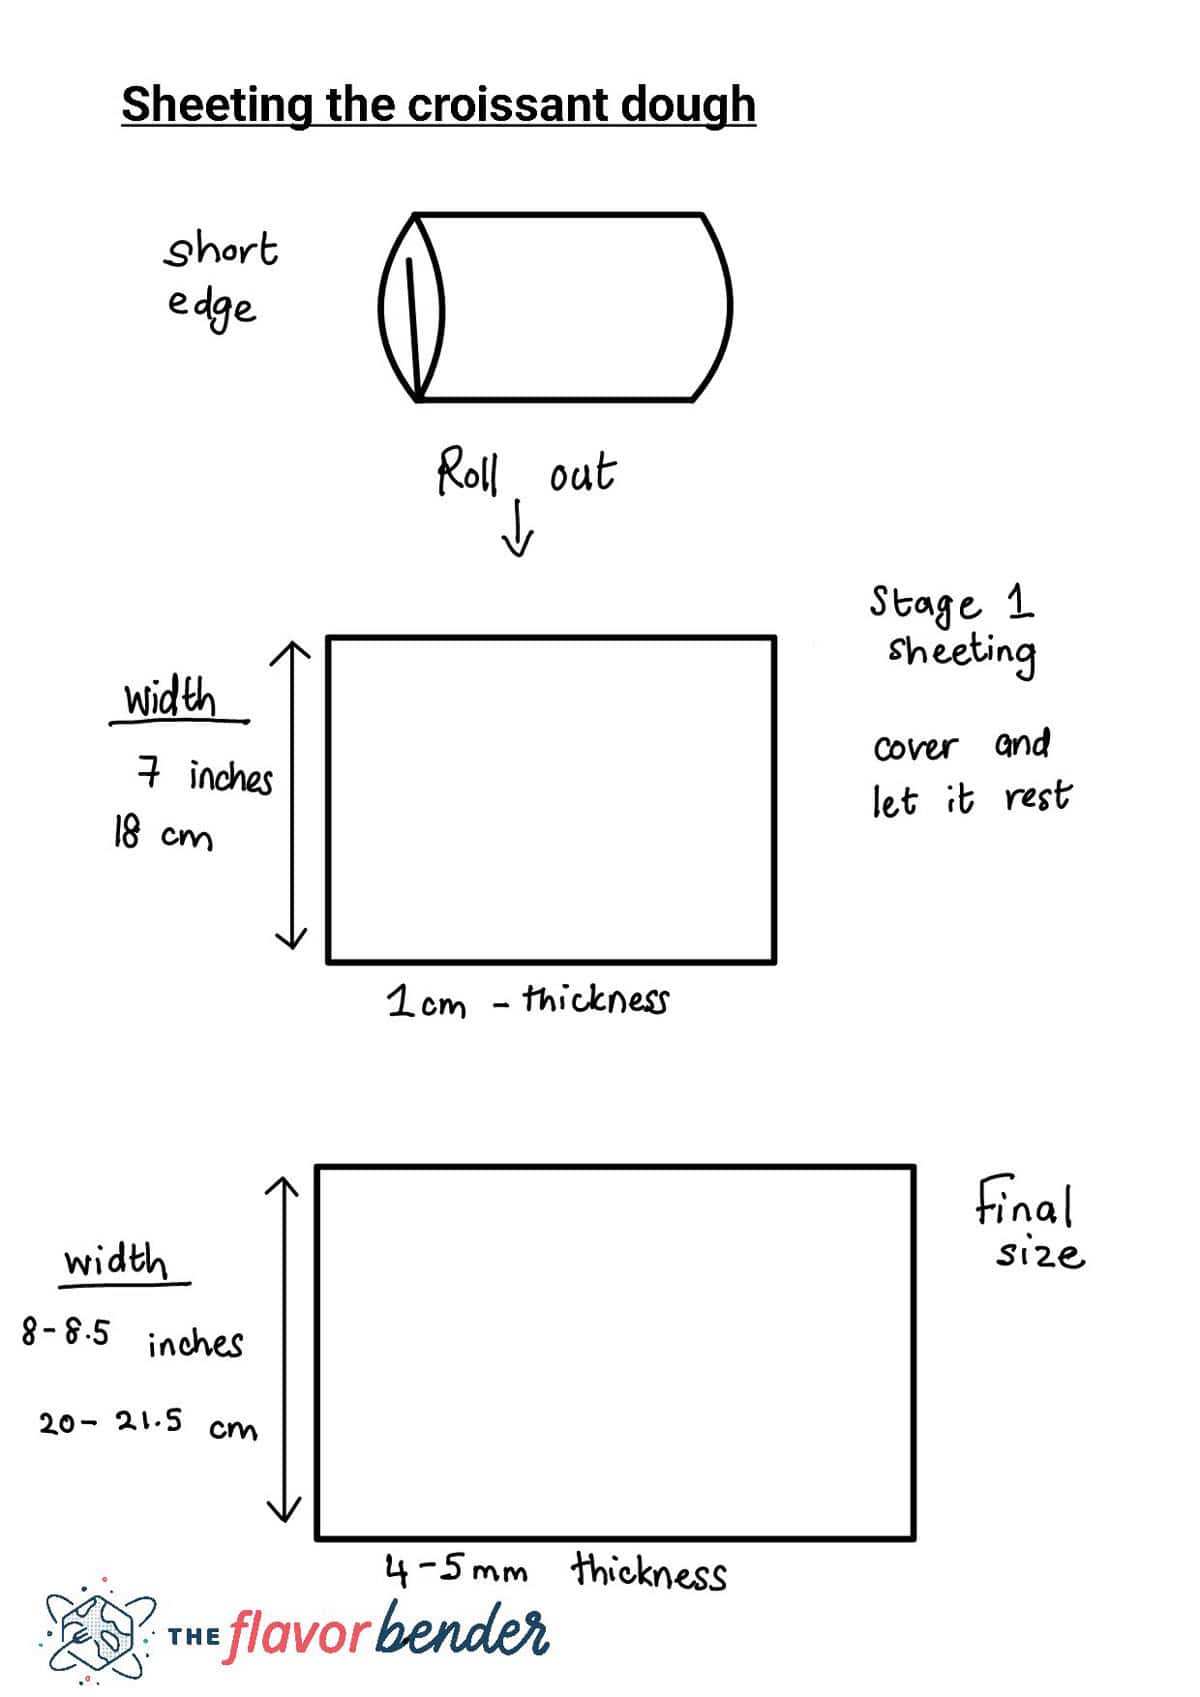
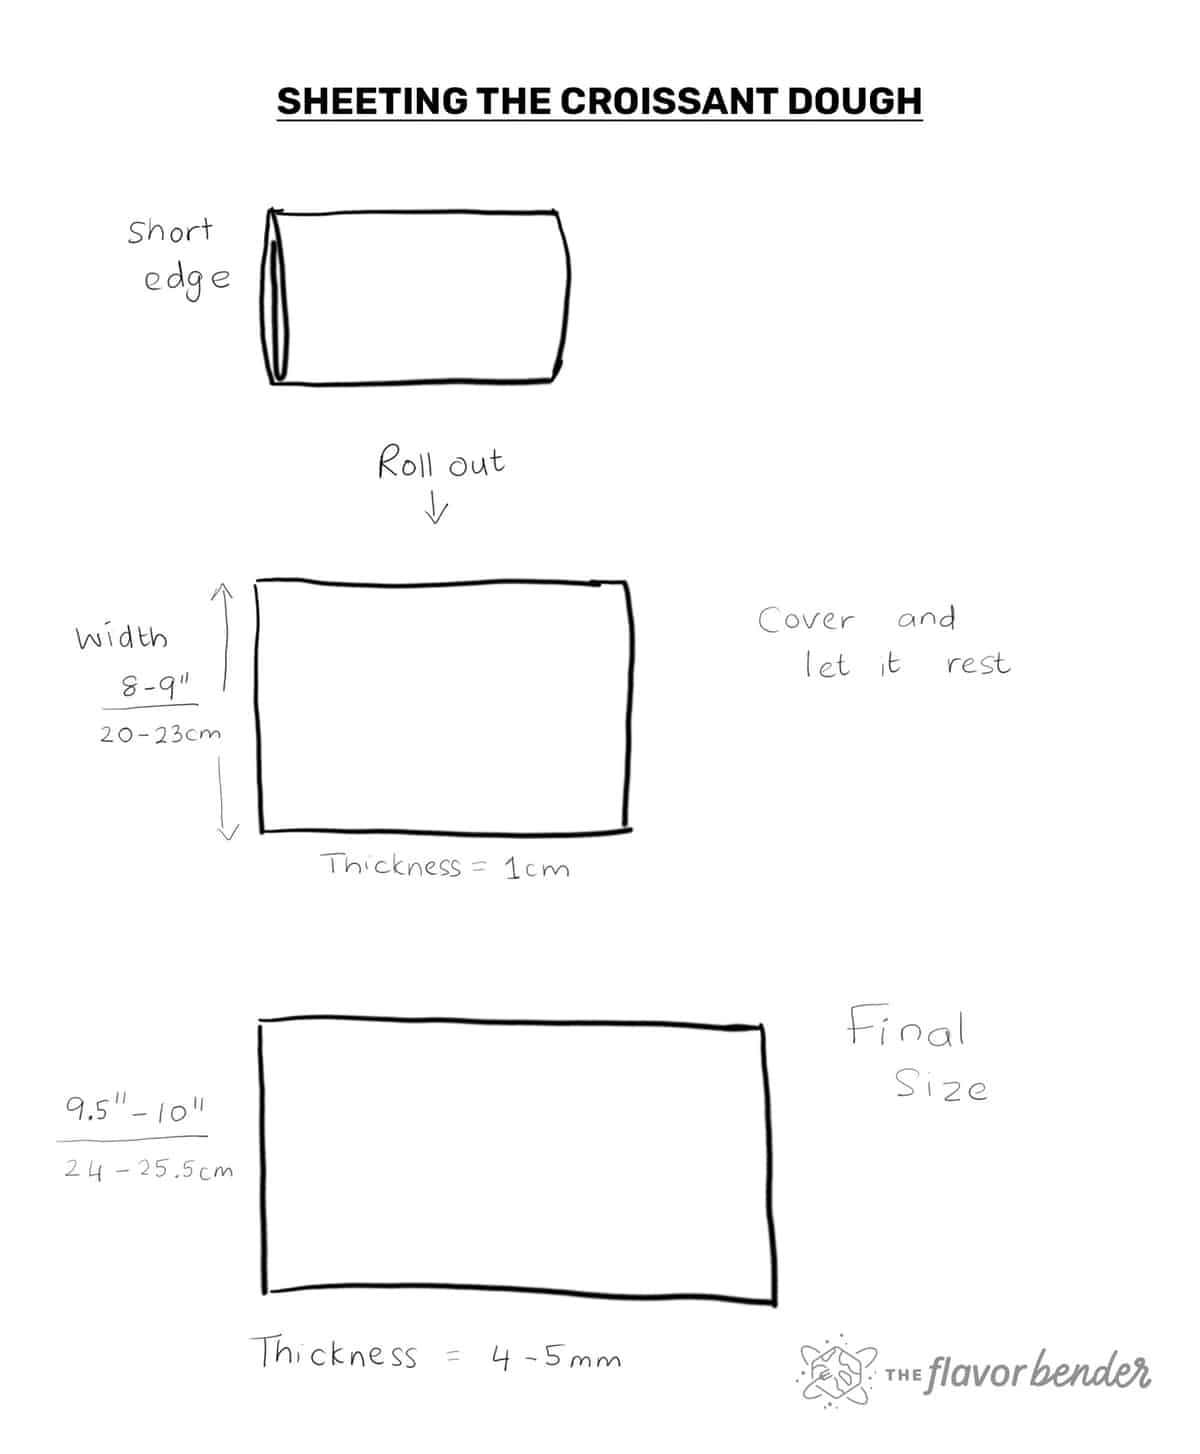
Step 8 – Sheeting the dough (first stage)
The purpose of this step is to start rolling out the dough to the right size and to cut it into portions for pain au chocolat. We do this in two steps, because the dough can get elastic as it’s rolled out thinner. So we rest the dough half way through to ensure we can properly maintain the lamination layers.
Roll out the rested dough on a very lightly floured work surface. The dough should have a width of about 8 inches (image 26). The height should be about 1 cm (3/8 inch). The length can vary. Cover the dough with plastic wrap and chill in the fridge for about 30 minutes (up to 60 minutes) (image 27).

Step 9 – Sheeting the dough (second stage)
Roll out the rested dough on a lightly floured surface again (image 28). This time the goal is to get the dough to a thickness of 4 – 5mm (3/16 inch), while maintaining an 8 inch width (image 29).
The length of the dough will vary from 16 – 19 inches.
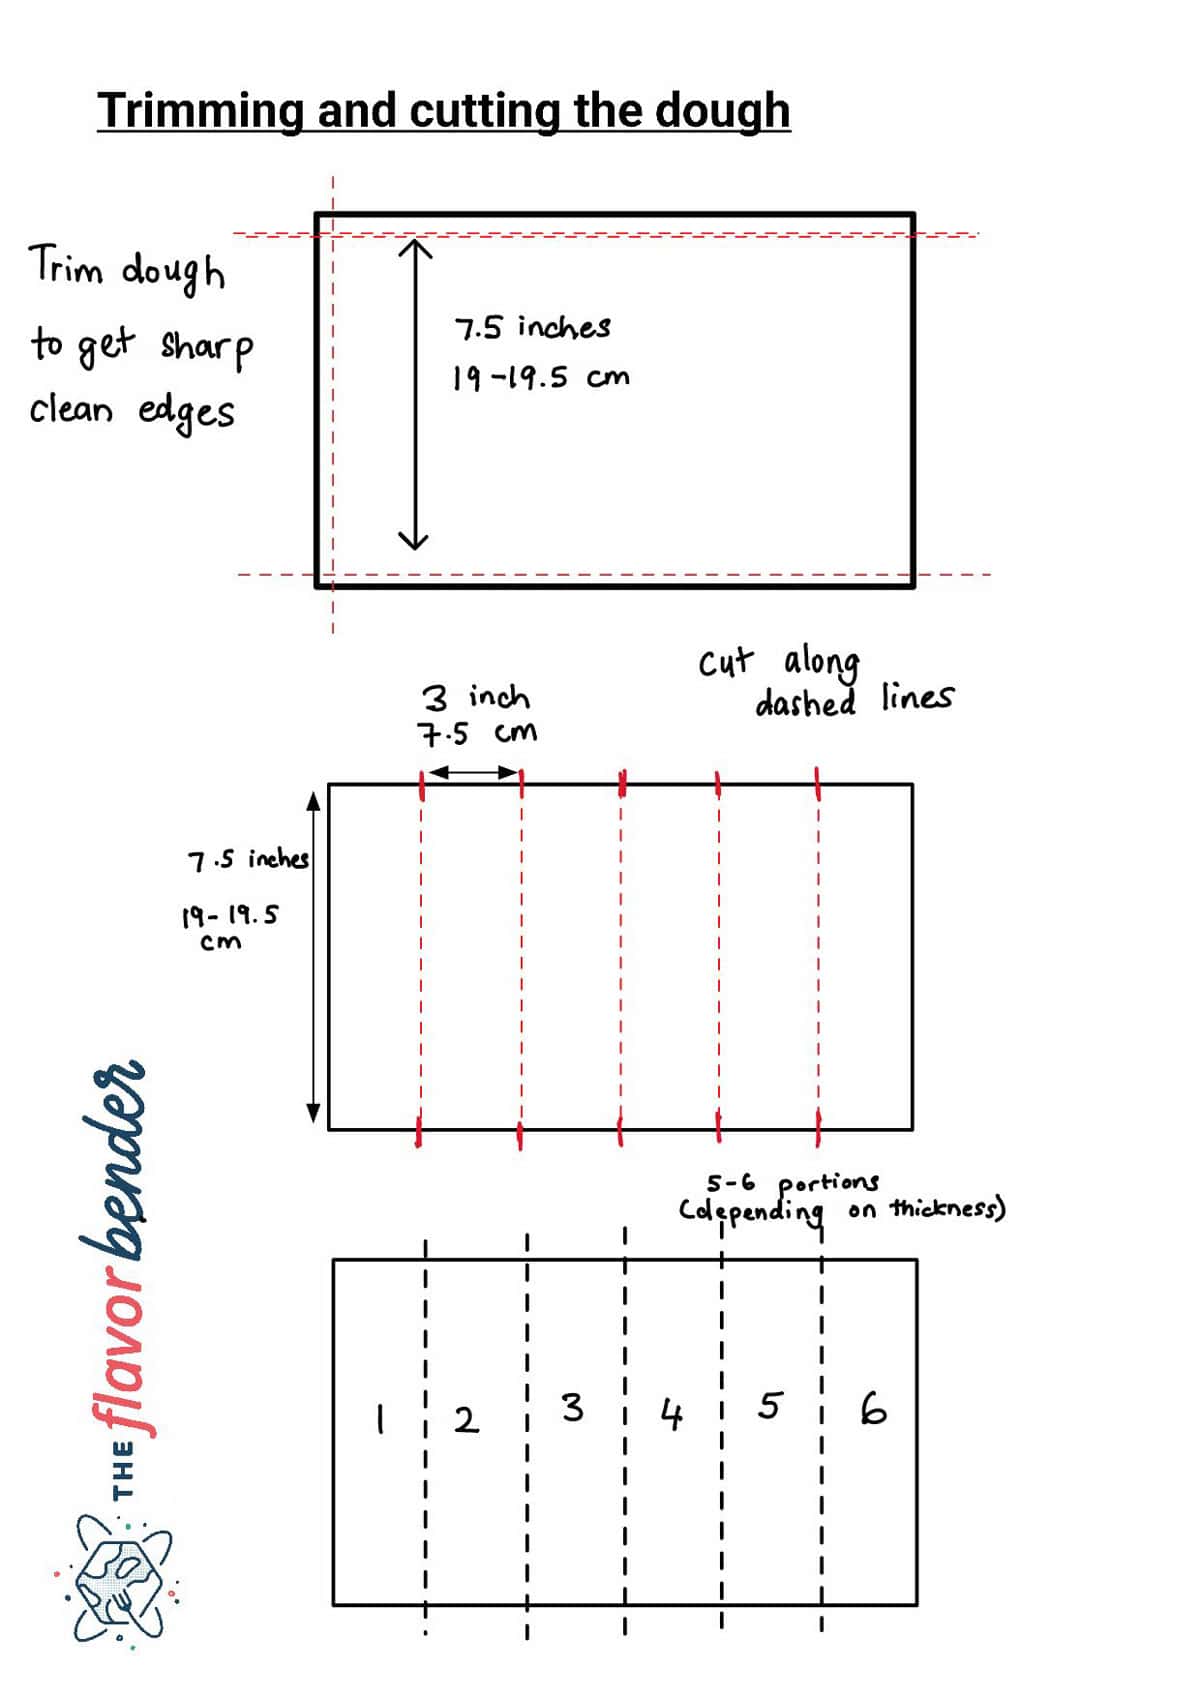
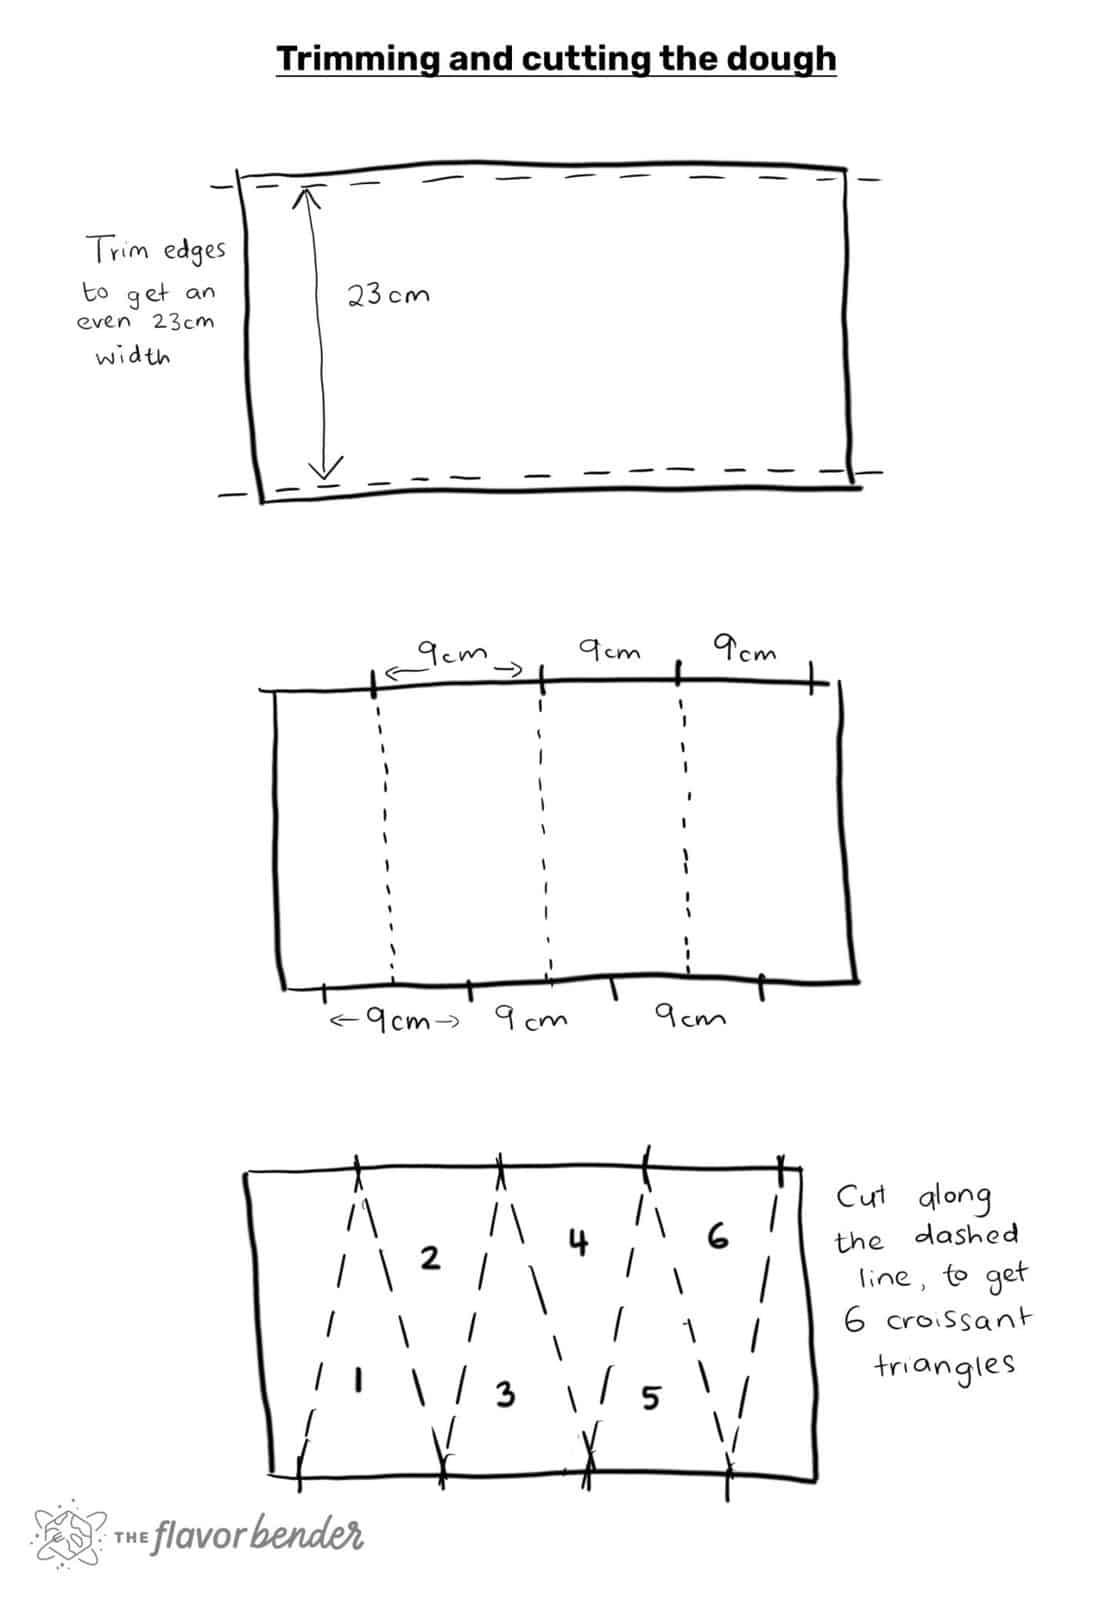
Step 10 – Cutting the dough portions

Trim the long edge of the rectangle with a CLEAN, SHARP KNIFE to form a clean straight edge. Measure the dough so that the width is about 7.5 – 7.75 inches. Trim off the excess to get clean edges (image 30).
Cut a straight line along the shorter edge of the dough to have a clean edge. Measure and mark the dough at 3 inch intervals along the two long edges (image 31). You should get about 5 – 6 portions.
Using a clean sharp knife, cut the rectangles (image 32). Avoid dragging the knife blade along the dough. Press the knife straight down into the dough instead to cut it.
Carefully place the rectangles aside. Each rectangle should be about 3 inches wide and about 7.5 inches long.
Step 11 – Shaping the pain au chocolat (chocolate croissants)

I prefer using chocolate batons / chocolate sticks, to make these pastries. However, you can also use cut up chocolate from a good quality chocolate bar as well. Make sure to cut the chocolate into 1 cm thick pieces, to fit inside the dough. These chocolate croissants will have two chocolate batons (chocolate sticks) per pastry .
Place one baton / chocolate stick or chocolate pieces on one end of the pastry rectangle (images 33 and 34). Roll up once to encase the chocolate in the dough (image 35). Then place a second chocolate baton near the seam (image 36), and roll it up again to encase the second baton (image 37).

Then firmly roll up the chocolate croissant (image 38). Place the pain au chocolat pastry down with the seam at the bottom (image 39). Then gently press down to seal the seam.
Then place it on a parchment paper-lined baking tray (image 40). Repeat with the remaining pastries, making sure to leave a lot of space between the croissants to proof. I only place 5 – 6 pastries per half sheet baking tray.
Step 12 – Proof
Cover the croissants with plastic wrap or a tray cover. Let them proof until doubled in size.
Proofing temperature should NEVER EXCEED 85°F / 29°C, as this will melt the butter layers. Ideally it should be about 77 – 80°F / 25 – 27°C for best results.
Depending on your ambient temperature, the proofing time will vary. In winter it can take about 3 hours, and in summer is can take 1.5 – 2 hours (at 25°C).
When the croissants have doubled in size, and are very wobbly when you shake the tray, they are ready to be baked (image 41).

Step 13 – Bake
Preheat oven to 375°F / 190°C. Brush the croissants with an egg wash (for the lovely shiny finish) (image 42), and bake in the preheated oven for about 20 – 25 minutes, or until the croissants are puffed, and a dark golden brown.
Step 14 – Rest and serve

Once the the chocolate croissants are baked, remove from the oven and carefully transfer them onto a wire rack using a spatula. The croissants will have a very delicate crust, so they could crumble with a little too much pressure.
Let it cool down before you cut into it, as the layers inside need to air out and set. If you cut the croissant while it’s warm the layers can stick together.
However, serve and eat the croissant while they are still a little warm! The melted chocolate center and buttery, flaky layers are absolutely irresistible!

The most important advice I can give to get the best results
At all stages, make sure that the dough,
- Is at the right temperature so that the butter is more likely to be pliable, and not break.
- Is not sticking to the surface (lift the dough).
- Has an even thickness throughout (feel the dough edges as you roll it out, and flip the dough and roll it out on both sides).
- Is not elastic at all – no shrinking of the dough when trying to roll it out.
- Try to maintain a rectangle shape by pulling the corners and straightening the edges, and using the rolling pin to create the rectangle shape.
Tips for rolling out the dough,
- Gently roll out the dough, with even pressure. Too much pressure can cause the butter to break.
- Too much flour on the work surface can cause the dough to dry out as it absorbs the extra flour.
- If the dough becomes elastic, place it back in the fridge so that the dough can relax. Do this as many times as you need to. DO NOT FORCE the dough to roll it out.
- If the butter does break inside the dough (and not rip through the dough), don’t panic. Let the dough and butter soften a little more and continue to roll it out. If the broken butter pieces can be rolled out smoothly, the results will still be fantastic!
- Make sure that the proofing temperature is not too warm. If the butter layers melt, the croissant will be dense.
Variations of chocolatine / pain au chocolat
You can use any chocolate you like in the filling. However, the softer the filling, the more likely for it to leak out as it bakes.
There are also many fancy ways to make chocolatines. Colored chocolate croissants use a sheet of brown dough on top to create a two-toned chocolate croissant. These are more advanced skills, but can be attempted when you’re more confident with making croissants at home.
Filling options
- Swap out the chocolate with Biscoff spread or Nutella.
- You can even use pastry cream (or chocolate pastry cream too) as the filling, but it can leak out.
- Chopped nuts and sugar to make a baklava croissant.
- Swap out the sweet fillings for a savory filling to make savory croissants. Such as goat cheese and pesto, or ham and cheese, or feta and spinach.
Topping options
- You can also sprinkle streusel topping on top.
- Instead of an egg wash, brush the freshly baked croissants with a sweet glaze (like an apricot jam glaze I used on these Easter bunny buns).
- Spread a thin layer of frangipane on top, along with sliced almonds, to make an almond chocolate croissant.
- Sprinkle cheese on top, for when you’re making savory croissants.
Storage instructions
Baked chocolate croissants can be stored in an airtight container for up to 3 days at room temperature. They will start to get stale at this point, but you can also use them to make croissant bread pudding or French toast.
They can last in the fridge for about 5 days. Chocolate croissants can be stored in the freezer for 1 month.
I like to reheat the croissants at 250 F / 121 C, until heated through and crisp again. This can take about 10 – 15 minutes, depending on the temperature of the croissant.
How to store shaped, unproofed, unbaked croissants
In the fridge (covered), up to 12 hours. Then take them out of the fridge, proof, and bake.
In the freezer (covered individually), about 1 month (haven’t tried any longer than this unfortunately). Let the frozen croissants thaw out in the fridge over 24 hours (so that they thaw out evenly). Then proof and bake. DO NOT thaw frozen croissants at room temperature, as this can proof the croissants unevenly.

Quick timeline for making chocolate croissants
The faster timeline (2 days)
Day 1 – Make the dough and prepare the butter block.
Day 2 – Encase the butter and create lamination layers. Sheet the dough and shape the chocolate croissants. Proof and bake. (Day two will be the busiest day.)
My preferred timeline (3 days)
Day 1 – Make the dough the prepare the butter block.
Day 2 – Encase the butter and create lamination layers. Sheet the dough and shape the chocolate croissants. Store the croissants in the fridge. (Still the busiest day.)
Day 3 – Let the croissants proof (very early in the morning if you like). Then bake.

Frequently asked questions
No, unfortunately you can’t make authentic chocolate croissants with puff pastry. Puff pastry is laminated pastry WITHOUT yeast, so it’s unleavened and very different from croissant dough.
While the resulting pastry will be flaky, it won’t have a soft interior that is characteristic of pain au chocolat.
Unfortunately, no. Phyllo pastry is very different to croissant dough. There’s no butter in phyllo dough at all, and the pastry will not puff up as it bakes either. It will resemble a chocolate baklava instead.
This can happen if the lamination layers are lost within the croissant dough. Reasons for losing lamination layers include,
– Butter was too soft and mixed into the dough during the rolling out process.
– The dough was rolled out with too much pressure causing the butter and dough layers to mix.
– The butter melted during proofing because the proofing temperature was too warm.
– The butter broke too much, losing the layers.
The honeycomb structure can also be lost when you lose the lamination layers.
In addition to this, the honeycomb structure can be weak if the butter layer breaks through the dough during the lamination process. Underproofed or overproofed croissants can also cause you to lose the honeycomb structure.
Yes! I prefer to freeze baked chocolate croissants because it’s so easy and fast to reheat the pain au chocolat in the oven. Heating the frozen pastries in a low heat oven will make the pastries warm and crisp and buttery again.
You can also freeze shaped, unbaked pastries before proofing. But they must be thawed out in the fridge and then proofed before baking for best results. This process will take longer than reheating baked chocolate croissants.

Looking for more recipes?Sign up for my free recipe newsletter to get new recipes in your inbox each week! Find me sharing more inspiration on Pinterest and Instagram.
Pain au chocolat (chocolate croissants)
What You Need:
- 1 large parchment paper, about 14 x 10 inches, folded in half to form a 7 x 10 inch paper for the dough
- 1 large parchment paper, enough to cover a 5 x 6 inch butter block
- Plastic wrap
- Heavy rolling pin
- 1 quarter sheet pan
- 1 Half Sheet pan
- A ruler with cm and inch markings. I like to use a heavy steel ruler with clean, precise edges.
- A sharp paring knife
- A sharp straight edged knife or pizza cutter
- Pastry brush (preferably one large and one small)
Ingredients:
Détrempe
- 85 g milk ⅓ cup, lukewarm
- 60 g water ¼ cup, lukewarm
- 5 g active dry yeast about 1½ tsp
- 5 g honey 1 tsp. (OR malt syrup, OR use sugar if you have neither)
- 25 g butter 1 ½ tbsp, melted and cooled, or softened
- 20 g white sugar generous 1 ½ tbsp
- 250 g AP flour 2 cups, spooned and leveled
- 5 g salt about 1 tsp
Tourrage and filling
- 140 g butter 10 tbsp
- 12 chocolate batons
Egg wash (whisk these ingredients until very smooth)
- 1 egg yolk
- 2 tbsp milk and / or cream
Instructions:
Détrempe (the dough)
- Dissolve the honey in the milk in a mixing bowl, and then whisk in the yeast. Set it aside for the yeast to activate for about 10 – 20 minutes.85 g milk, 5 g honey, 5 g active dry yeast
- Add the rest of the ingredients into the bowl in the order listed in the ingredients list. Stir with a spatula or spoon to mix it into a scraggly dough.60 g water, 25 g butter, 20 g white sugar, 250 g AP flour, 5 g salt
- Using your hands, knead the dough for about 1 – 2 minutes until a scraggly dough is formed. You can also use a stand mixer, but the dough amount might be too little for a mixer to knead.
- Take the dough out of the bowl and knead it on a work surface until smooth and fairly elastic; about 4 – 5 minutes. You shouldn’t have to put too much effort into kneading here because it isn’t a very stiff dough. Place the dough back in the mixing bowl and cover with plastic wrap. You can also do this step in the mixer (depending on your mixer).
- Place the dough on a very lightly floured surface, and form it into a rectangle shape. It doesn't have to be precise, but the rectangle should be about 6 inches wide and about 10 inches long (6 x 10 inches, OR smaller).
- Fold the 14 x 10 parchment paper in half. Place the dough in the middle of the folded parchment paper and wrap with plastic wrap well.
- Place the dough in a quarter sheet pan and chill in the refridgerator overnight. See recipe notes below.
Tourrage (butter block)
- The butter block can be prepared in different ways. You can either cut the cold butter into smaller pieces and roll them out to form a block (as in my croissant recipe post), OR you can also use the rolling pin to smash and roll the butter into the desired shape and thickness.140 g butter
- Place the cold butter inside folded parchment paper or wax paper. Use the rolling pin to hit the butter until it's flattened to about an inch or less thick.
- Fold the parchment paper to form a pocket that is about 5 x 6 inches. Place the butter within the folded pocket and fold the parchment paper to enclose the butter.
- Using a rolling pin again, hit the butter to make it thinner and more pliable to fill the pocket. Then, using the rolling pin, roll out / spread the butter to fill the inside of the parchment paper pocket, all the way to the corners. Use the rolling pin and roll it over the butter block to make sure the butter block is evenly thick.
- Transfer this butter block into the fridge until chilled.
Enclosing the butter
- IMPORTANT – when laminating the butter and dough, it’s REALLY crucial that they both have similar pliability and are cold. The dough and butter can be kept at room temperature to reach the ideal temperature of 10 – 15°C / 50 – 60°F. See recipe notes below for more tips.
- Place the chilled dough on a clean or very lightly floured work surface. Measure the dough, and if needed, roll out the dough to make it about 6 (or 6.5) x 10 inches with even thickness.
- While the butter is still cold, use a rolling pin to hit the butter and roll on it, while it's still wrapped in parchment paper. This is to condition the butter and make it pliable WHILE still cold. Do not do this if the butter is warm and too soft.
- Unwrap the parchment paper from the butter block, but keep the butter still attached to the parchment paper.
- Place the butter block on the dough with the parchment paper still on top of the butter. You can place the butter on half of the dough at one end, or right in the middle of the dough as well. Either way works. The width of the dough should be similar to the height of the butter block, or very slightly larger.
- Now pat the butter over the parchment paper to let it “bind” to the dough below. Then carefully peel off the parchment paper. Scrape off any excess butter on the parchment paper and smear it on the butter block as well.
- Fold the dough over the butter to completely enclose the butter. Press the seams of the dough together to seal the butter inside the dough. Pat the dough again to help the butter “bind” to it. If the butter was placed in the middle, the seam will be in the middle of the butter block. If the butter was placed at one end of the dough, the seam will be on the side.
- The dough should still be very cold (ideally about 10 – 13°C / 50 – 55°F) . If it isn’t, wrap it and put it back in the fridge for about 30 – 60 minutes to chill the dough.
First lamination – double fold (click here to see image)
- Flour your work surface and dough, fairly well. Place the dough on the work surface and using the rolling pin, gently press along the length of the dough to make sure the butter is pliable.
- While maintaining the 5 – 5.5 inch (12.7 – 14 cm) width (short end), roll out the dough to a length of approximately 16 – 20 inches (40 – 55 cm), while the dough is approximately 1 cm / ½ inch thick throughout.
- While rolling out the dough, gently lift the dough and flip it over to ensure that it's not sticking to the work surface. Use flour as needed to make sure the dough doesn’t stick to the counter. Also use your hands to keep the width even and keep the edges straight to maintain a rectangle shape.
- Work quickly to keep the dough and butter cold. If the butter softens too much, return the dough to the fridge or freezer.
- Brush off excess flour on the work surface using a large pastry brush. Trim just a little piece of dough along the shorter edges to make those two edges straight.
- Fold in about ⅙ to ⅛th of the dough towards the middle (about 2 – 3 inches). Bring the other end to meet the folded end. Make sure the two ends are as close together as possible with no gaps. Using a paring knife, make small cuts at the four corners of the folds to release the tension.
- Brush off excess flour on the surface of the dough. Now, fold the dough in half. Firmly tap the dough on top to maintain the shape. Again, make cuts at the corners of the fold (2 cuts).
- Wrap the dough in plastic wrap and refrigerate for at least 30 – 60 minutes.
Second lamination – single fold (click here to see the image)
- Make sure the dough is within the optimum temperature for proper lamination. If needed, keep the dough outside to warm it up slightly if it's too cold.
- Flour the work surface and place the dough on it. Gently press into the dough with a rolling pin along the length of it to make sure the butter inside is pliable.
- Keep the dough with the end with visible folds, facing you. Maintaining this width (about 5 inches / 12 cm), roll out the dough to 15 inches (38 cm). As you roll out the dough, make sure the final width is kept to about 5 – 5.5 inches. Also make sure the dough isn’t sticking to the work surface, and the width is straight and even.
- Brush off excess flour from the surface of the dough using a pastry brush.
- Fold in ⅓ of the dough towards the center (about 5 inches / 12.7 cm). As before, cut the corners of the fold with a paring knife to release tension.
- Brush off excess flour again, and fold the other edge of the dough OVER the first fold. Cut the folded corners with a paring knife to release tension.
- Wrap the dough in plastic wrap and refrigerate for another 30 minutes (preferably 60 minutes).
Sheeting the dough (click here to see image)
- As before, make sure the dough is at the optimal temperature range. Place the dough on a floured surface – the end where you can see all the folds should be facing you.
- Gently press the dough with a rolling pin along the length of it to make the dough and butter pliable.
- Roll out the dough to about a 1 cm thickness (with an 7 – 8 inch / 18 – 20 cm width at the edge facing you). If at any point the dough becomes elastic and hard to roll out, wrap the dough and keep it in the fridge to rest.
- Wrap the dough and refrigerate for about 30 – 60 minutes to allow the gluten to rest.
- Once the dough is rested, roll it out again until it reaches 4 – 5 mm thickness, with an 8 inch width. Lightly flour the surface to make sure the dough doesn’t stick to the surface.
- During this process, the dough should not be elastic, and should not be sticking to the work surface. If the dough is elastic, the dough will shrink as you cut the dough into smaller portions. If, at any point, the dough becomes too soft or starts to shrink / become elastic, wrap it and return it to the fridge for at least 30 minutes.
- The final dough should have a width of about 8 inches / 20 cm, and a thickness of about 4 – 5 mm. Ensure that the dough is not sticking to the work top, and not shrinking before cutting it in the next step.
Cutting the dough (click here to see image)
- Cut a very thin strip along the long edges of the dough to have a width of about 7.5 – 7.75 inches / 17.5 – 19 cm . Make sure the edges are straight and even. Use a pizza cutter or a sharp knife. Avoid dragging the knife along the dough as you cut it, as this can distort the dough. Simply press the knife straight down to cut.
- Along one of the long edges, make 3 inch / 7.5 cm markings. Next, make 3 inch / 7.5 cm markings on the opposite edge as well.
- Use the ruler and a small sharp knife to connect the markings on the two sides with straight lines.
- Using the marked lines as a guide, cut the dough with a pizza cutter or a sharp, long knife. You should end up with about 5 – 6 rectangles, per batch.
Rolling up the croissant + proofing
- If you're using chocolate batons, use 2 batons per chocolate croissant. If you're using a chocolate bar, cut the chocolate bar with a sharp knife. The pieces should have a width of about 1 cm, but can be long.12 chocolate batons
- Brush off excess flour from both sides of the dough rectangle and keep it on the work surface.
- On one edge, place 1 chocolate baton, or a cut piece of chocolate (that is roughly 1 cm thick) along the width of the dough. Roll the dough to encase the chocolate once.
- Place a second chocolate baton / chocolate piece at the edge of the seam, and roll up the croissant the rest of the way. Make sure the spiral is fairly tight with no gaps, without squeezing the dough too much.
- Place the rolled up pain au chocolat on a parchment paper-lined half sheet pan. The seam of the chocolate croissant should be placed at the bottom, so that the croissant is sitting on top of the seam. Gently press down to seal.
- Repeat with the remaining portions of dough. Make sure there is plenty of space between the croissants on the pan, so that proofed croissants don’t stick to each other; about 5 – 6 croissants per pan.
- Cover with plastic wrap loosely, but well. You can also place another half sheet pan on top (as a lid) or a half sheet pan cover. There should be plenty of space so that the proofed croissants don’t stick to the half sheet pan on top.
- Proof the chocolate croissants (somewhere that's at about 25°C / 77°F) until doubled in size. The time can vary depending on the ambient weather. I proof mine inside an oven with just the light turned on, and it still takes me between 2 – 3 hours. The proofing setting on the oven is too warm however, and it could melt the butter.
- The croissants have proofed if they have doubled in size, look very pillowy, and will jiggle a little when you give the sheet pan a light shake.
- Preheat the oven to 375°F / 190°C (conventional oven setting), at least 30 minutes before baking the croissants.
Baking the chocolate croissants
- Mix the egg yolk and milk together to make the egg wash.1 egg yolk, 2 tbsp milk and / or cream
- Brush with an egg wash (use a soft, small pastry brush, because the croissants are very delicate at this stage). Bake at 375°F / 190°C (conventional oven) for about 20 – 30 minutes until golden brown. Turn the tray once halfway through the baking time, if needed.
- Remove from the oven and let them cool for a few minutes before transferring the croissants onto a cooling wire rack. Then let them cool down further to allow the insides to set (otherwise the croissants will be too soft).
Tips & Tricks
Preparing the dough
In my croissant recipe, I proof the dough at room temperature first, and then shape and freeze the dough overnight before enclosing the butter. This can be done here as well. The method I’ve shared in this post shapes the kneaded dough and then allows the dough to proof slowly in the fridge overnight instead. Both of these methods work.Notes about enclosing the dough
There are different methods for enclosing the dough. This is the French method. The butter block is enclosed with two layers of dough on either side. The butter block can be kept at one end of the dough, and the other end can be folded over like a book (with a side seam). OR the butter block is placed in the middle and both ends of the dough are folded on top of the butter, so that the seams meet in the middle of the butter block.Optimal temperature for the dough
The ideal working range for the dough is about 10 – 15°C / 50 – 60°F. However, there is some flexibility with this temperature (depending on the ambient temperature). If it’s winter and the room temperature is cold (about 18°C / 64°F or less), then the dough and butter can be around 15 C or even slightly more, as long as the butter is not melting. If it’s summer and the room temperature is warm (over 18°C / 64°F), then the dough and butter should be colder. This is because rolling the dough will warm up the dough and butter faster, and you risk losing the lamination layers.Other tips for perfecting this recipe
- If the dough gets too soft at any point, wrap it and put it back in the fridge to chill.
- If the dough resists when you’re rolling it out, wrap it and put it back in the fridge to rest.
Tips for doubling the recipe
Yes, you can double this recipe. But, make sure you have enough room on your work surface to roll out the door. The size of the butter block that I like to make is about 6 – 7 x 8 inches. The dough should have a width of about 8 inches, and the length should be about 12 – 14 inches (double the butter block). The finale sheeting of the chocolate croissant dough should be about 15 – 16 inches wide, and 0.2 inches / 4 – 5 mm thick. Then the dough can be cut in half (to get TWO 7.5 – 8 inch width dough pieces). Alternatively, keep the dough at 8 inches width and roll it out to get a very long dough portion. Essentially, you either double the length of the dough, OR double the width of the dough and keep the thickness the same.Quick timeline for making chocolate croissants
The faster timeline (2 days)
Day 1 – Make the dough and prepare the butter block. Day 2 – Encase the butter and create lamination layers. Sheet the dough and shape the chocolate croissants. Proof and bake. (Day two will be the busiest day.)My preferred timeline (3 days)
Day 1 – Make the dough the prepare the butter block. Day 2 – Encase the butter and create lamination layers. Sheet the dough and shape the chocolate croissants. Store the croissants in the fridge. (Still the busiest day.) Day 3 – Let the croissants proof (very early in the morning if you like). Then bake.A note about using parchment paper and plastic wrap
I reuse the plastic wrap throughout the entire recipe to make the most of it. I have tried using more eco-friendly options, but it’s hard to keep the dough from drying out without using plastic wrap. Reusing them will reduce wastage. The parchment paper is also reused. I do not throw away any parchment paper used to store butter and flour, and use them to bake the croissants later.Nutrition Information:
“This website provides approximate nutrition information for convenience and as a courtesy only. Nutrition data is gathered primarily from the USDA Food Composition Database, whenever available, or otherwise other online calculators.”

Caroline says
Stunning! Your recipes are foolproof as always Dini! I tried this after making your other croissant recipe and they are easily the best things I’ve ever made! Thank you so much for the thorough recipes.