
Learning how to make pie crust for the first time can be confusing and daunting! The saying “as easy as pie” makes ZERO sense when you’re just starting out and when you’re the one making it!
But not to worry! This tutorial on how to make pie crusts is written just for you! Here I break down every step of making pie dough, and explain the basics of making pie in detail.
This pie crust tutorial is for you if,
- You’ve never made pie crusts before and need detailed instructions, recipe and tips.
- Like me, you also want to understand the basics of making pie dough.
- You’re not a beginner, but are having some trouble with your pie crusts.
- You’re not a beginner, and you have your grandma’s recipe, but need some help understanding what to look for at each step.
- While I do share tips for complete beginners for making pie crusts, I’ll also share shortcuts that you can take and foolproof tips for those who are more familiar with making pie crusts.
- Making the pie dough by hand or food processor?
- A beginner’s guide on how to make pie crust
- Step by step instructions to make pie crust dough
- How to handle pie dough for baking
- Baking the pie crust (foolproof tips and tricks)
- Tips for a double crusted pie (or filled pie)
- Common troubleshooting problems
- More expert tips for making foolproof homemade pie crusts

Types of pie crust
There are several different types of pie crust that you can make. This includes pie crusts for fruit pies (like this apple pie and mixed berry pie), meat pies (like this bacon and egg pie), shortcrust pies, and puff pastry as well! You can also make graham flour pie crust that combines the flavor of graham cracker crust but with the flaky texture of regular pie curst! But in this post, I’ll be covering,
Flaky pie crusts – perfect for fruit pies, and even for topping savory pies (such as meat pies).
Mealy pie crusts – used for custard pies (such as pumpkin pies), and also as the bottom for meat pies. This is similar to shortcrust pastry as well.
The secret to making very tender pie crust
There is only one major factor that needs to be highlighted when it comes to making perfect pie crust. The secret to a very tender pie crust is to have very little gluten develop in the flour. Less gluten = more tender. Every tip for making pie crusts will contribute to making sure you don’t overwork and develop gluten in your dough.
Making the pie dough by hand or food processor?
I prefer making pie crusts by hand. This way, I have more control over how big the butter pieces are, and the consistency of the dough as well. However, food processors do make things faster and easier.
If you are a beginner, I highly recommend using your hands. That extra time you spend handling the dough will help you understand pie dough that much better. When I was first started learning how to make pie crusts, I found that I added too much water whenever I used the food processor.
Flaky pie crust or crumbly pie crust?
I personally love a beautiful flaky pie crust, but a crumbly pie crust is better for a custard-based pie. Each has their purpose in life.
Tips for a flaky pie crust
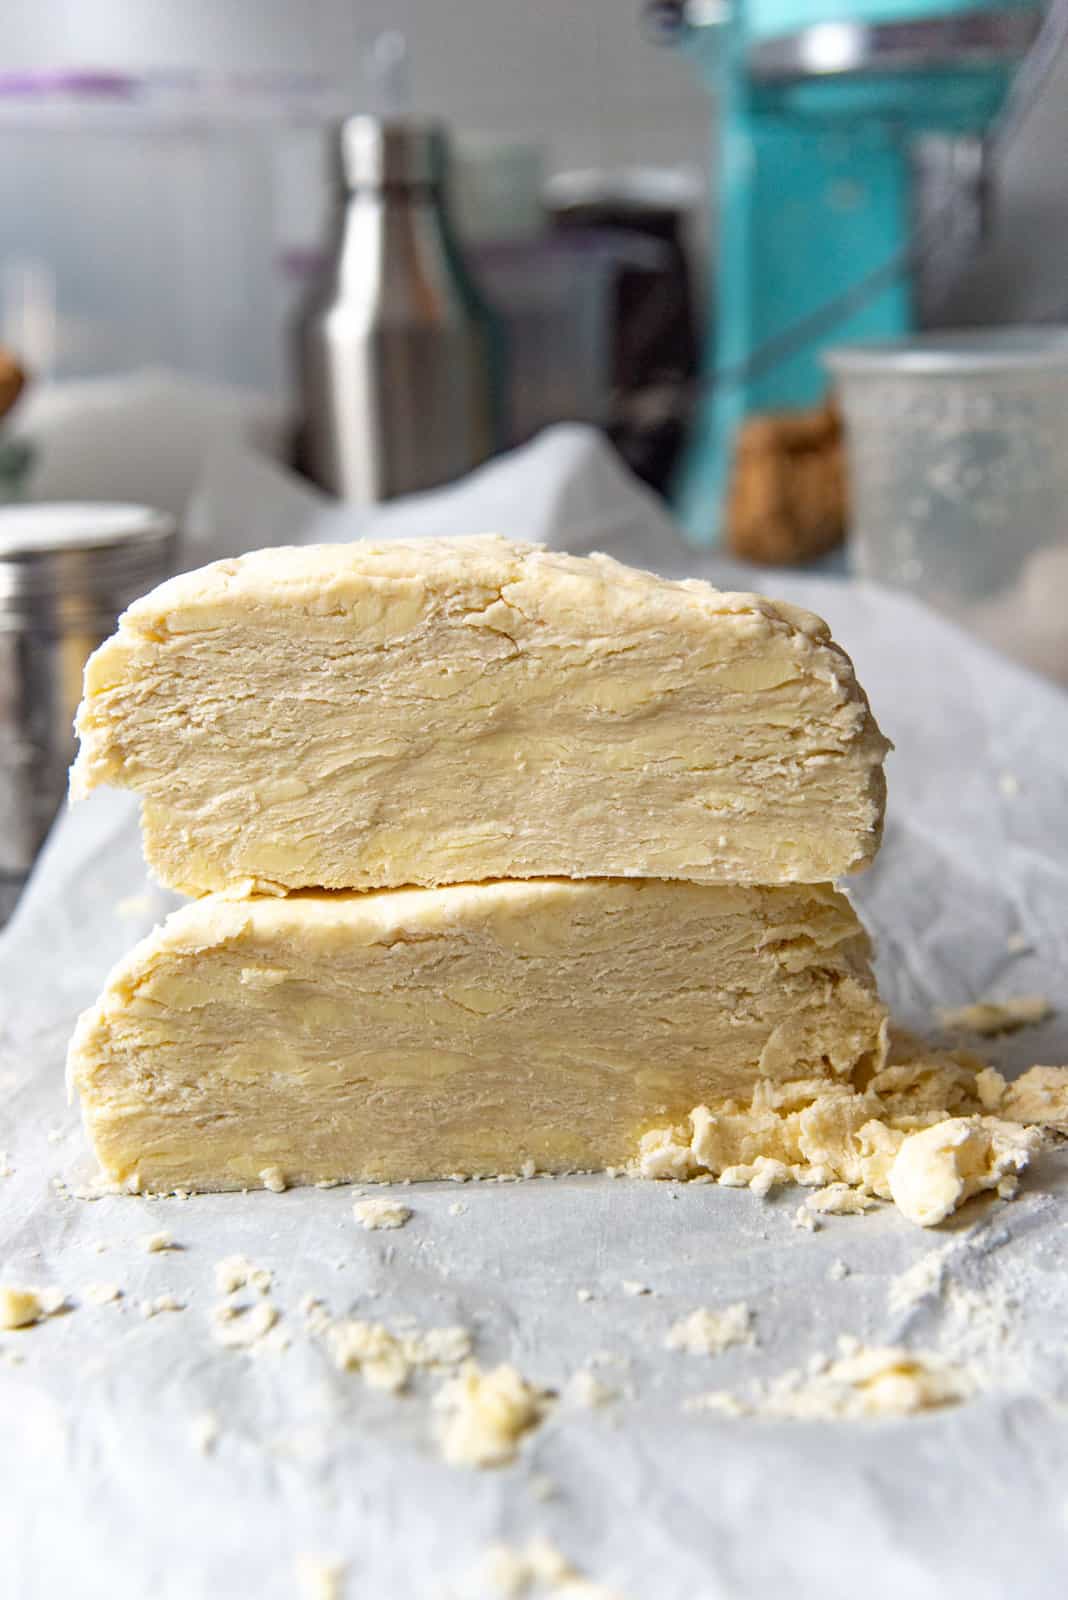
Keep the butter pieces nice and chilled, and make sure there are larger butter pieces in the pie dough. I like to have large flat pieces of butter throughout the dough. The pie dough will also be “folded” to create layers.
Tips for a mealy pie crust
Keep the butter nice and chilled. The butter can also be grated, or you can use a food processor, since the butter needs to be smaller to create a coarse breadcrumb texture in the dough.


A beginner’s guide on how to make pie crust
Ingredients
All ingredients should be kept cold or chilled for best results.
- All purpose flour – Preferably 10-11% protein content. AP flour is more widely available in stores.
- Cold butter – I use unsalted butter, but you can use salted butter too. If you do so, simply reduce the amount of salt you add. Fat in the butter inhibits gluten development. Do NOT use margarine.
- Ice cold water – Cold water helps to keep the butter solid.
- Salt and sugar – Salt is a must. Sugar is optional however.
Optional additions
Iced vodka or iced vinegar – Replacing some of the water with vodka or vinegar also helps to reduce gluten development, since water aids in gluten development.
Step by step instructions to make pie crust dough
The most important tip is to make sure EVERY INGREDIENT is chilled! If you have warm hands, stick your hands in the freezer. Just kidding. But really, if you do have warm hands, chilling the dry ingredients is also a good idea.
Cut the butter into cubes. About ½ – 1 inch cubes if you prefer a flaky crust, or grate the butter for a mealy crust. After preparing the butter, chill it again, in case it softens.
In a large bowl, place the flour, salt and sugar (if using). Mix to combine.
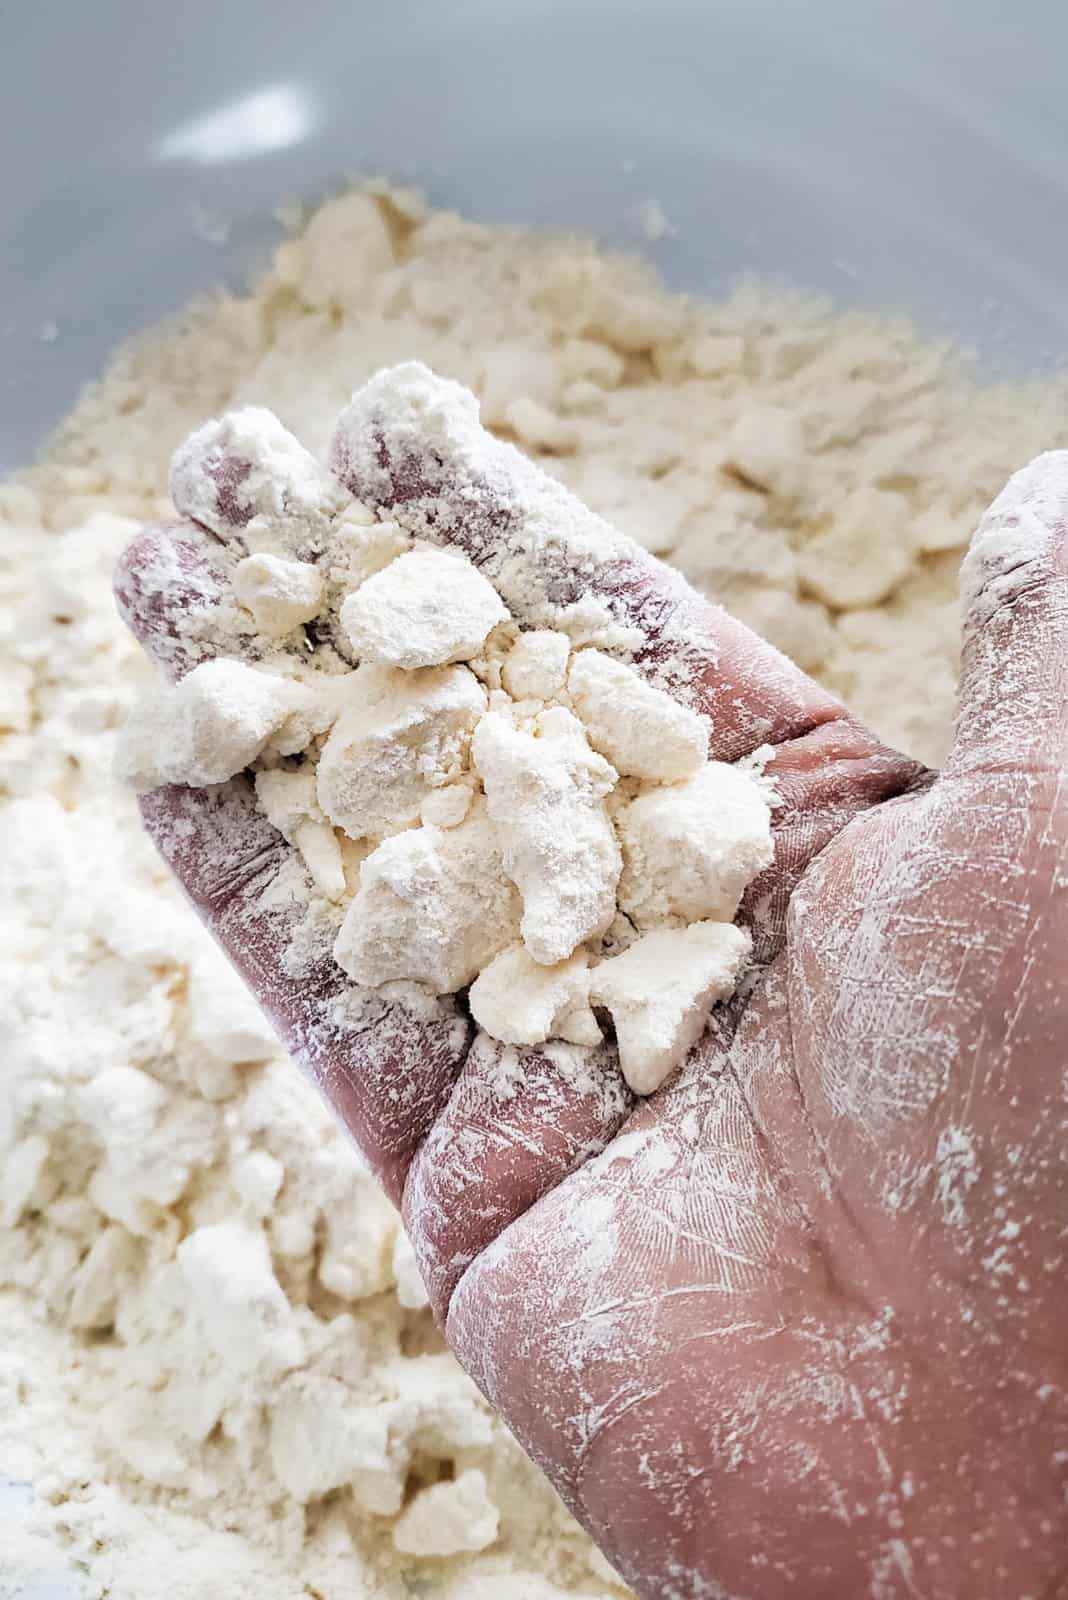
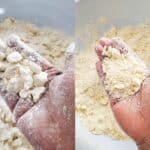
Add the butter pieces to the flour, and toss the butter to coat it with the flour.
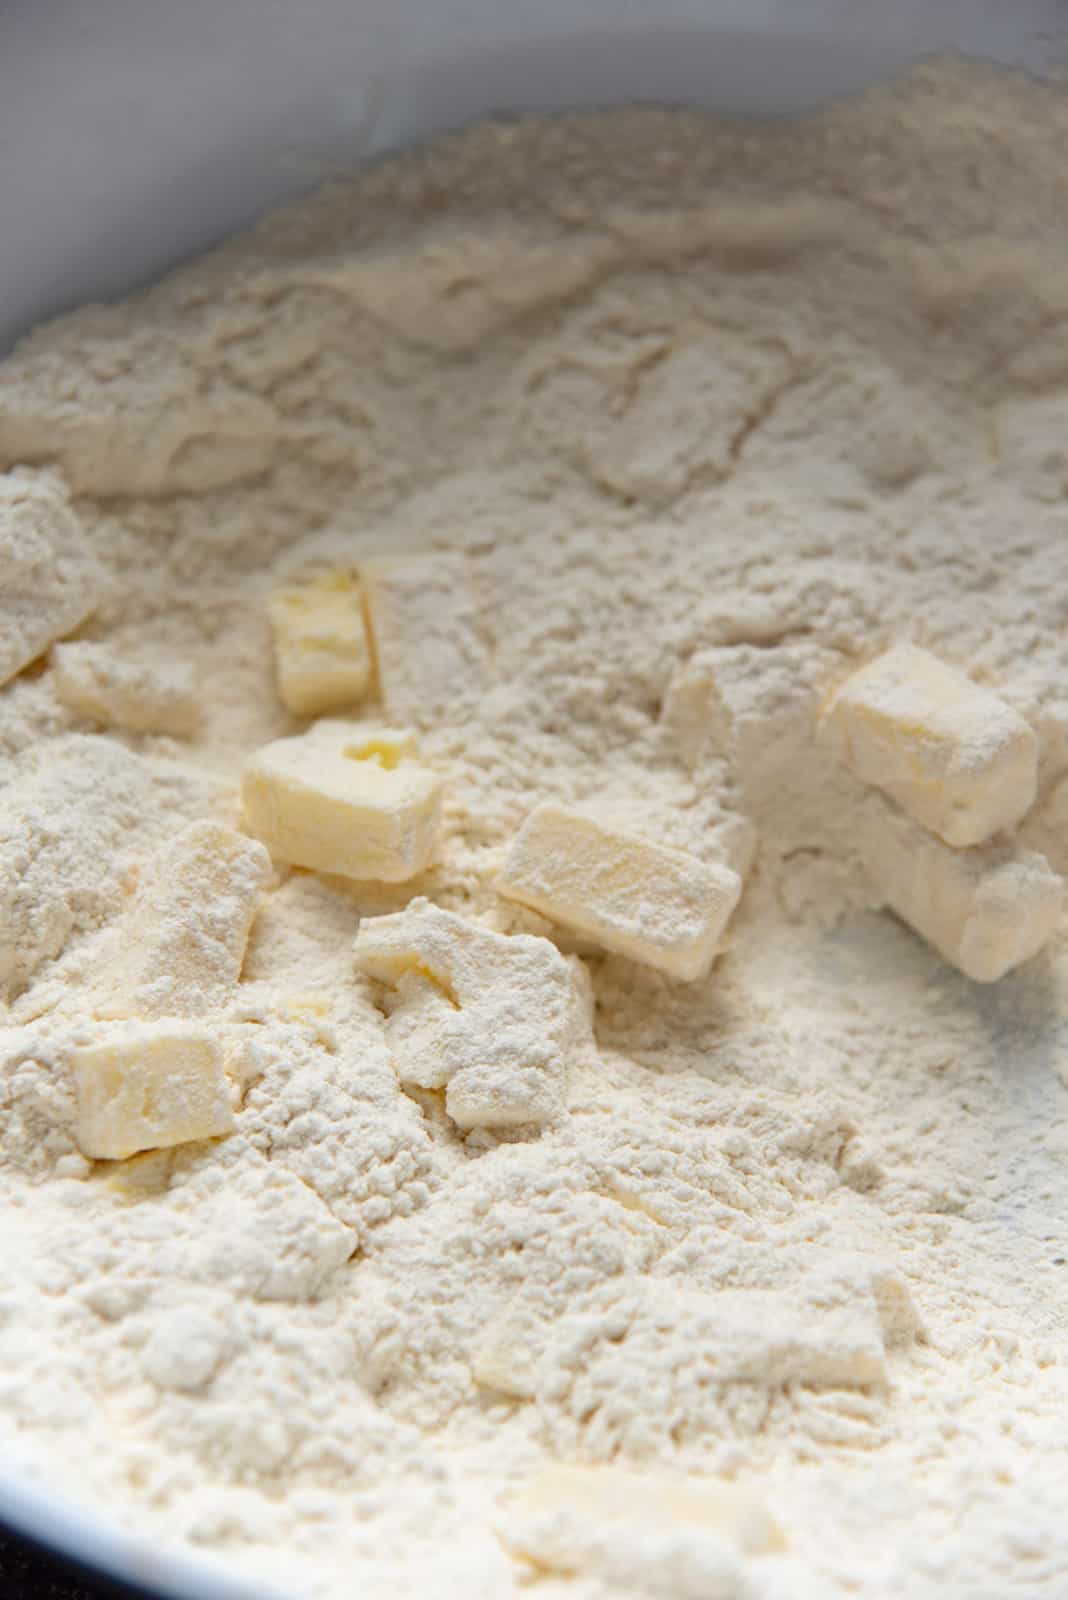
Use your fingers to press the butter pieces and flatten them. It’s OK if some break into smaller pieces. Toss to make sure the butter is still coated well with the flour. If the butter softens during this process, put it back in the freezer for a few minutes for the butter to harden again.
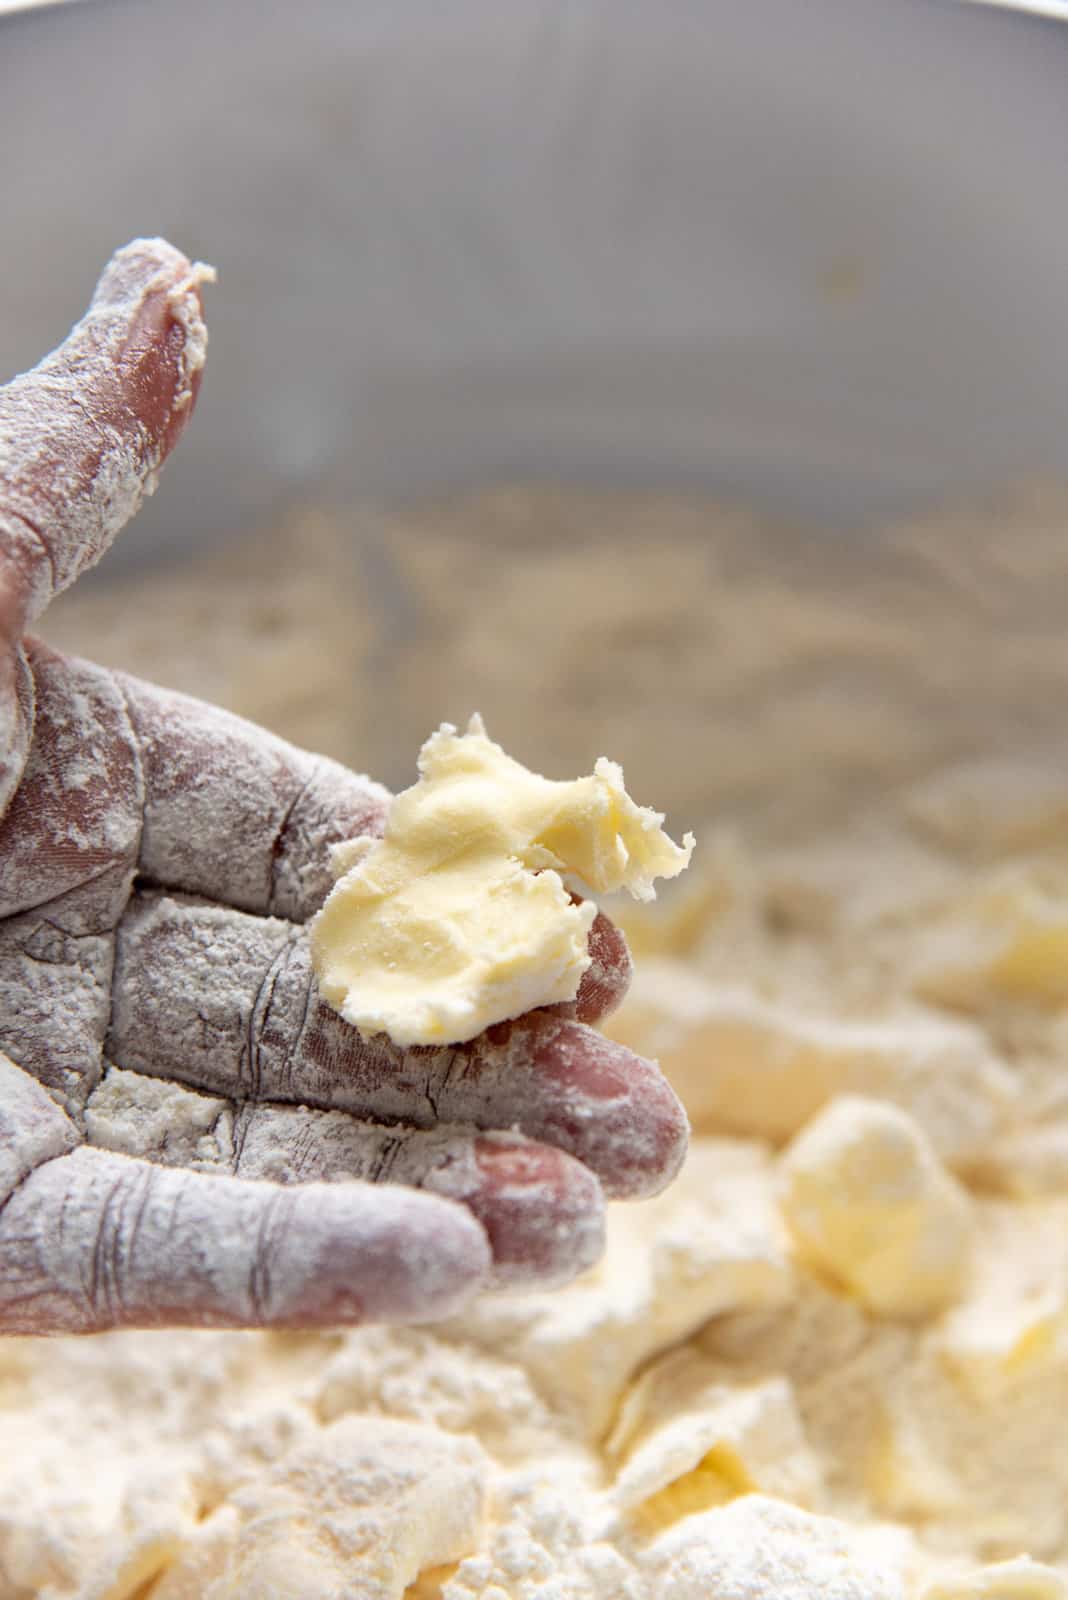
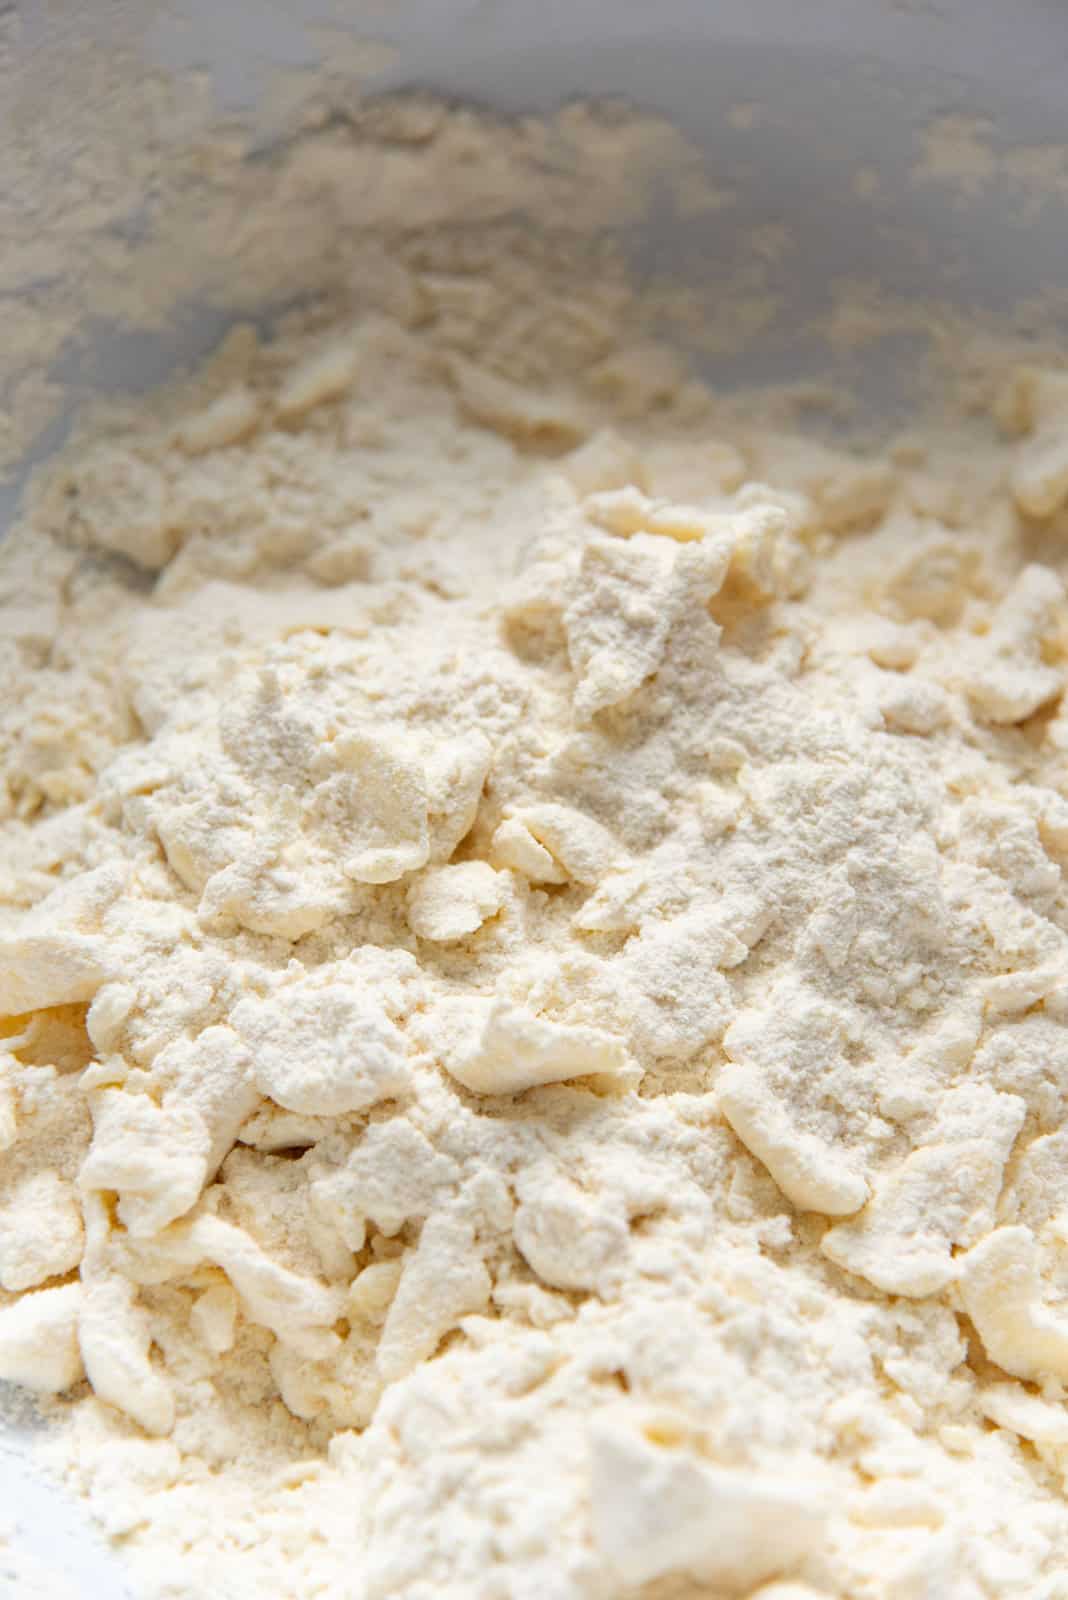
For a flaky pie crust – You should end up with a mixture with larger pieces of butter in the flour (about 1 inch flattened pieces), and smaller pieces of butter.
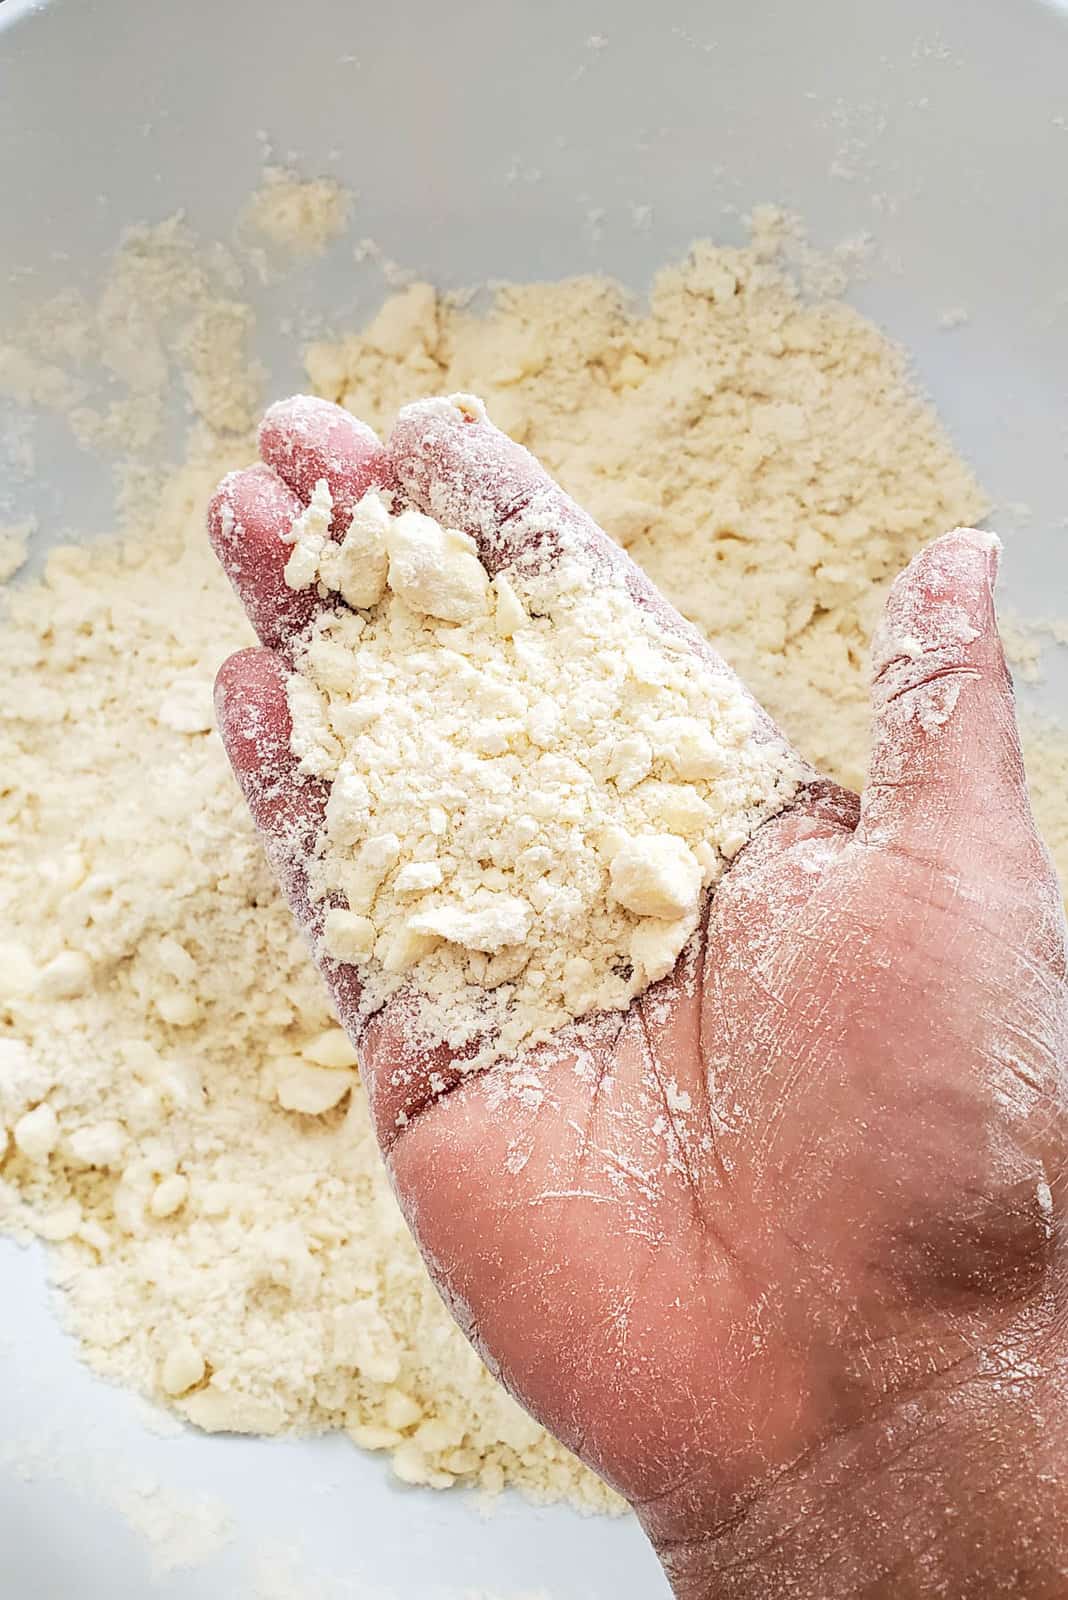
For a mealy pie crust – The flour mixture should have some pea-sized butter pieces, along with the rest resembling coarse bread crumbs.
Adding the liquid to the dough
Once the butter is cut into the flour mix, liquid will be added to make a dough.
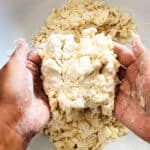
Mix the vodka or vinegar (if using) with about ¼ cup of ice water, and pour it gently over the butter and flour mix.
Mix the liquid into the butter and flour mix. This will start to create larger lumps. You can use your fingers OR a fork to do the initial mixing. Eventually you will be using your hands / fingers to mix the dough.
Add more water – just enough water so that the dough forms / comes together when squeezed, with some dry spots still visible. This is where many beginners encounter problems. Some add too little water, or, more commonly, too much water.

How to check if the dough has enough water
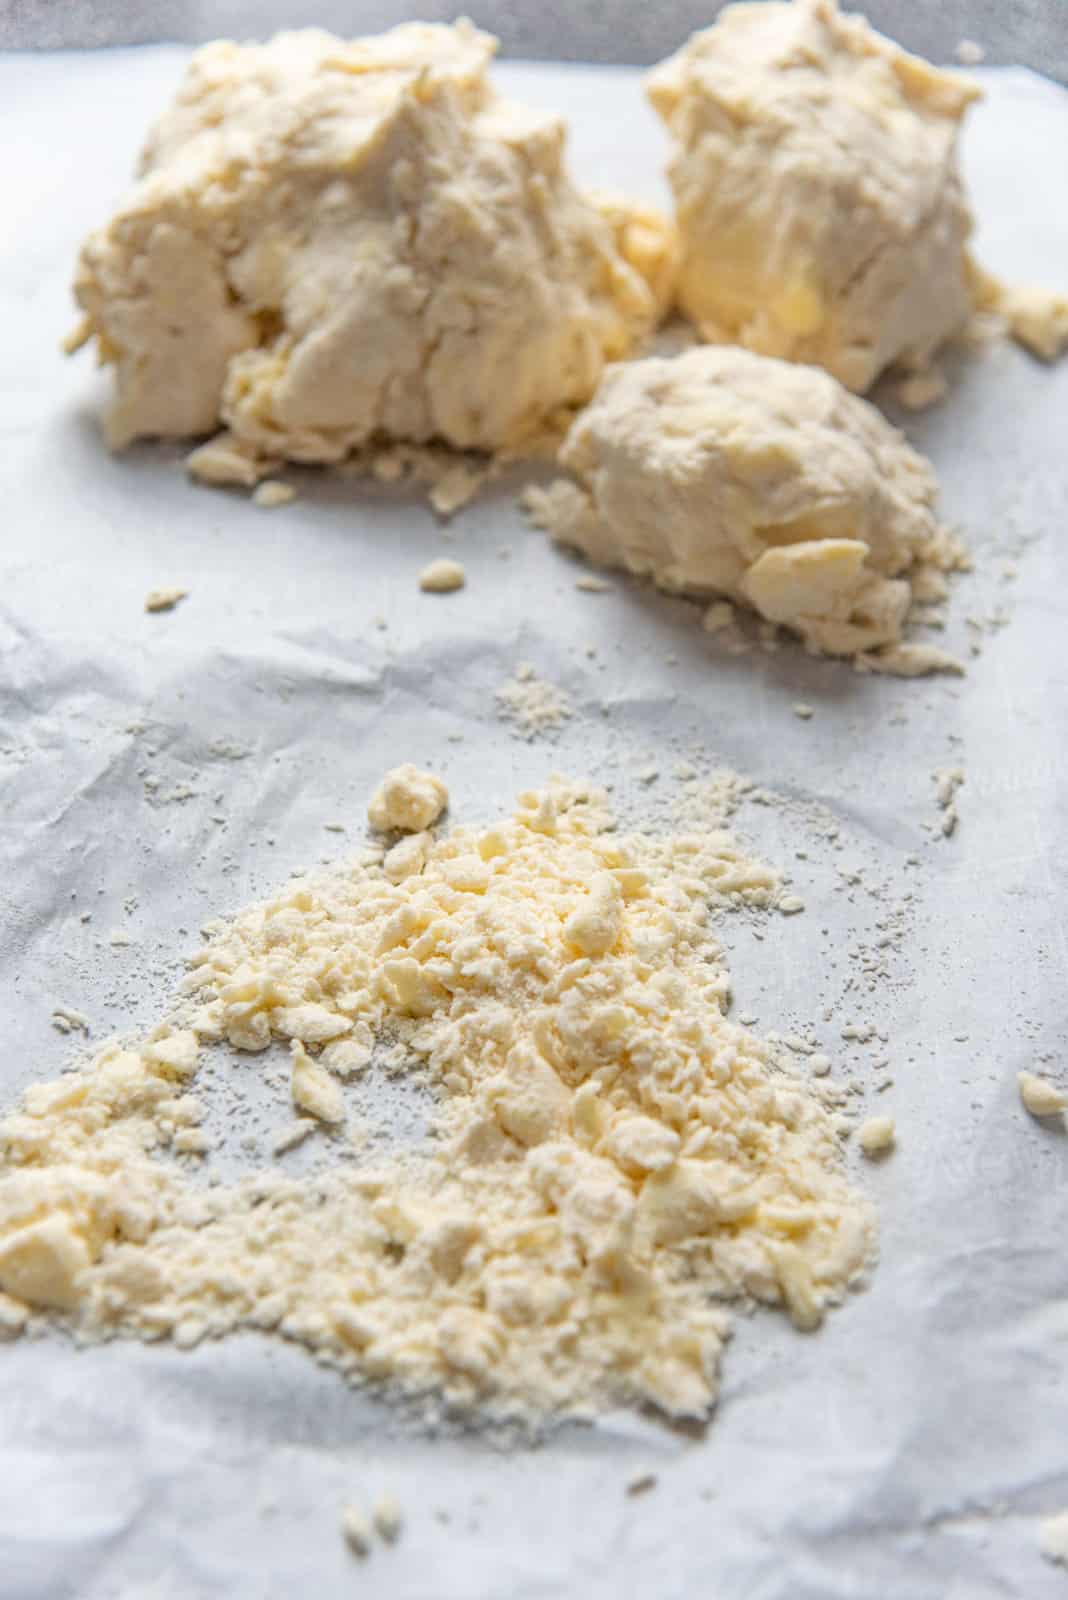
As a beginner, what I used to do was squeeze portions of the dough in my palm and if it clumps together, then I set it aside. I do this until most of the dough can form clumps. If there’s any dry flour mix left in the bowl that cannot clump up, just drizzle a little bit of water to let it to form a dough when squeezed.
Another technique is to use a spray bottle (filled with ice cold water) to spray enough water on the dry spots. This provides them with just enough moisture that they will stick together when squeezed.
If you do add too much water, you can fix it by sprinkling in some flour before forming a dough. OR, you can flour the dough liberally with some flour before you wrap the dough in plastic wrap. Too much moisture can form too much gluten, and create a dough that will shrink when baked.
As you add water to the dough, the clumps of dough have excess moisture, while the dry parts have no moisture. The water in the clumps will help hydrate the drier parts of the dough when squeezed together, and allowed to rest.
The same principle applies when you’re making the dough in a food processor. Squeeze a little of the dough in your palm and it should start to stick together.
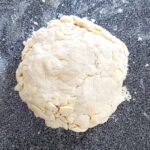
How to shape the dough
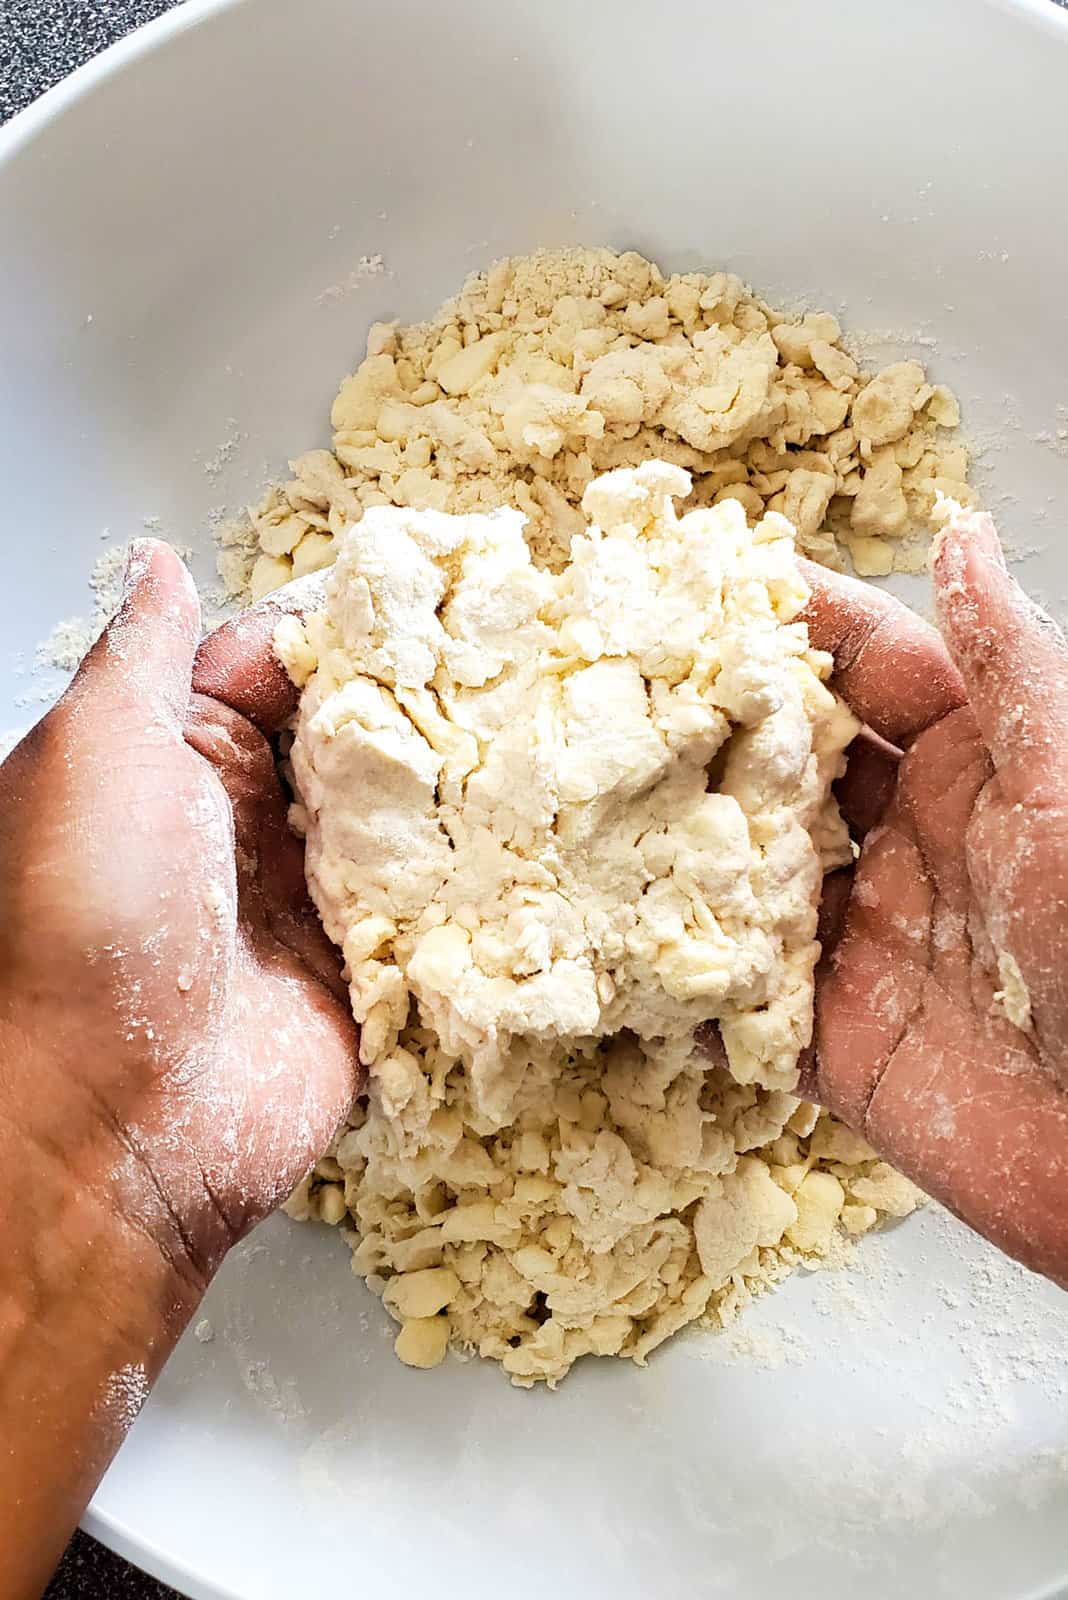
Transfer the contents of the dough on to a floured surface, OR a large piece of parchment paper. Fold the dough over itself and squish it together to form a dough mound, which will still have some dry spots. Then gently flatten it on the parchment paper. Cut the dough into 4 portions and stack each portion on top of each other. THIS stacking will help create the flaky layers as well.
Use the parchment paper to flatten the stack a little. Cut the dough in half again to make two dough portions. Use drops of water to moisten very dry spots if needed.
Shape each portion into a circle and wrap each portion with plastic wrap. This recipe will create enough dough for a standard double crusted pie.
If you added too much water, liberally flour the dough disc and wrap it in plastic wrap.
It is VERY important to let the dough rest in the fridge for at least 1 hour. This resting period will achieve a few things, as follows.
- Relax any gluten that develops in the crust.
- Help hydrate the dough more evenly (as water will disperse from more hydrated areas to more dry ones).
- Chill the dough and butter so that it’s easier to manage the dough, and will also help create a flakier crust.
Rolling out the dough
Once the dough is chilled, it’s ready to be rolled out. Remember the fridge and freezer are your friends, so use them whenever the butter is softening OR the dough is overworked and needs to just chill for a bit…
Flour your work surface and lightly dust the dough as well. The dough will be hard because it’s chilled, so you will need to make it a little pliable to roll it out properly. Use your rolling pin to hit the dough firmly a few times. Do this on both sides of the dough disc.
Start rolling out the dough. It’s important that the dough doesn’t stick to the counter as your roll it out. So make sure the dough and counter are lightly floured, and move the dough around to prevent sticking. To ensure the dough is evenly rolled out, and to prevent it from sticking,
- Roll the dough and turn it a quarter turn and repeat.
- Make sure to flip the dough over, so you roll it out on both sides.
If any cracks appear, simply press the dough together to reseal the dough, and keep going.
If at any point the butter softens and looks like it’s melting, OR if the dough is shrinking as you’re rolling it, place the dough on a baking tray and REFRIGERATE for about 15 – 20 minutes to relax the dough. This is so important, as this will help with the final flakiness as well as prevent the pie crust from shrinking when baking.
Roll out the dough until it’s about 3mm in thickness. Some pie crust recipes will give you the diameter, but with this recipe, you want to go by thickness. This pie crust recipe allows for extra wiggle room to compensate for any errors.
How to handle pie dough for baking
Placing the pie dough in the pie plate
Because of the butter content in the pie dough, you don’t need to butter or line your pie plate.
Standard pie plates are usually between 9 – 10 inches. You can also find shallow pie plates that are just over 1 inch in depth, but I like to use the deep pie plates that are about 2 inches in depth. I only use the shallow pie plate for fillings that are very rich and dense.
To transfer the rolled out pie dough into the pie plate, you can either,
- Fold the dough into quarters, and transfer it to the plate and gently unfold it, OR
- Roll the dough on the rolling pin, and then gently unroll the dough from the pin onto the pie dish.
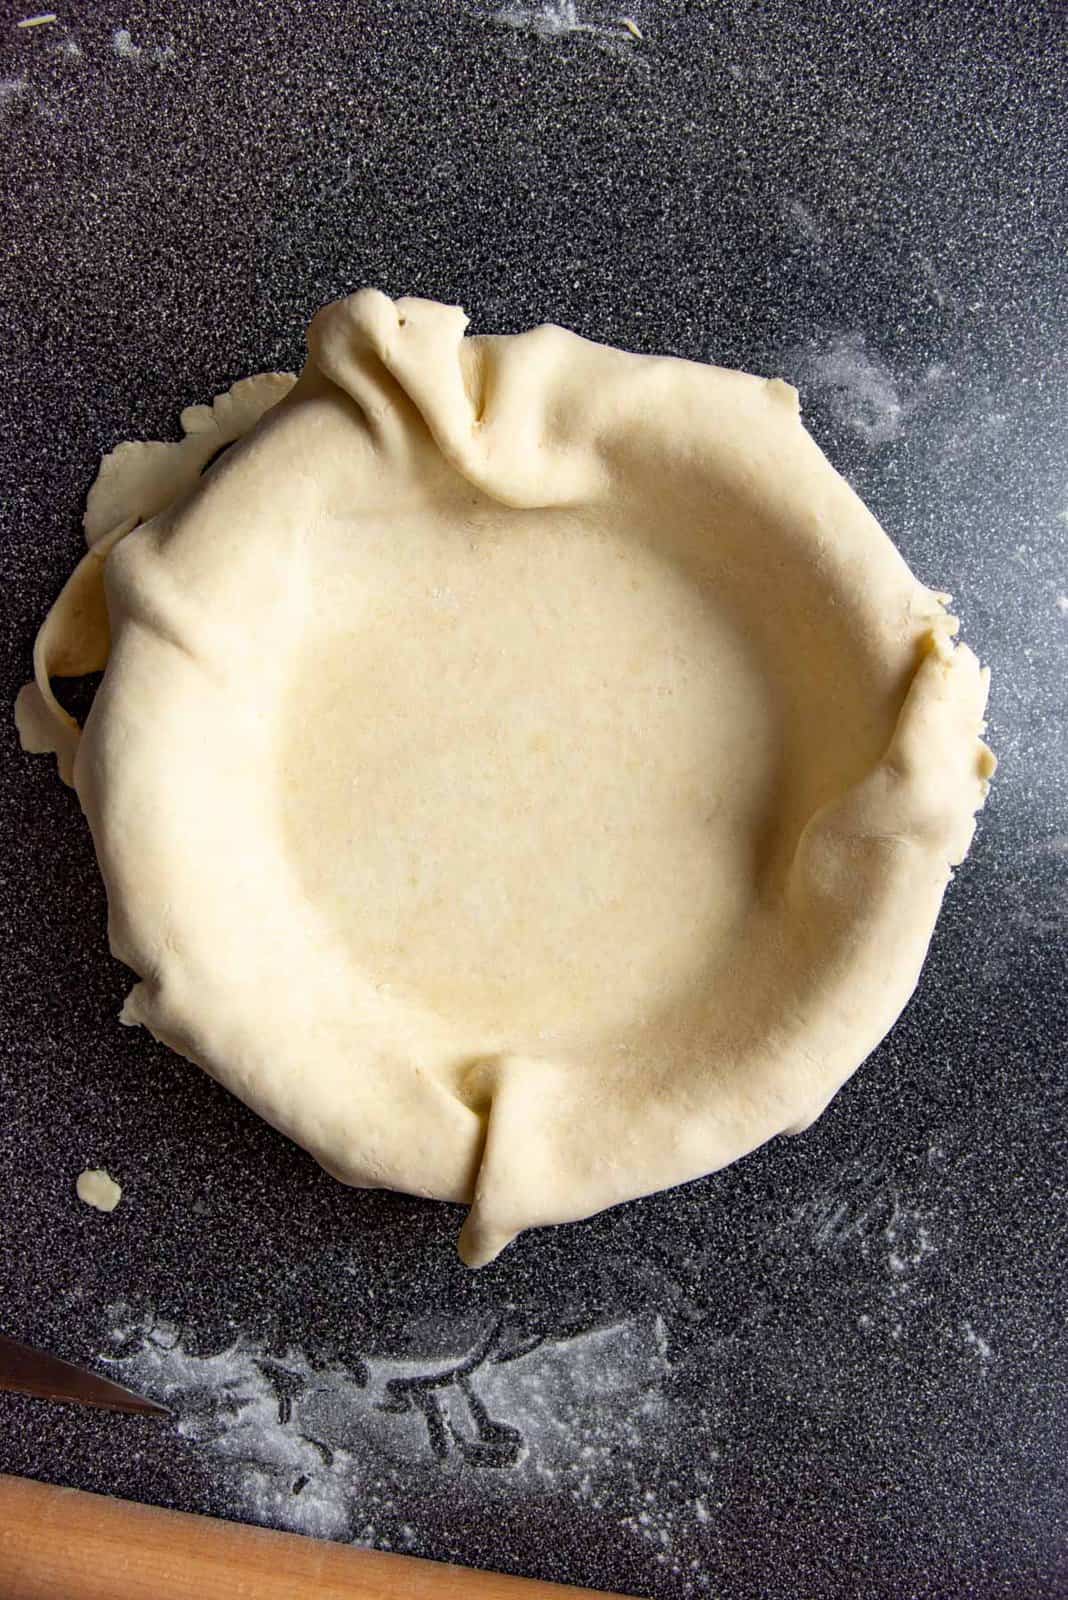
It’s VERY IMPORTANT to remember the following when you’re fitting the dough in the pie plate.
DO NOT stretch the dough in the pie dish.
Gently lift the dough and lay it on the pie dish, rather than stretching it to fit into the pie dish. Once the dough is laid inside the pie dish, use the back of your finger to gently press the dough into the bottom edge of the pie dish.
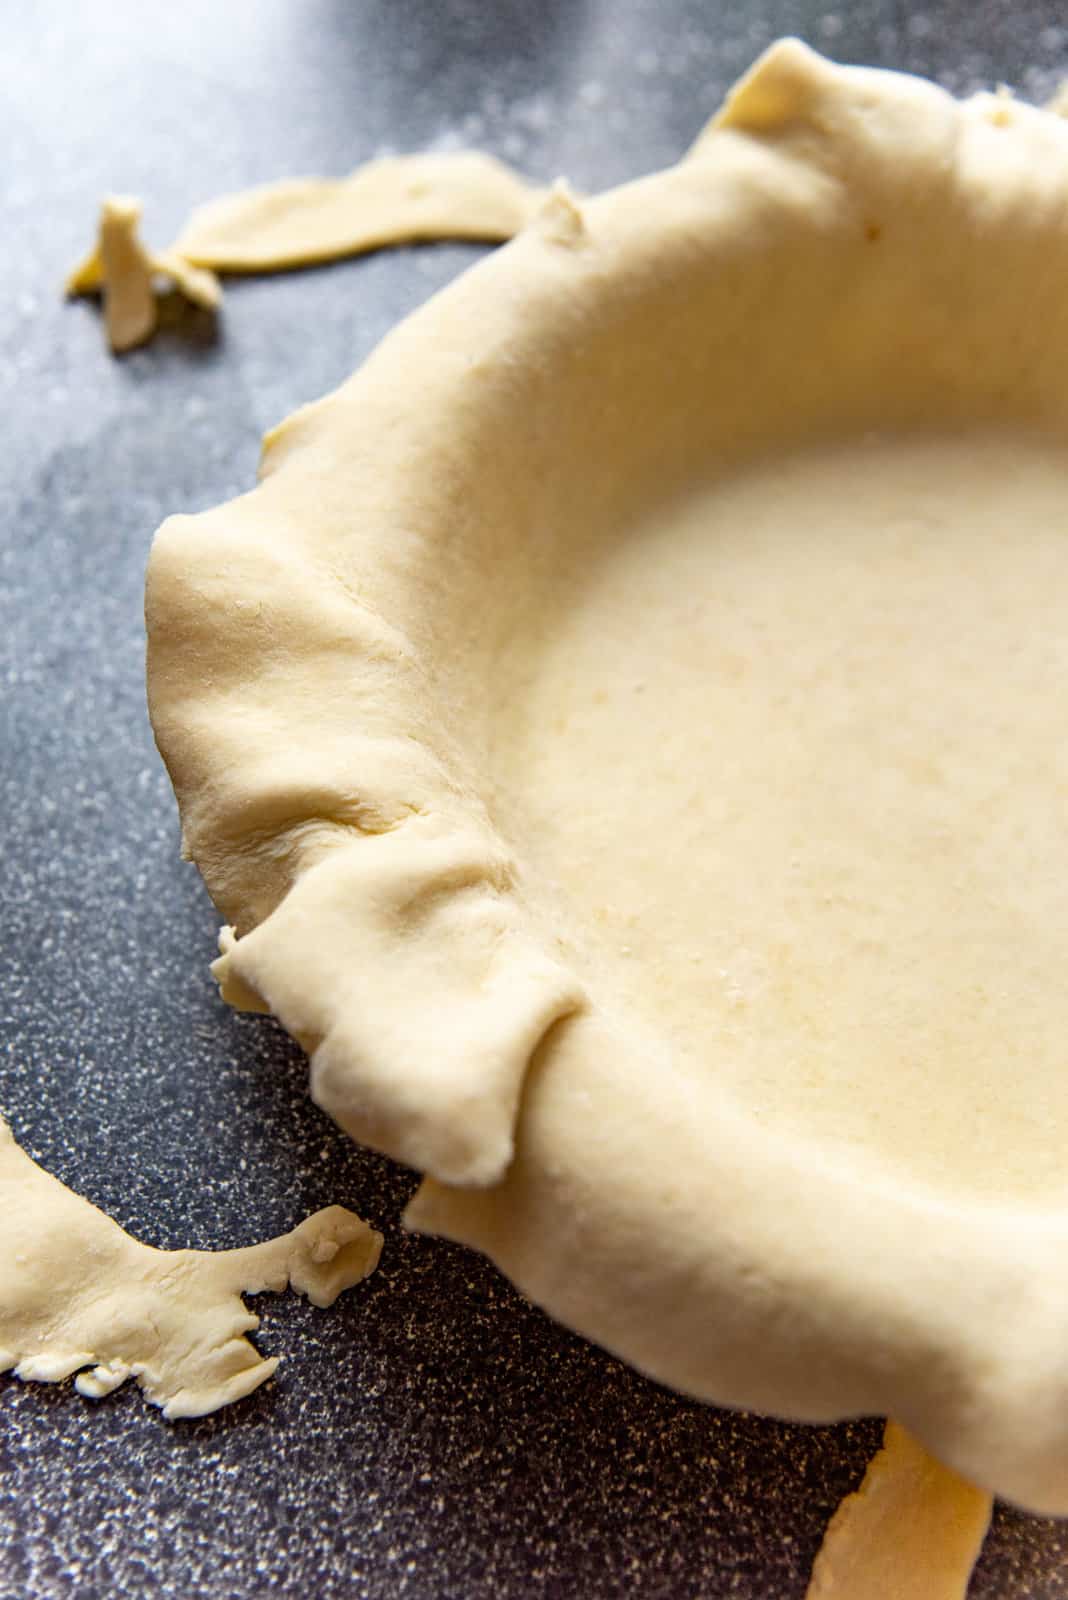
Cut any excess pie crust dough that is hanging off the pie dish, but make sure to leave about a 1 inch overhang for single crust pies, or a ½ inch overhang for double crusted pies. The overhang should be measured from the edge of the pie plate rim. Some pie recipes recommend a ½ inch overhang, but if you’re a beginner, I would go with at least a 1 inch (or 1.5 inches even) overhang.
If you’re a beginner, start with a 1 – 1.5 inch overhang for single crusted pies, and a 0.5 – 0.75 inch overhang for double crusted pies.
Roll the overhang under the crust to form a thick border that is flush against the edge of the pie pan. IF the butter is soft, let it harden in the fridge for a few minutes.
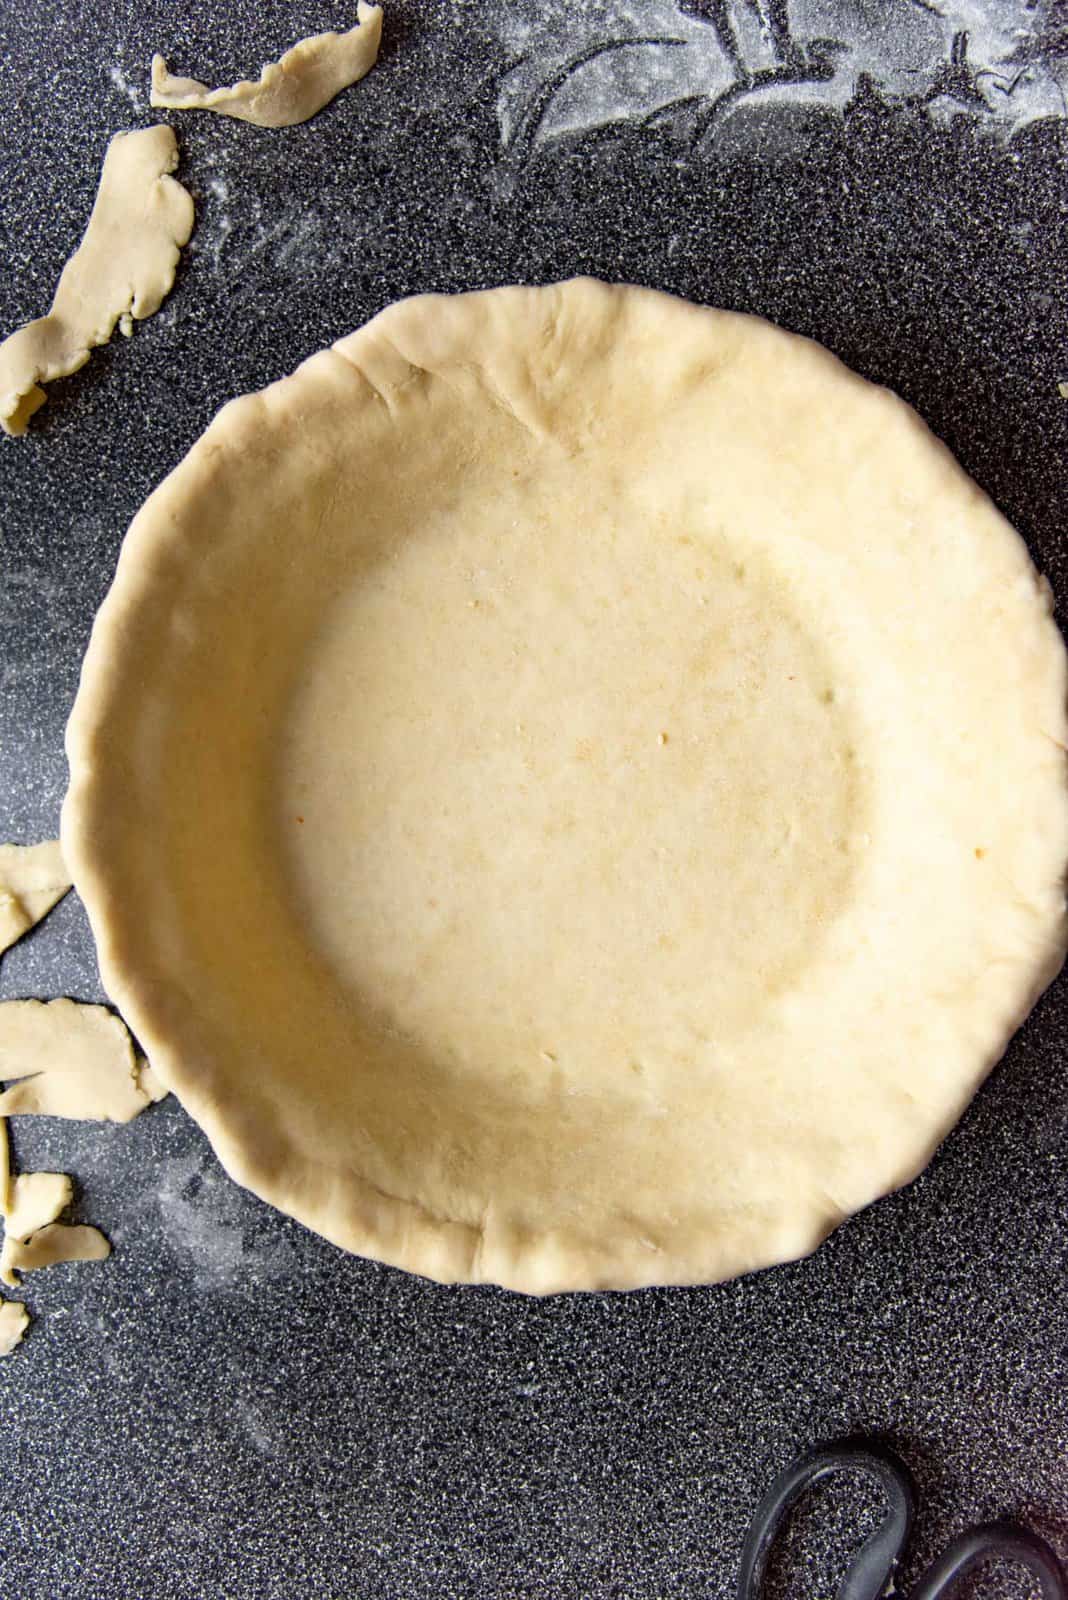
Finally, you can crimp or flute the edge of the pie crust to form the pie crust edge. A heavier pie crust edge will grip onto the edge of the pie plate better and prevent slipping as well.
PRO TIP – At any stage, if the butter softens, cover the pie crust in the pie plate with plastic wrap and refrigerate or freeze until the butter firms up again before proceeding with the next step.
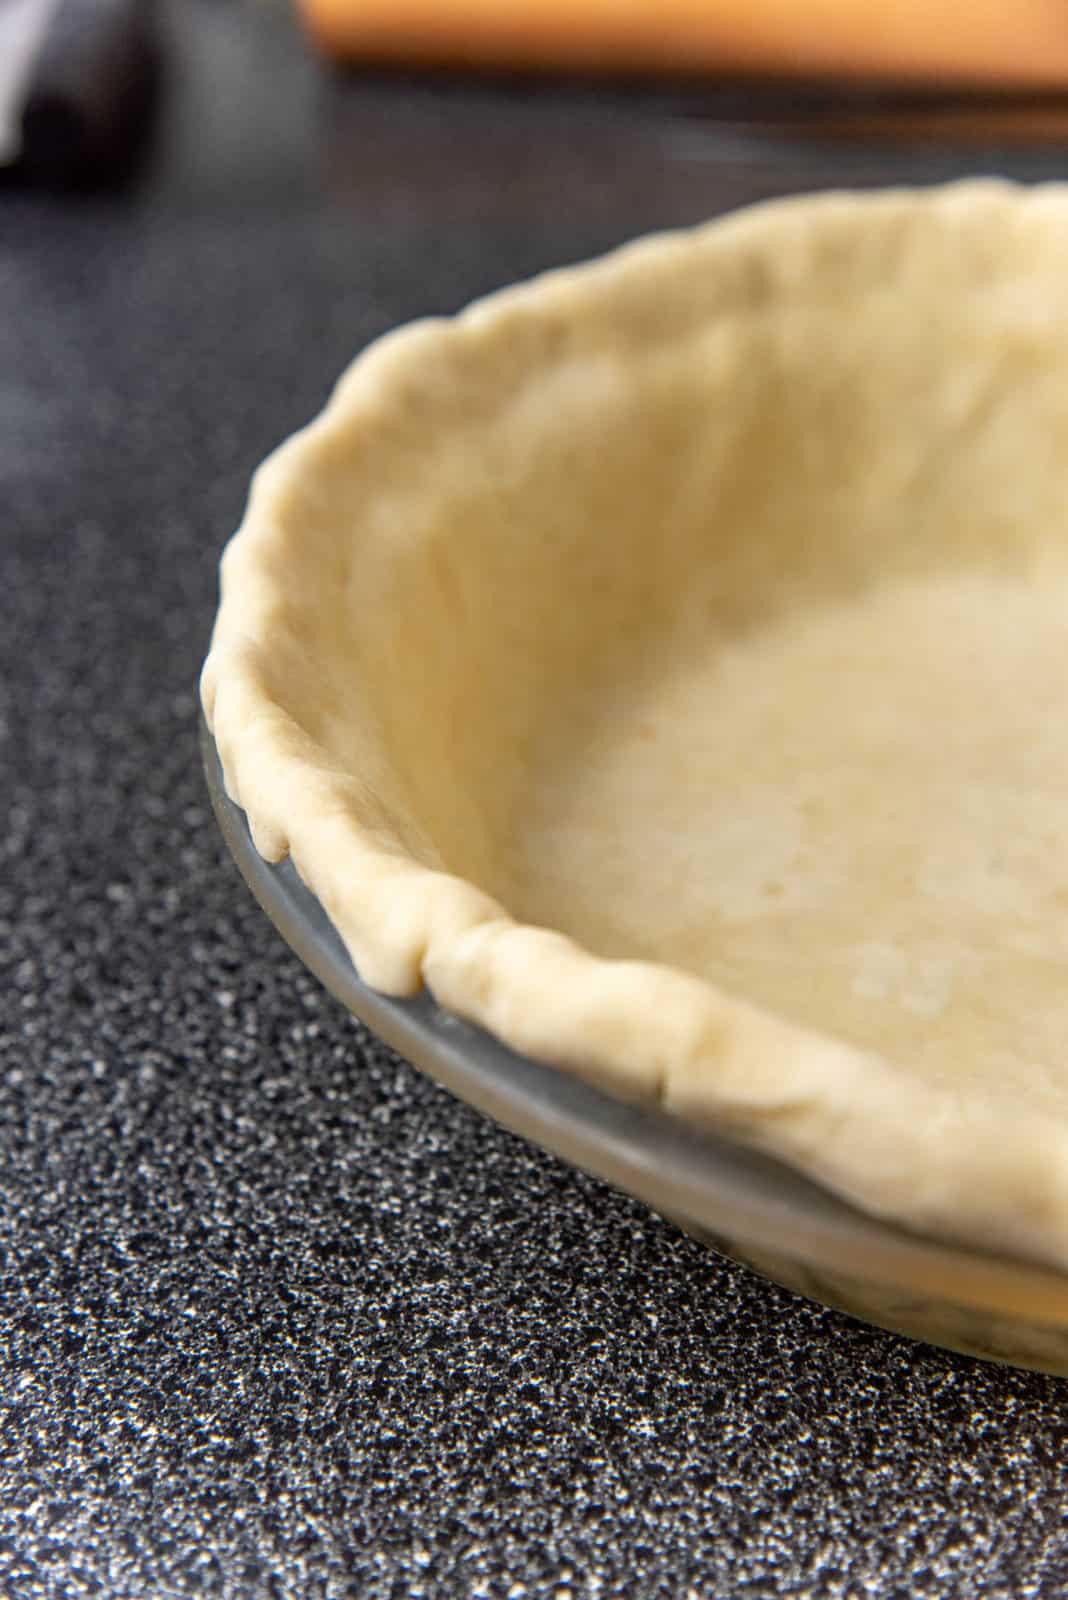
When the pie crust is ready, refrigerate the pie crust for at least 60 minutes, or 30 minutes in the freezer before baking. This allows for the gluten to relax, and for the butter to become firm again. This will help prevent the pie crust from shrinking AND produce a nice flaky crust as well.

Baking the pie crust (foolproof tips and tricks)
There are 3 methods to baking the pie crust.
- Pie crust baked with the filling.
- Partially par baked crust, before baking all the way through with the filling.
- Fully blind baked pie crust.
How to blind bake pie crust
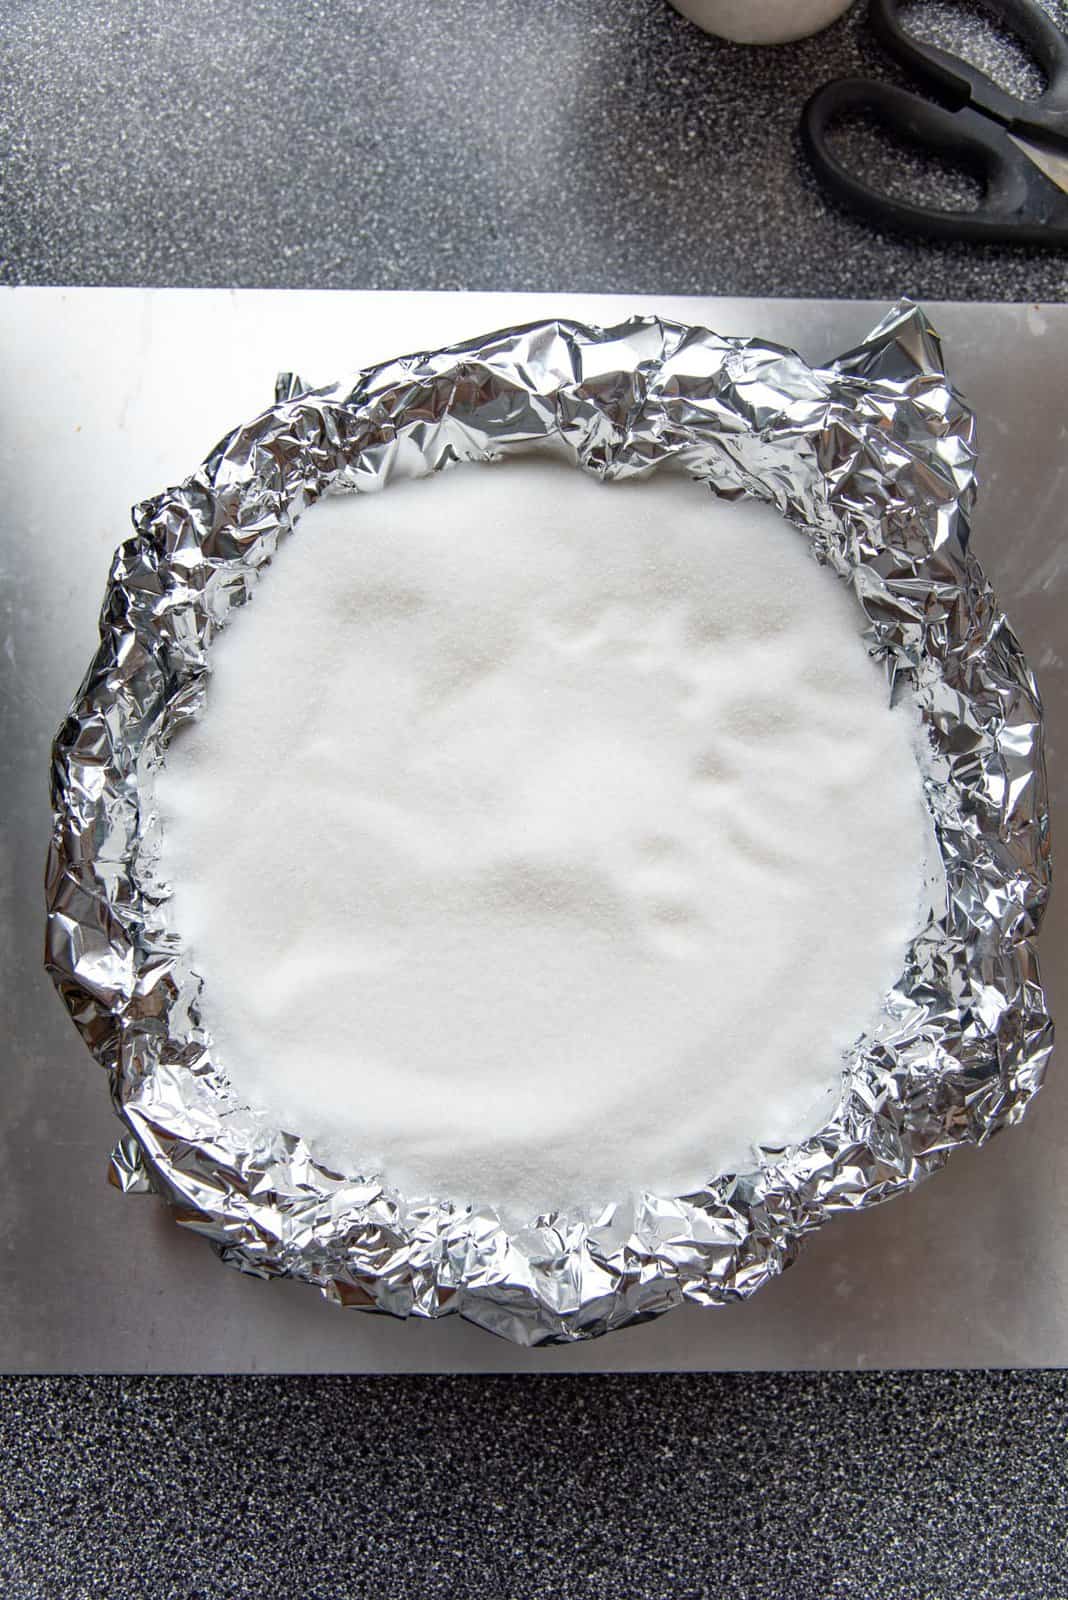
Blind baking a crust is the method where you bake the crust with no filling. This method is used for par-baking a pie crust, as well as for a fully baked crust with no filling. For this method, you require something to weigh down the crust while it bakes. This helps the crust keep its shape as it bakes and “sets”. Otherwise, the crust will lift off of the pie plate as it bakes.
There are many ways to weigh down the pie crust. You will need a piece of parchment paper or non-stick aluminum to line the pie crust first, and then fill it.
You can buy ceramic pie weights, but they can be pricey.
Other cheaper options
- White sugar – As a bonus, you will end up with sugar that also toasts in the oven! This sugar can be used for baking without a problem. But do keep in mind that this sugar will get some butter in it, so it will NOT be suitable to make meringues.
- Uncooked rice
- Dried beans
My favorite options
Of all these options, I love using parchment paper or foil, filled with white sugar. But you will find me using pie weights as well sometimes.

Step by step blind baking instructions
Classic method
I used to blind bake pie crusts at a very high heat initially, and then remove the weights and bake for a further few minutes at a lower temperature until the crust reached the right color.
This classic method is (relatively) fast, but it took me a VERY long time to get consistent results with this method. You have to ensure that the pie crust is vented properly to prevent the dough from collapsing along the side of the pie plate.
The classic method is as follows (a short summary)
- Preheat the oven to 425 F / 218 C for at least 30 minutes, with a baking sheet or pizza stone in the oven.
- Prick the pie crust with a fork, and then line the pie crust with parchment paper or foil. Place pie weights inside the crust.
- Bake the pie crust in the lower third of the oven, on top of the pizza stone or baking sheet. Bake for 20 minutes.
- Remove the pie weights, and reduce the oven temperature to 375 F / 190 C.
- Prick the pie crust with a fork again and return the pie crust to the oven to bake.
- Par baked crust – bake for another 5 – 10 minutes.
- Fully blind baked crust – bake for another 20 minutes until the crust is golden in color all over.
Foolproof blind baking method
Perfect for beginners as well as experts.
Instead of baking the pie crust at two different temperatures, the pie crust is baked for a longer time at a lower, consistent temperature. This technique is what is recommended by Stella Parks as well.
This allows the pie crust to set and brown gently while being weighed down. This prevents the collapse and shrinking of pie crusts almost entirely!
Preheat the oven at 350 F / 180 C (conventional oven). Place the oven rack in the lower third of the oven. For best results, place a pizza stone OR a baking tray in the oven and let it preheat for at least 30 minutes before baking the pie. This will help with baking the bottom of the pie crust.
When you’re ready to blind bake, prick the bottom of the pie crust with a fork.
Take a piece of parchment paper or foil and crumple it into a ball. Then unfold this, and place it on top of the chilled pie crust.
A crumpled paper or foil will mold to the shape of the pie crust and fit inside the pie crust edges easily.
Fill the pie crust with the weights, making sure they come at least ¾ of the way up, but preferably all the way up. A common mistake beginners will make is to only fill the bottom, which can result in the sides of the crust slipping down and shrinking.
Having the weights come all the way up the pie crust will keep the sides and bottom intact and in place. My recommendation is to start with either rice or sugar as the weight.
Make sure that the foil or parchment paper extends over the crust, so that it shields the crust naturally, and prevents the crust from browning too much and too early.
Place the pie plate in the oven, on top of the pizza stone or baking tray, and bake for 60 – 65 minutes.
After 60 minutes, the crust should start to lightly brown. Take the pie crust out of the oven, and very carefully remove the parchment paper / foil ALONG WITH THE WEIGHTS.
Do this step very carefully, so that you remove all of the sugar / rice / pie weights. Otherwise, you’ll end up with a mess. Keep an empty bowl next to you, so you can immediately transfer the parchment paper / foil to it.
I like to prick the crust with a fork a few times again, and return the pie crust back into the oven.
For a par baked crust – Bake for another 5 – 10 minutes, until the bottom of the crust looks matte or dry. It should not brown too much, but a slight golden color is OK.
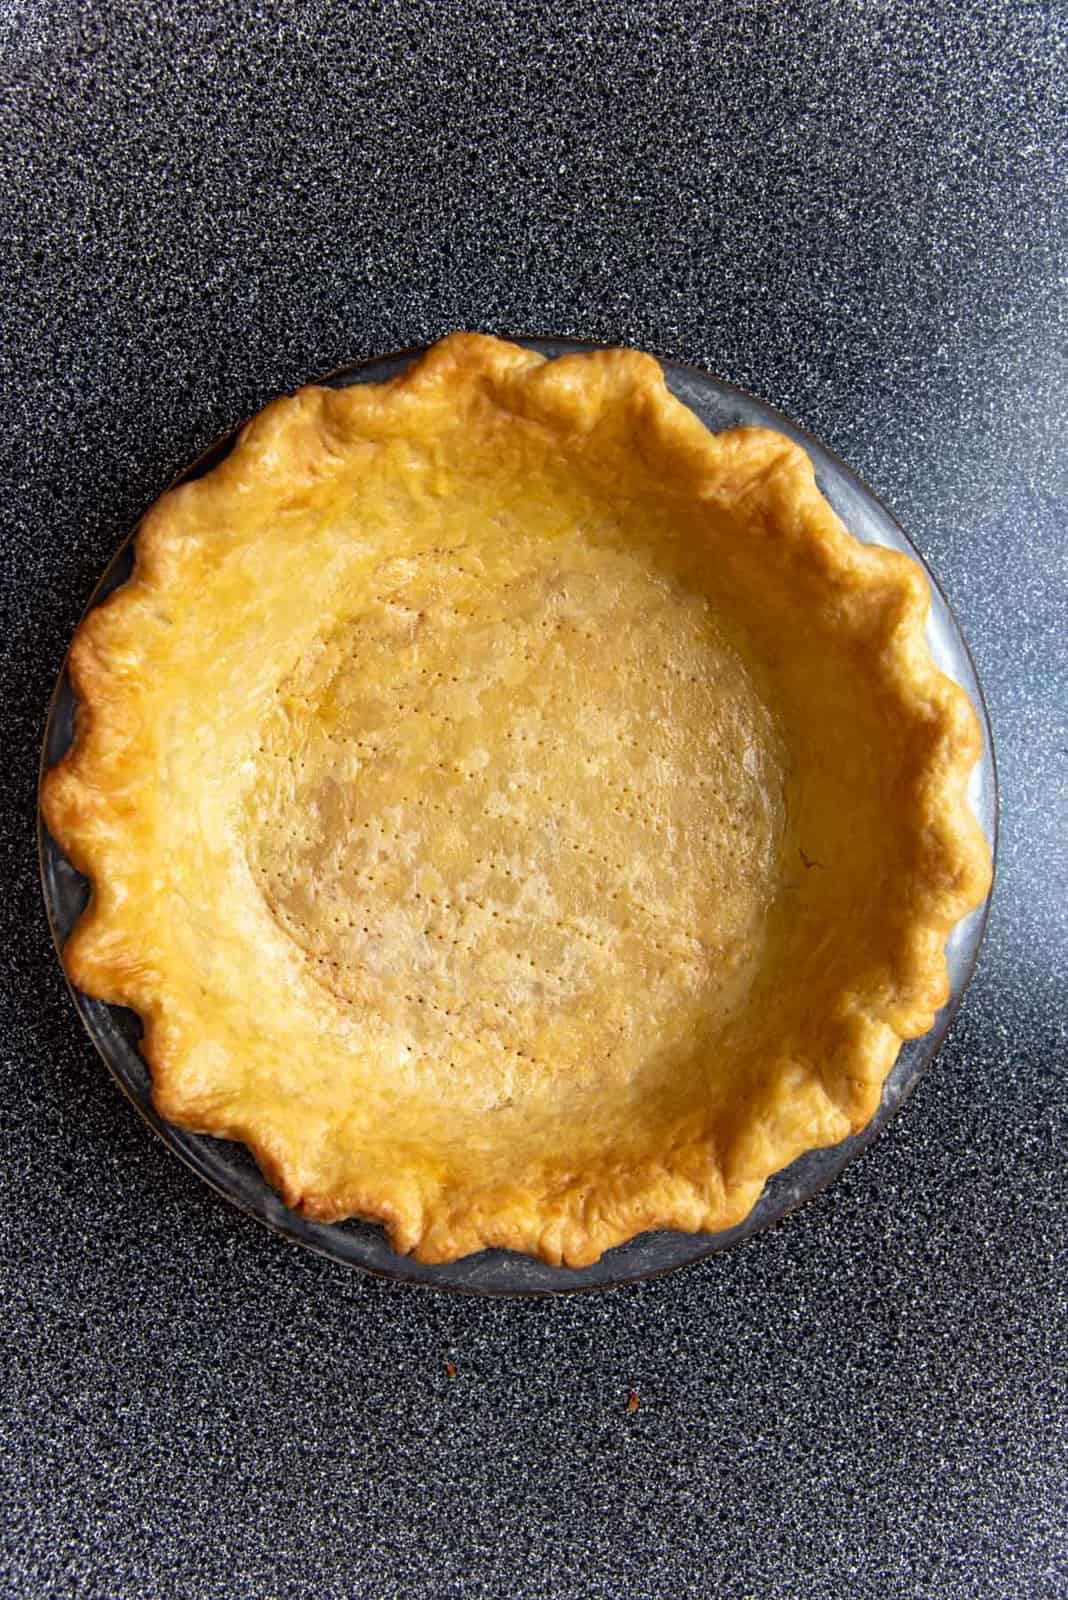
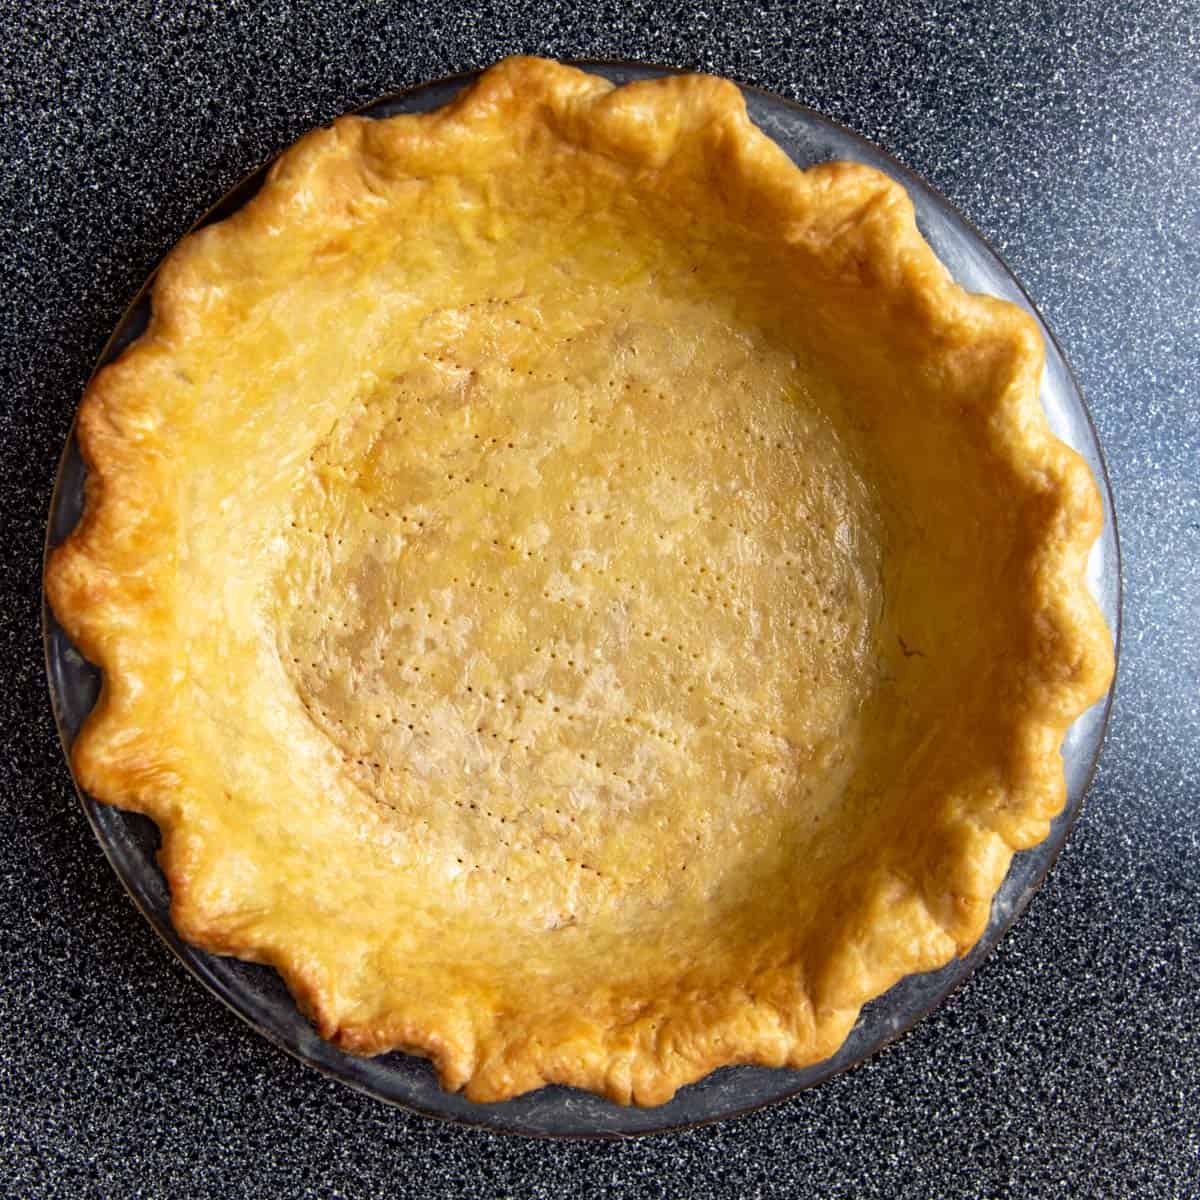
For a fully blind baked crust – Bake for another 15 – 20 minutes until the crust is golden in color all over. To get a beautiful shiny finish, brush an egg wash all over the crust before the final 5 minutes of baking.
For both, if the pie crust edges start to caramelize too much, you can use a foil to cover the edges, or you can also purchase silicone pie crust shields. I’ve never needed to do this in my experience, however.

Tips for a double crusted pie (or filled pie)
For pies that will be baked with a top crust, both the bottom and top crusts are not pre-baked. This makes it easier to stick the dough together.
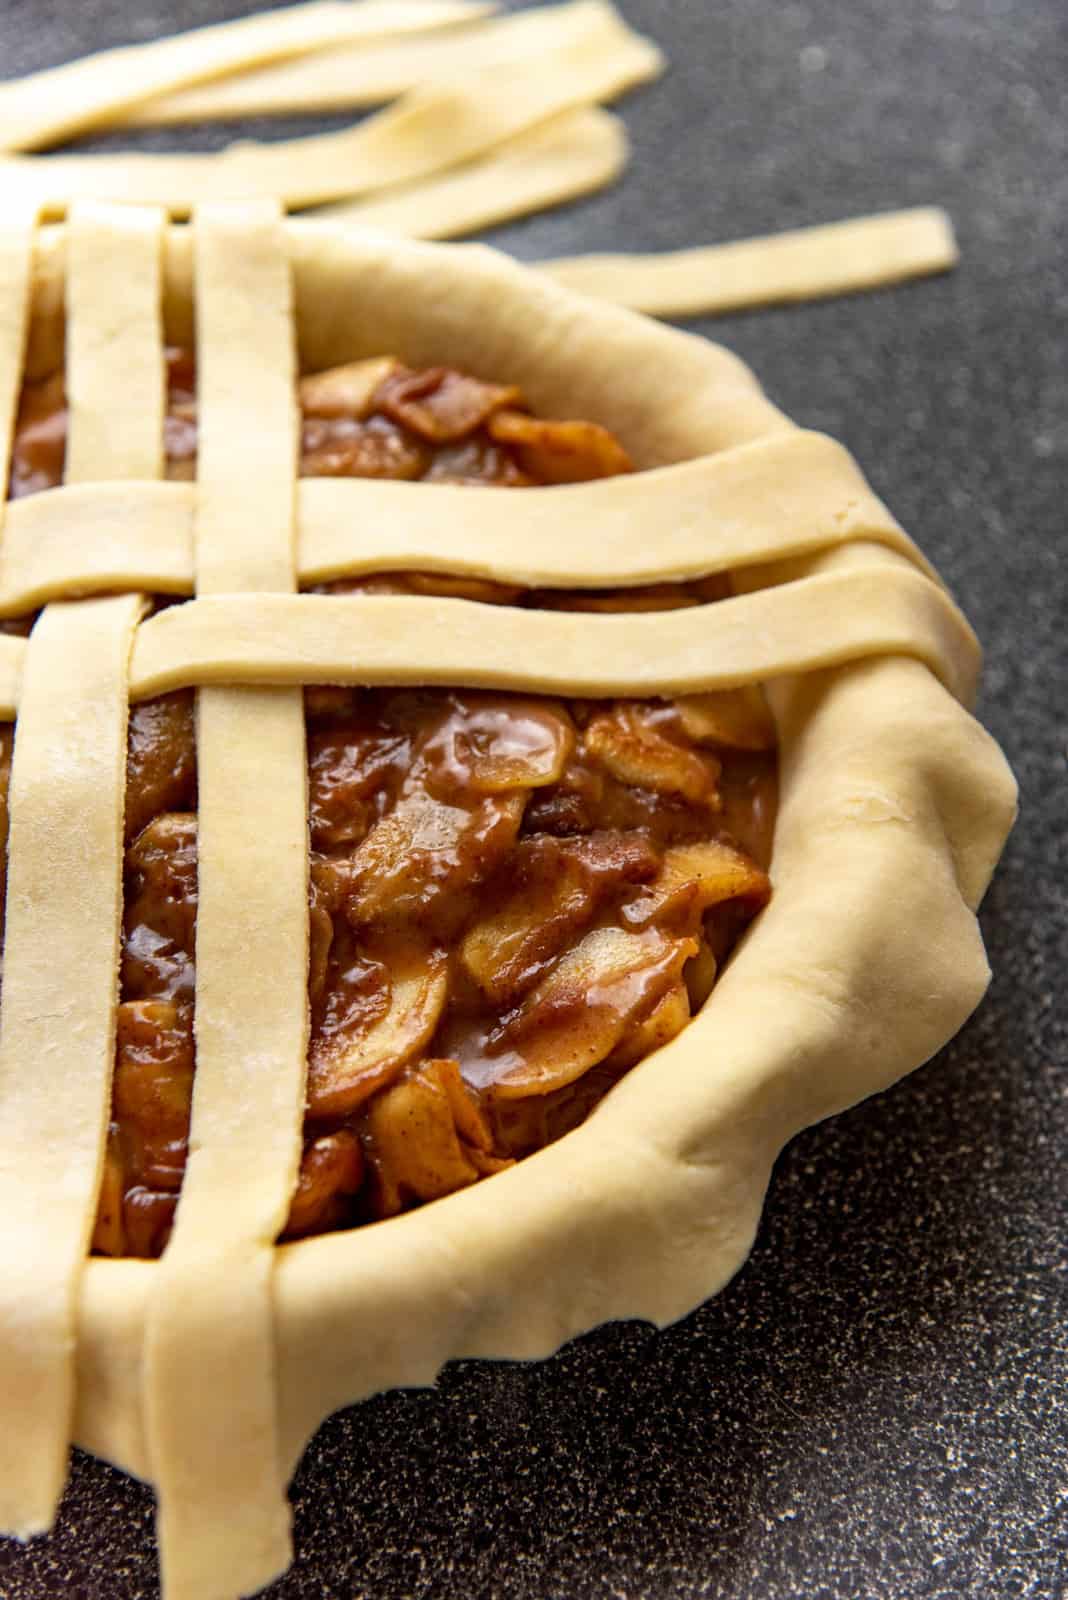
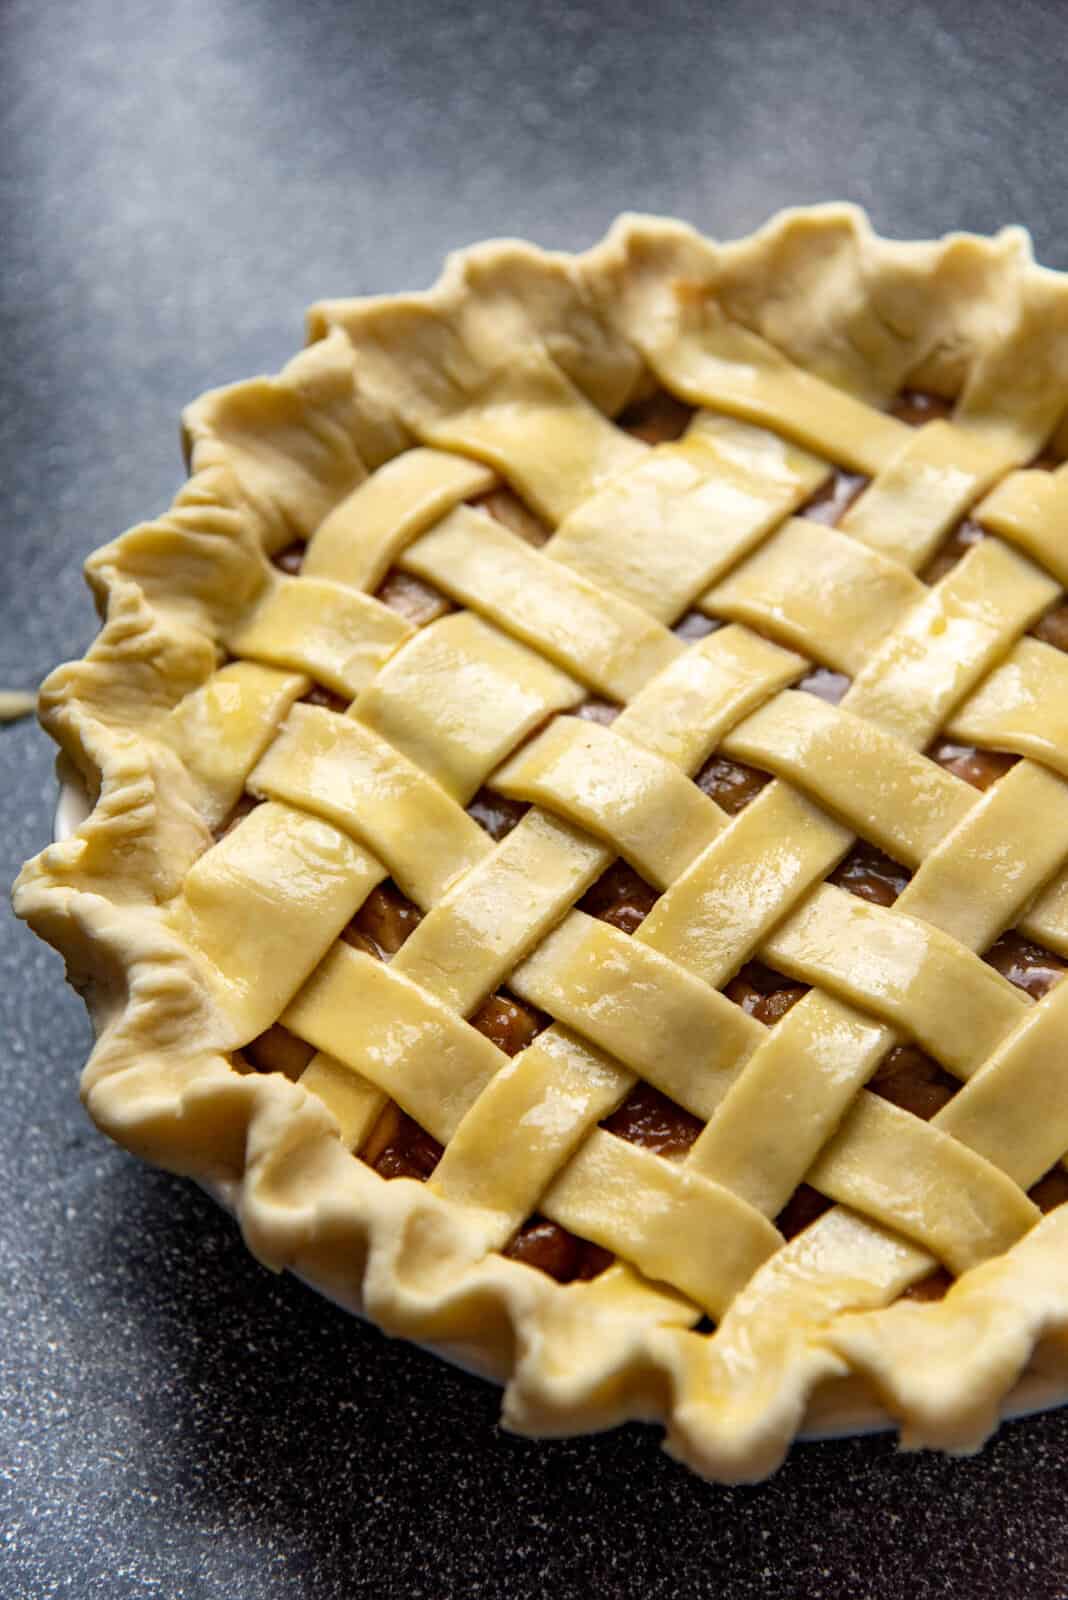
You can either use one whole piece of dough as the top crust, or use a pastry cutter or knife to cut shapes or ribbons to create a lattice top or other decorations. If you use a full top crust, make sure to cut holes or shapes for ventilation.
The biggest challenge for baking pies that already have a filling, is how to ensure that the bottom also cooks properly without getting soggy or remaining raw.
Foolproof way to perfectly bake a double crusted pie or a pie with filling.
Bake the pie in a preheated oven, on top of a baking stone or tray. Make sure that the pie plate is at the bottom third of the oven, so it’s closer to the main heating element of your oven. Bake the pie at 425 F / 218 C for 10 minutes, and then at 375 F / 190 C for 50 – 60 minutes for that perfect golden crust on the top AND the bottom!
Specialized equipment that will be helpful for making pie crusts (but not all are essential).
- Parchment paper or non-stick foil.
- Pie weights (sugar works very well too – just remember that the sugar CAN get some melted butter in it.)
- Spray bottle – to spray water to get the right dough consistency.
- Pizza stone or metal baking tray.
- Silicone pie crust shields (you can also use shaped foil).
Common troubleshooting problems
If the gluten in the pie dough is overworked or stretched too much at any stage (mixing, shaping, rolling or fitting in the pie plate), this can result in the pie crust shrinking during baking.
To prevent this, make sure to,
Always keep the dough chilled.
Do not add too much water (more water can encourage gluten development, which can cause the crust to shrink).
Do not overwork / over-handle the dough.
If the dough starts shrinking during the rolling process, let it rest in the fridge for a few minutes before proceeding.
Do not stretch the dough to fit it inside the pie plate.
The butter needs to be cold throughout the whole process. If it melts into the dough, the pie crust will not be flaky.
Another reason why you won’t get a flaky crust is if the butter pieces in the dough were too small. If you use a food processer, you can accidentally cut the butter too small. This is OK for mealy pie crusts, but not for a flaky crust.
So make sure to keep butter pieces at least hazelnut-sized, OR make sure there are larger flatter pieces of butter in the dough.
Also make sure to cut the dough and layer it to maximize the flakiness.
This is a result of overworking the dough. The nice flakiness turns into a thick crust that is too hard, when the flour is overworked.
This can also happen if the crust is too thick. If you cannot roll out the dough to a 3mm thickness, it’s because the dough has been overworked. Let it rest in the fridge for at least 20 minutes, before trying to roll it out again.
The trick to getting a nice brown crust is to ensure the pie plate is closer to the bottom element of the oven. This is why I recommend baking the pie crust in the lower third of the oven.
To aid with browning the pie crust well, I also recommend placing a pizza stone or baking tray in the oven, which will provide the pie plate direct contact with a hot surface. This will help caramelize the pie crust.
More expert tips for making foolproof homemade pie crusts
- Start with cold ingredients, especially chilled butter and ice water.
- If the butter softens, return the dough to the freezer to let the butter harden AT ANY STAGE.
- Vodka can help with preventing gluten development, but it isn’t essential.
- DO NOT overwork the dough. Use the parchment paper to fold the dough over, to form the pie dough.
- The dough should not be fully hydrated, and some dry spots are expected. As the dough rests, the dough will fully hydrate.
- Rest the dough if it starts to shrink when rolling it out. This will prevent the crust from shrinking in the oven.
- DO NOT stretch the dough to fit into the pie plate.
- Be generous with the pie crust border, as this can help with maintaining the shape.
- Blind bake the pie crust with foil / parchment paper with sugar as a weight. Bake at a lower temperature for longer, for foolproof results every single time.
- Bake the pie in the lower third of the oven, with a baking sheet / stone underneath to promote a perfectly baked bottom crust.
Looking for more recipes?Sign up for my free recipe newsletter to get new recipes in your inbox each week! Find me sharing more inspiration on Pinterest and Instagram.
Pie Crust Recipe (with tips for beginners)
What You Need:
- 9 or 9.5 inch pie plate (between 1 – 2 inches deep)
- Foil or parchment paper
- Sugar or rice to be used as a pie weight
- Rolling Pin
- Spray bottle (optional)
Ingredients:
- 300 g unsalted butter preferably chilled
- 120 mL iced water
- 30 mL chilled vodka or use the same amount of iced water
- 400 g All purpose flour (spoon and level when using cup measurements)
- 30 g sugar
- ¾ tsp fine sea salt
- Spray bottle with iced water optional
Instructions:
Making the dough
- Ideally, you should have all the ingredients chilled well. However, it's crucial that at least the butter, water, and vodka (if using) are chilled well.
- Cut the butter into cubes, about 1 x 1 cm OR 1 x 2 cm. Keep the butter in the freezer until you're ready to use it.300 g unsalted butter
- Mix the flour, sugar, and salt in a large bowl.400 g All purpose flour, ¾ tsp fine sea salt, 30 g sugar
- Add the cubed butter, and toss to coat the butter with flour.
- Using your fingers, to squish each piece of butter, making sure to toss the butter from time so that it’s still coated with flour. Work fast, so that the butter won't soften or melt.
- For a flaky pie crust, most of the butter pieces should be larger and flatter. Ideally, at least hazelnut-sized or walnut-sized, but flatter. For a mealy pie crust, the dough crumbs should resemble coarse wet sand, while still retaining some pea-sized butter pieces.

- Toss to make sure the butter pieces are coated in flour.
- Mix half of the iced water, with the vodka (if using). Drizzle the water into the flour mixture, and mix it in using your fingers or a fork.120 mL iced water, 30 mL chilled vodka
- The lumps will become bigger as you mix in the liquid. Add more water until more of the dough forms larger, stickier clumps.
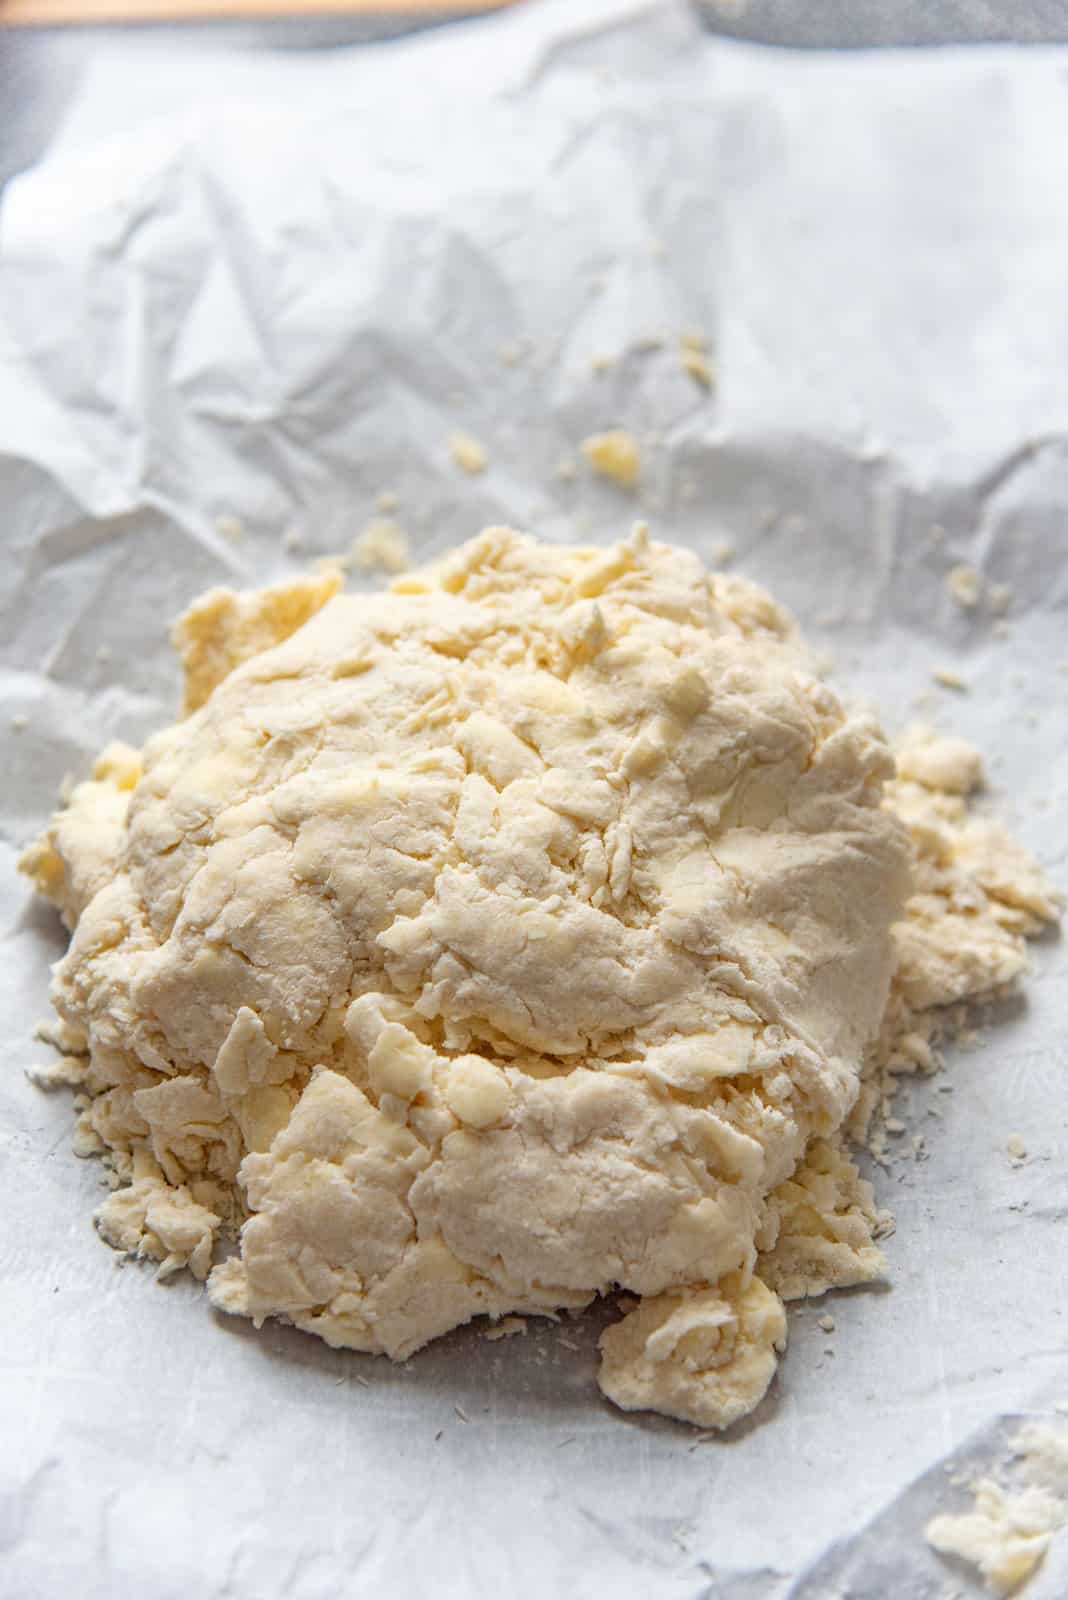
- Toss the clumps in the flour mix using your fingers, to ensure that the water is mixing as evenly as possible. However, you will find that there will be large wet clumps of dough, and lots of dry spots in the flour mix as well. This is OK!120 mL iced water
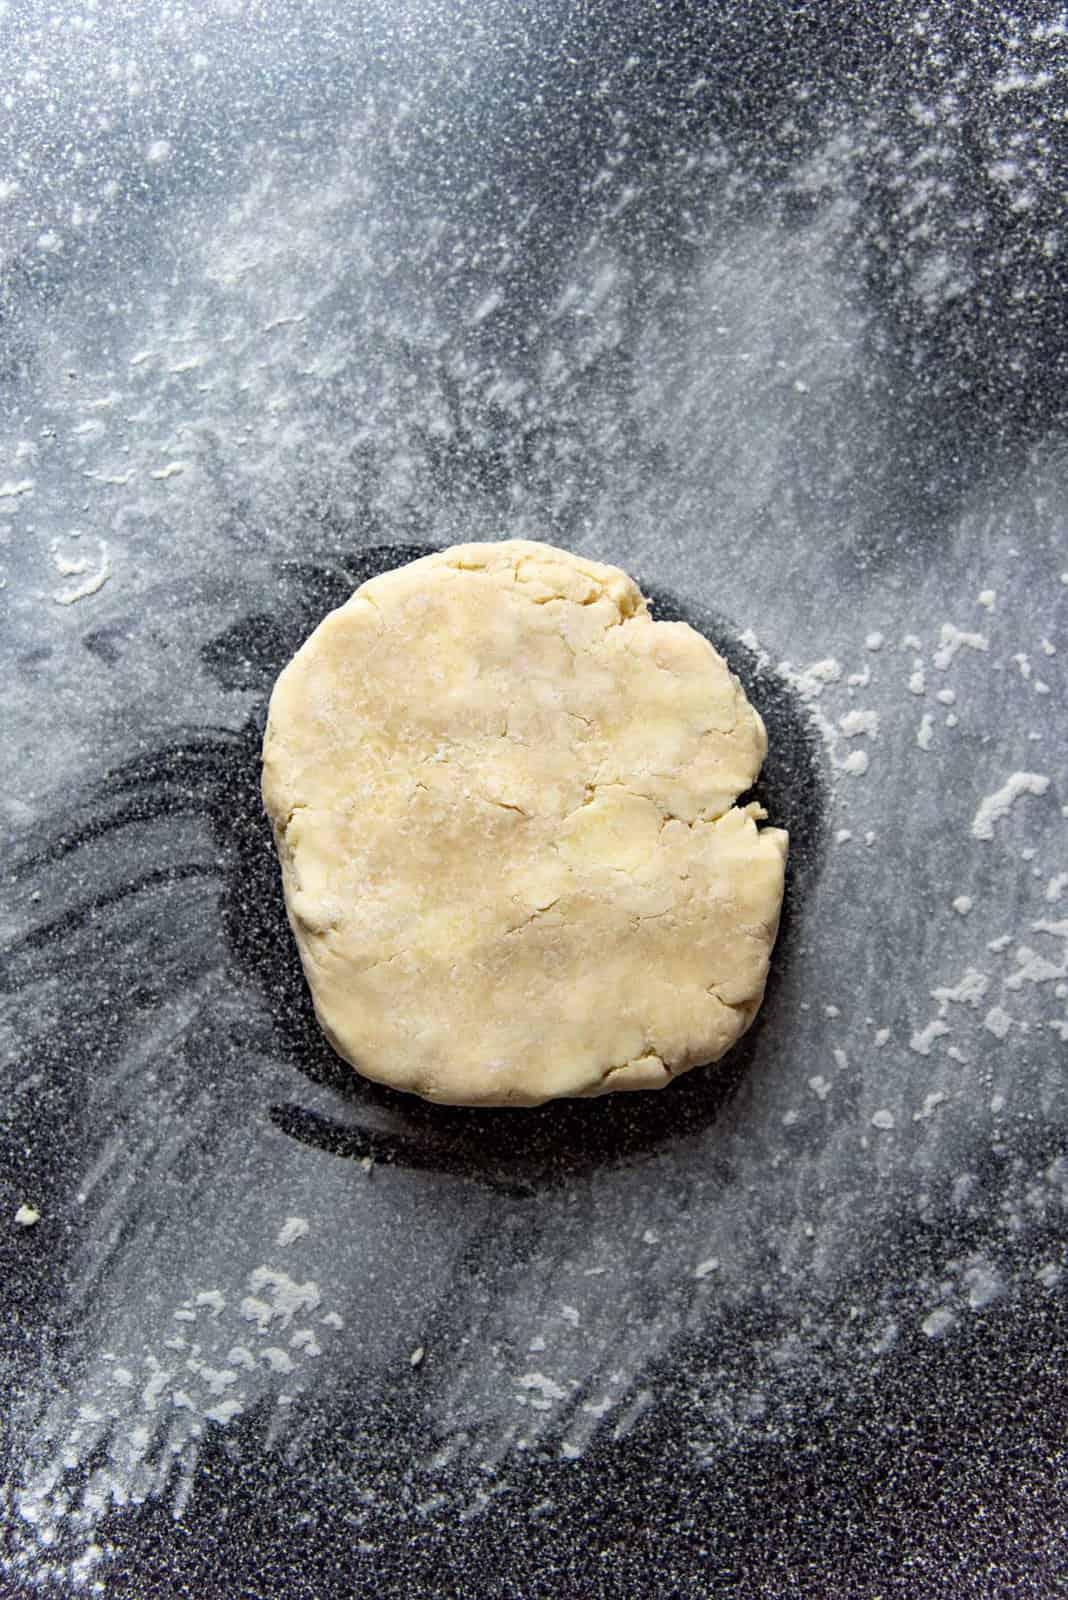
- To check if there's enough water in the dough (if you're a beginner) – take some of the dough in your hand and squeeze it to form a large clump. The clump should just hold together, along with some dry spots present. Set this clump aside (either on your work surface or separate bowl – see attached picture). Repeat with the rest of the dough. You should only end up with a small amount of flour in the bowl that won’t clump up.
- However, if there is still a lot of flour mix left in the bowl that won't form clumps, drizzle a few drops of water to help with clumping when squeezed together. Alternatively, you can use a spray bottle to spray iced water on the dry flour spots, without adding too much water.Spray bottle with iced water
- The dough will have enough water if you can form a dough that is just holding together when squeezed, AND there should also be a few dry spots of flour. The more familiar you become with this dough, this stage will be easier to recognize. I usually never need more than 150 mL of water.
- Place a piece of parchment paper on your work surface.
- Turn the pie dough out onto the parchment paper. If the butter softens at any stage, remember to refrigerate / freeze the dough for a few minutes as needed.
- Use the parchment paper to fold the dough over to form a rough dough mound. Add a few water drops (or use the spray bottle) if needed, so that the dough sticks together. There should be some dry flour spots.
- If there is too much water, and the dough is sticky, sprinkle more flour on the dough.
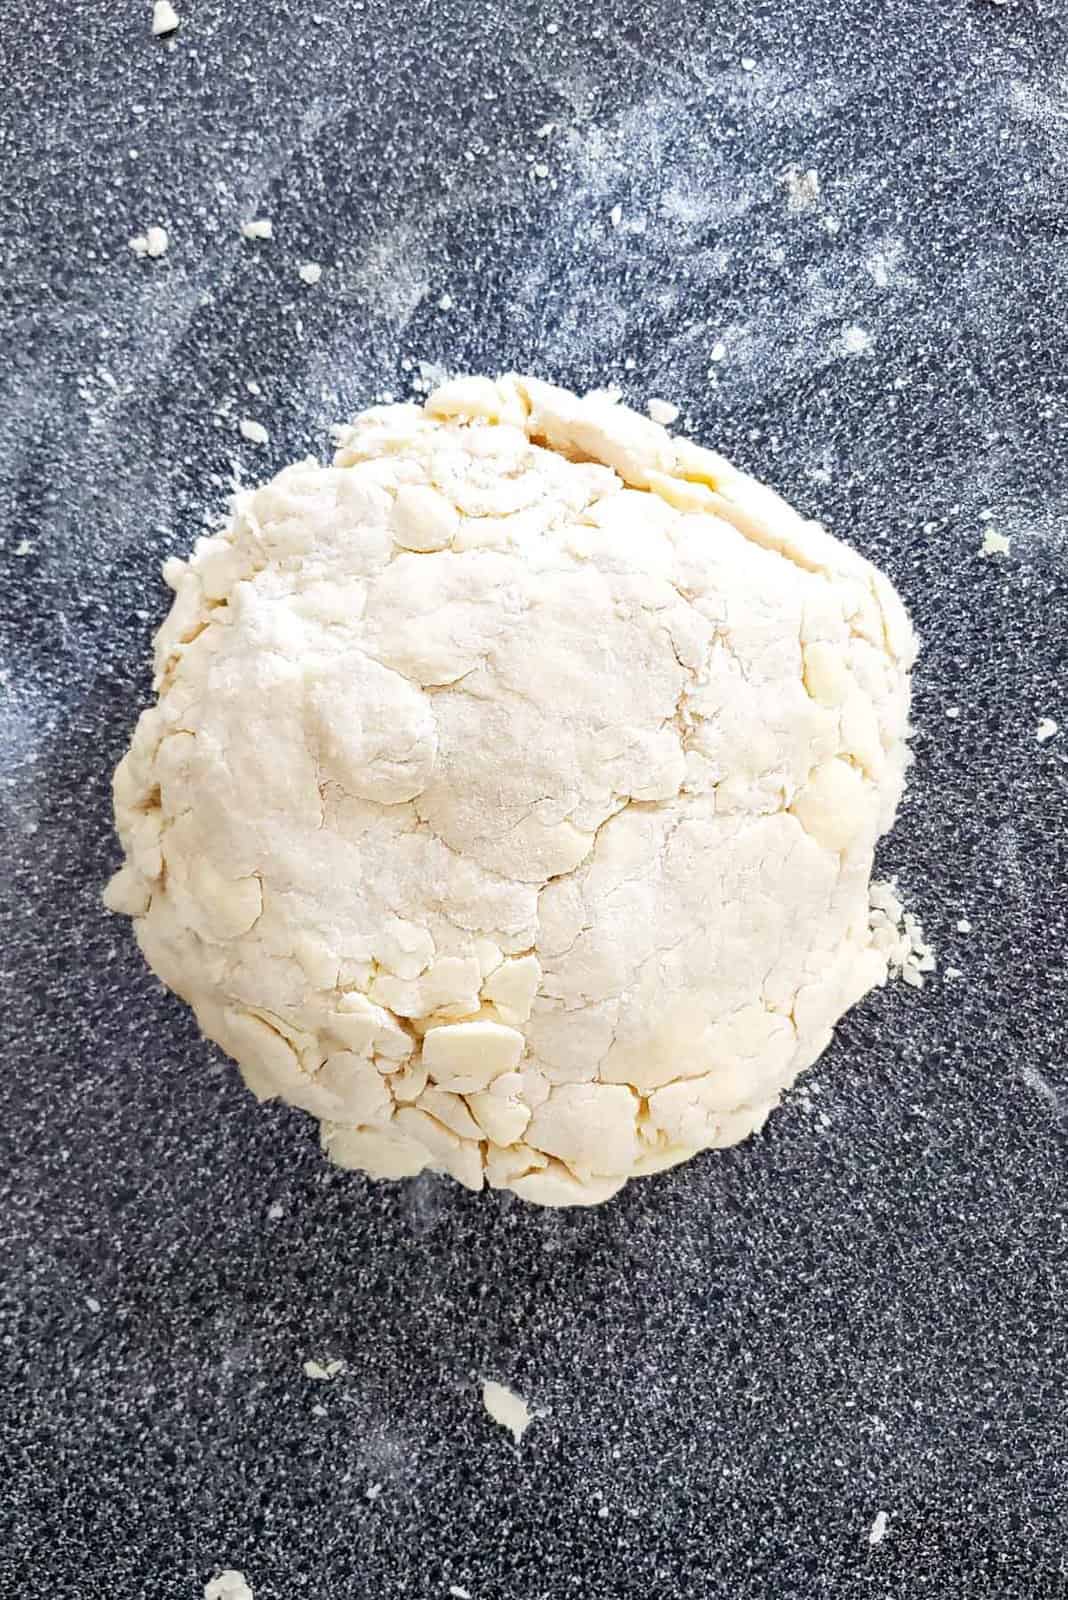
- Now slightly flatten the dough mound and cut it into four portions. Stack these portions on top of each other. (Alternatively, you can cut the dough in half, stack, and then cut it in half again and stack).
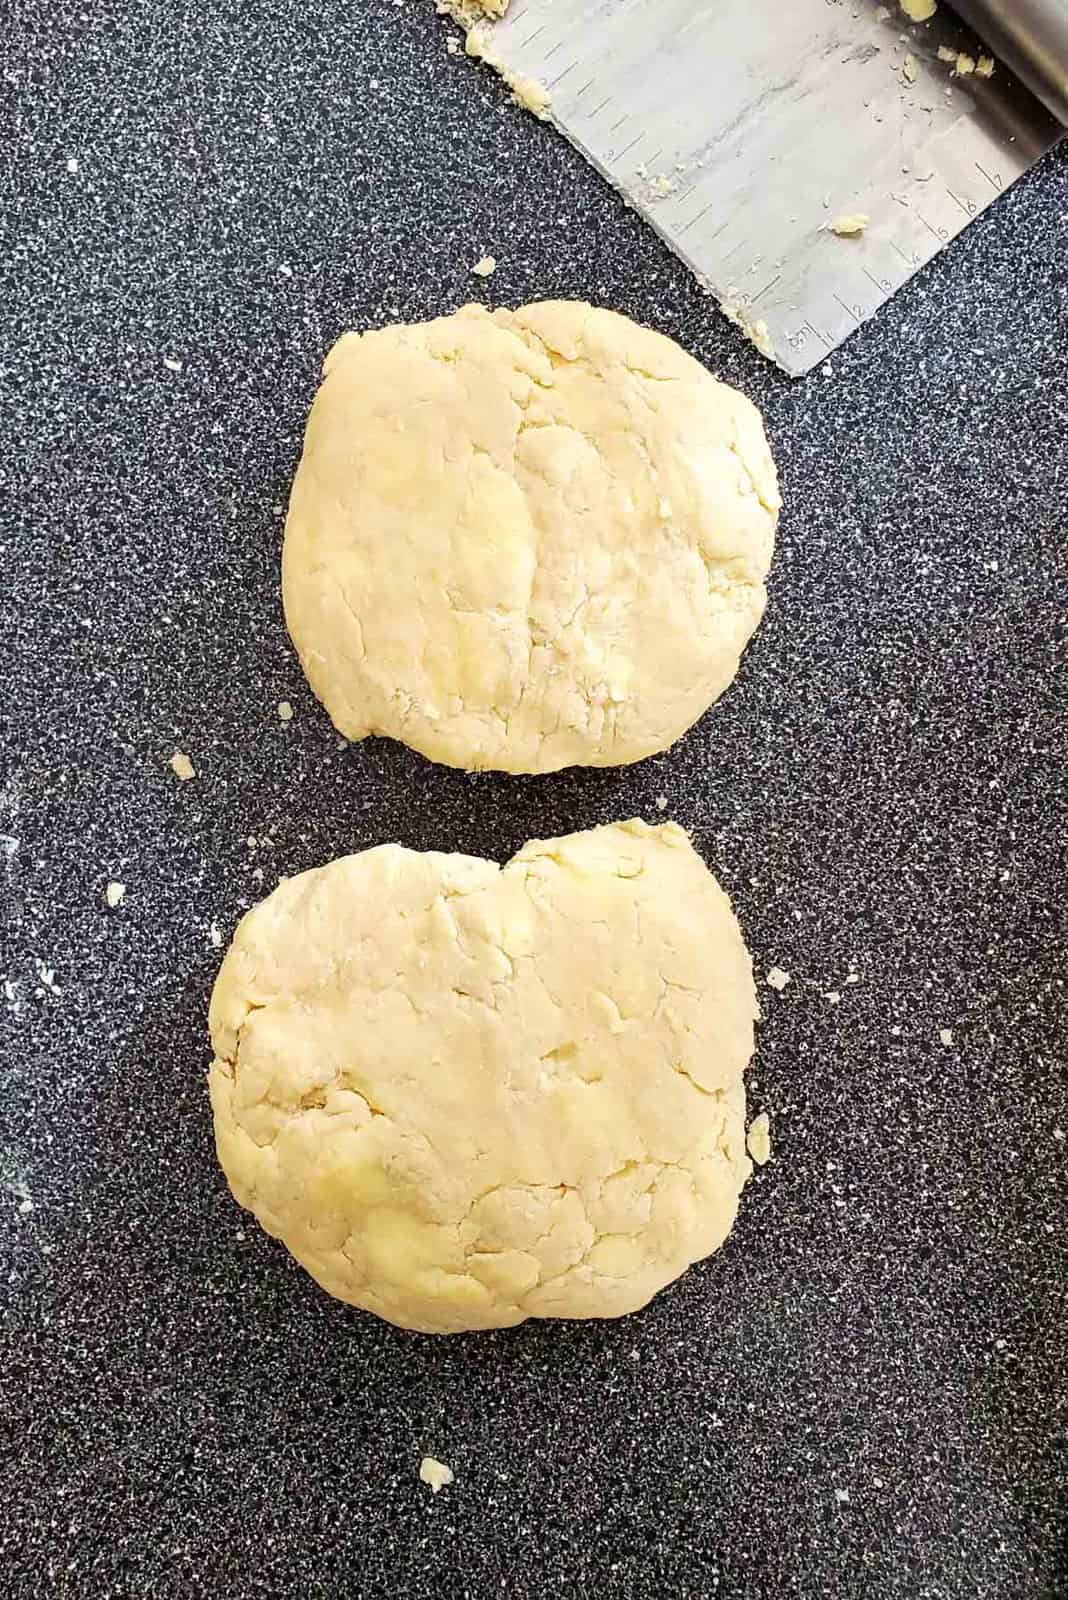
- Flatten the dough slightly, and cut it in half. You could either weigh the dough, and cut it in half precisely, or cut the two portions approximately.
- Form a dough disc with each portion. Be careful and gentle when handling the dough. Wrap each disc with plastic wrap and let it rest in the fridge for at least 1 hour. I prefer to let it rest at least 2 hours, or overnight.

Rolling the dough
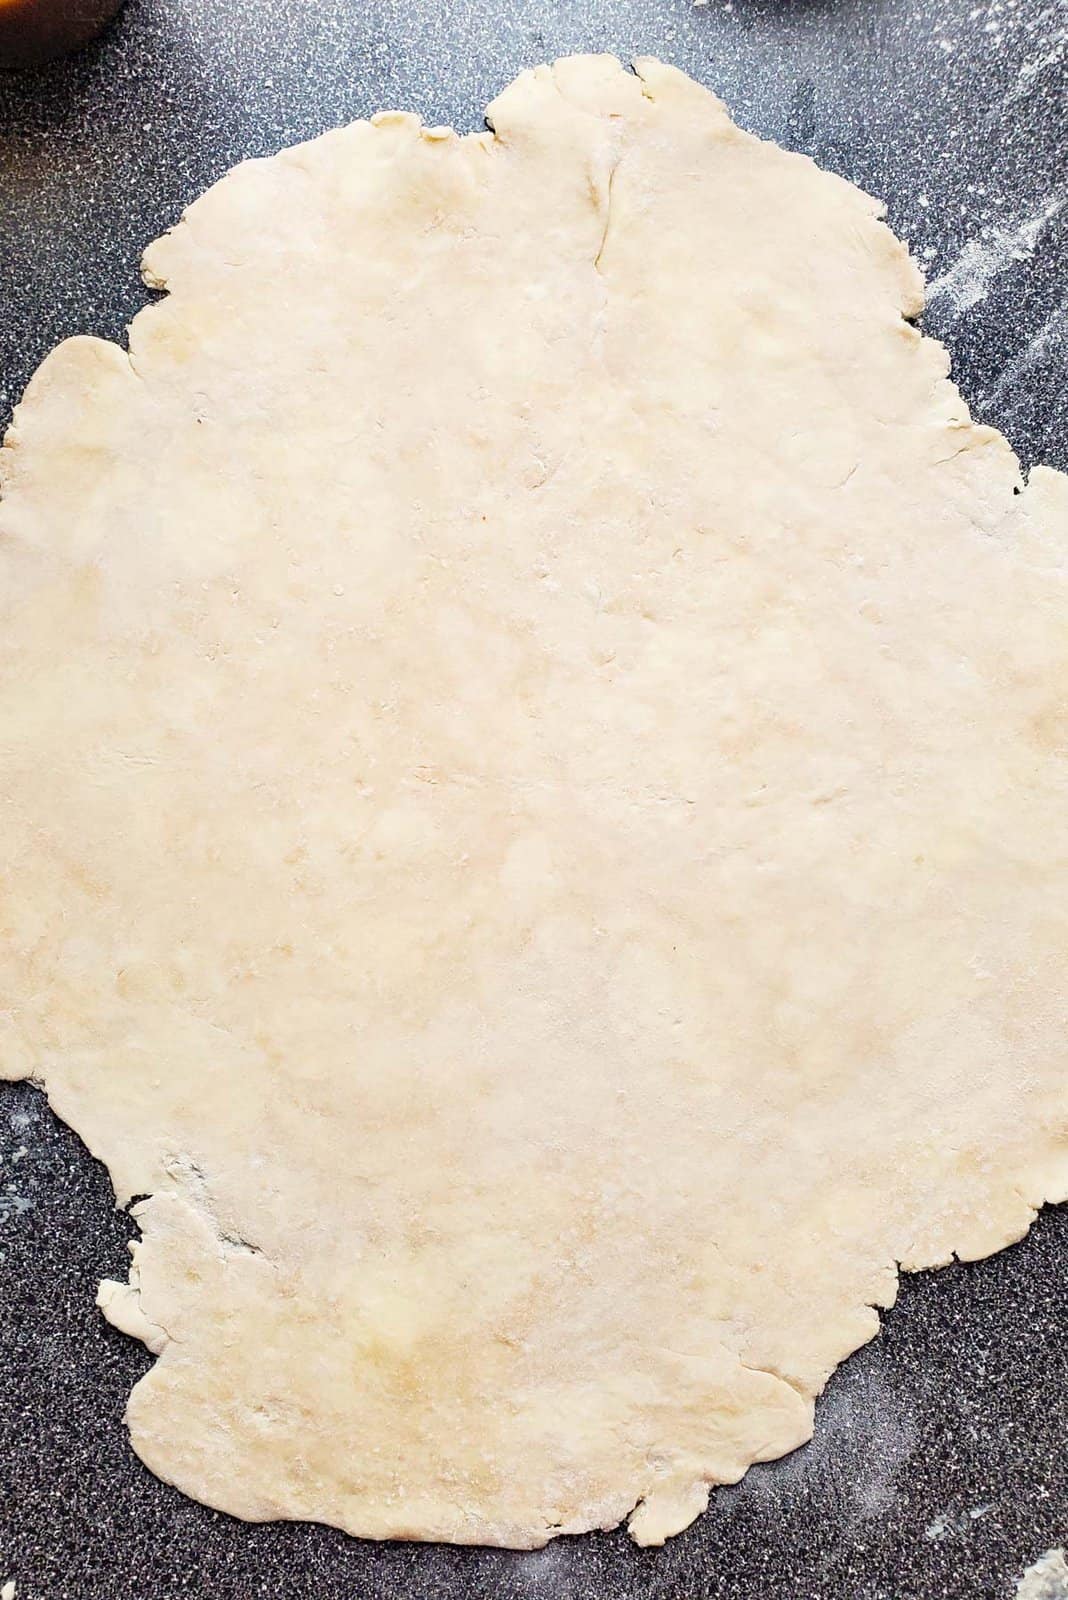
- Take one portion of the pie dough. Unwrap the plastic wrap, and place it on a floured surface.
- Since the butter will be very firm, it'll be hard to roll out the dough right away. Strike the dough disc a few times with a rolling pin, on both sides, to make it more pliable and easy to roll out.
- Roll out the dough, while maintaining the shape of a circle as best you can. Squeeze any cracked dough together to seal. Turn the dough a quarter turn after each roll, to ensure that the dough maintains the shape of a circle and also does not stick to your work surface. Use a light dusting of flour as needed, and also remember to flip the dough so that you roll it on both sides.
- Roll the dough until it’s about 3mm in thickness. The diameter should vary, but it should definitely fit a 9.5 inch diameter, deep pie dish.
- If the dough starts to shrink as you roll it, lightly flour the dough surface and either fold it into quarters OR roll it onto a rolling pin, and then cover it with plastic wrap. Let the dough rest in the fridge for at least 20 minutes, and then proceed with rolling it out again.
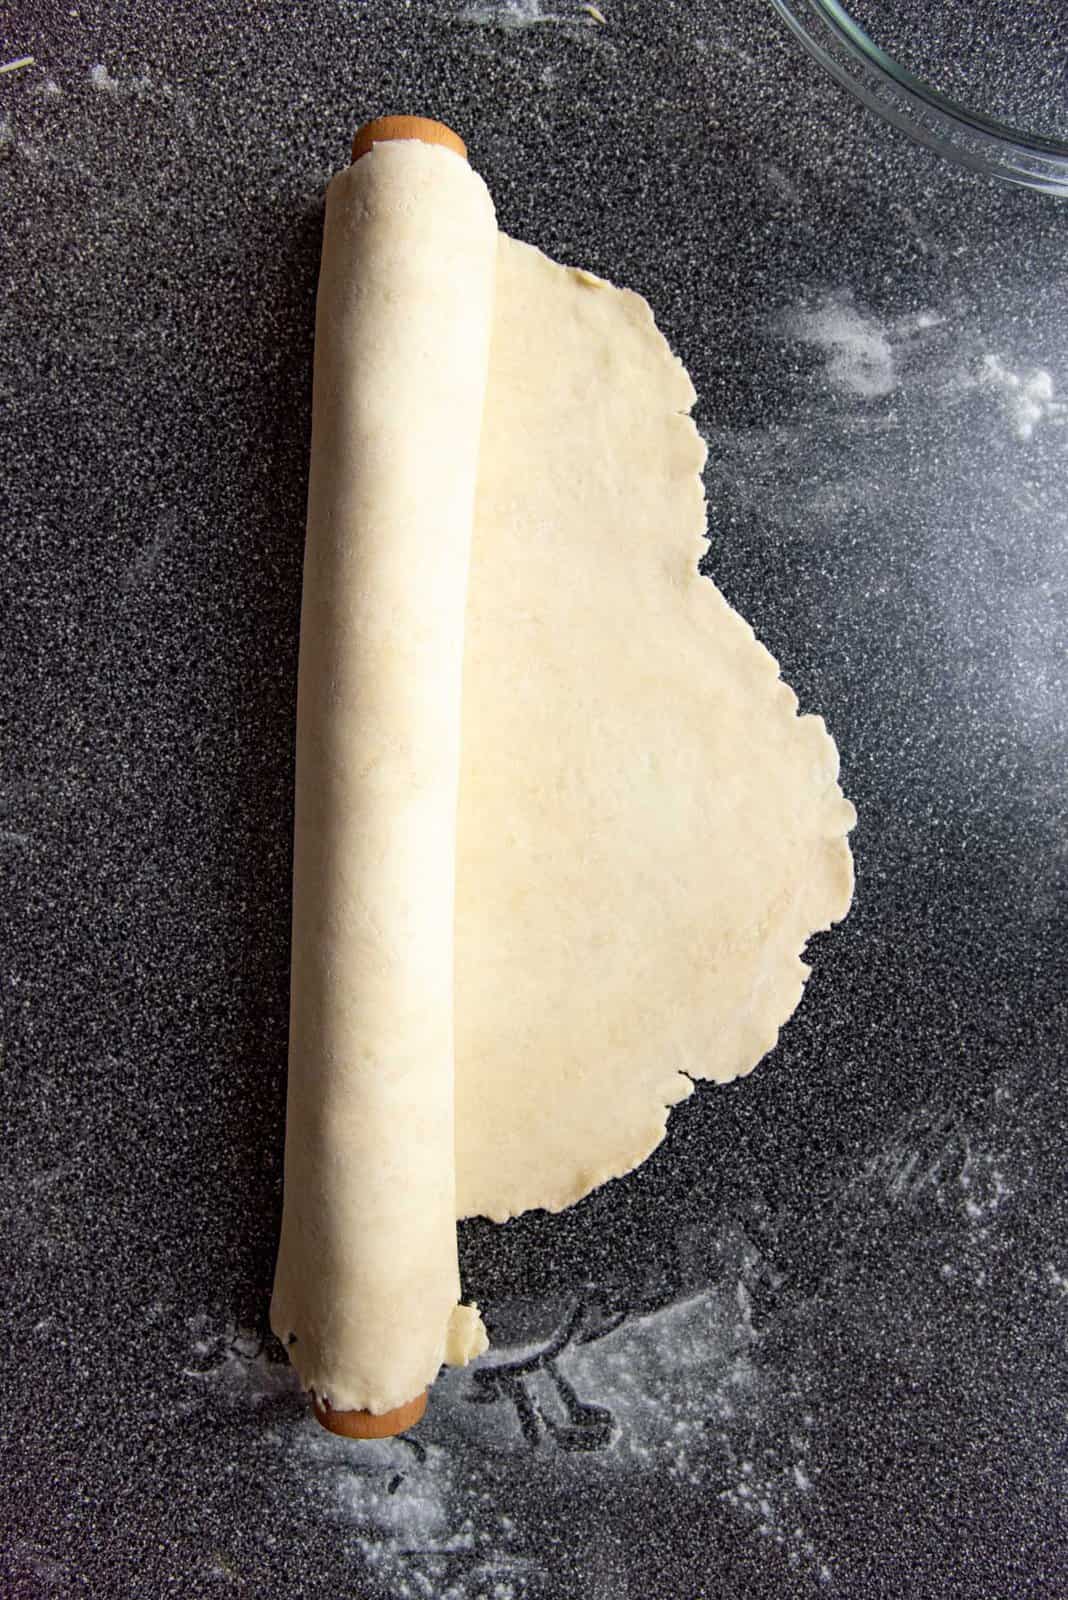
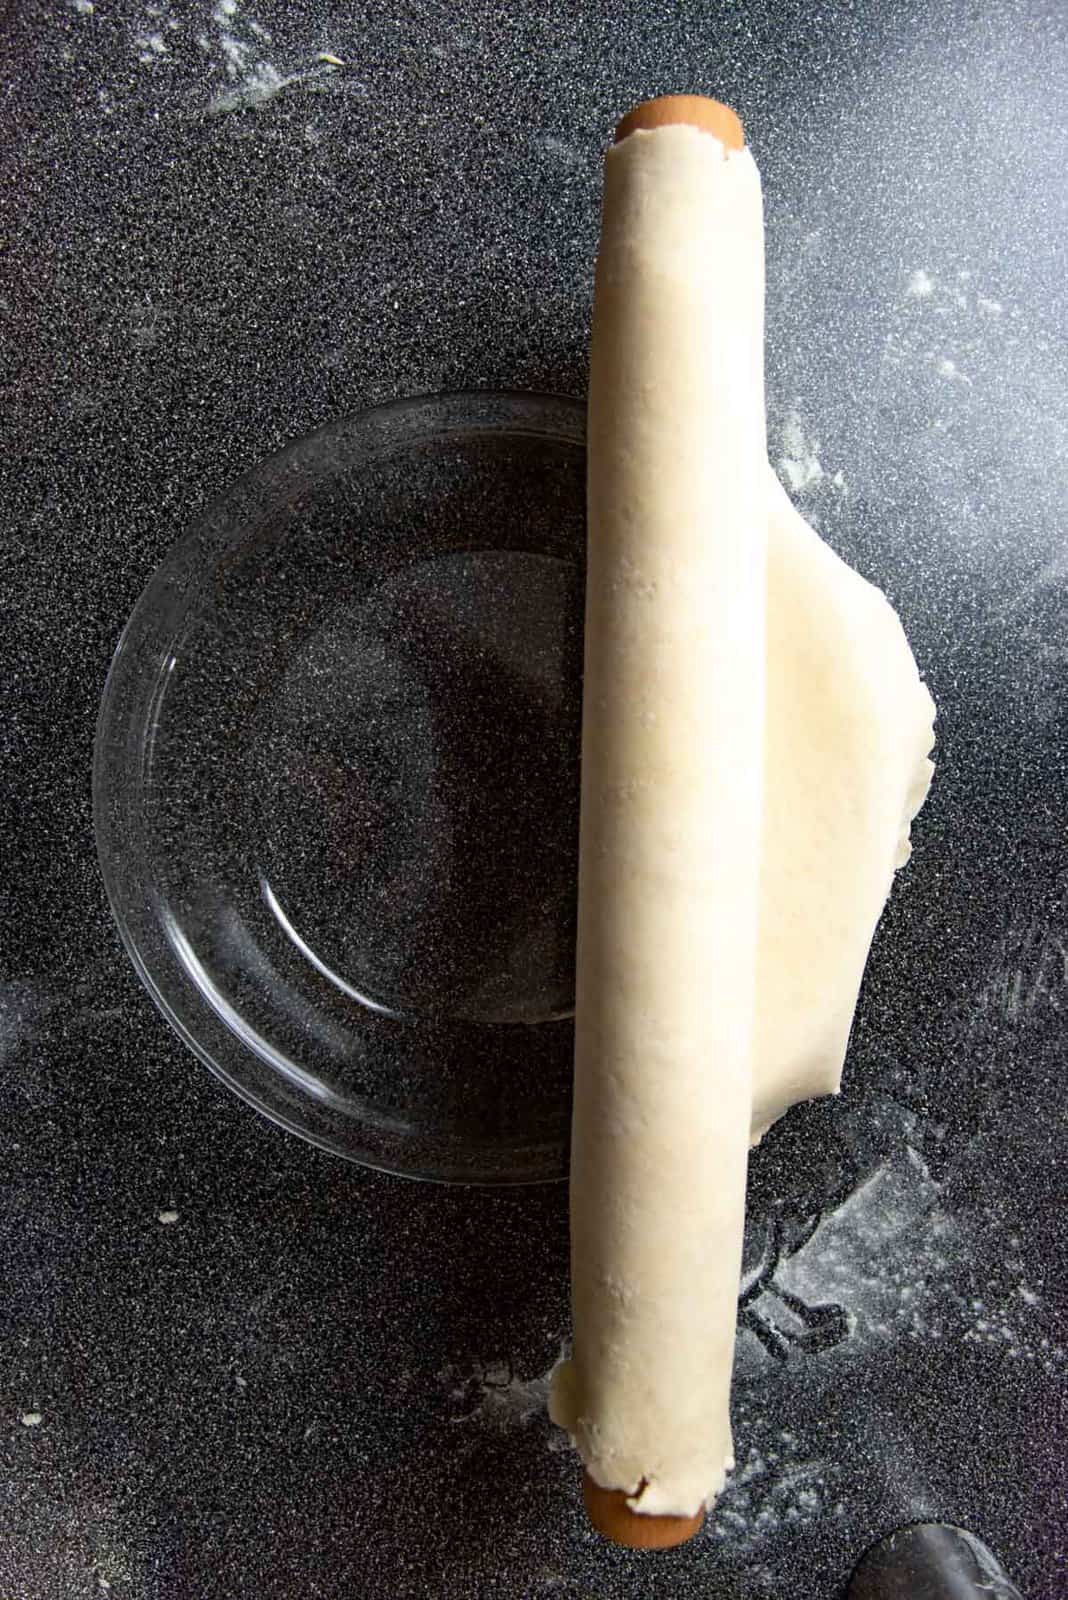
- Now transfer the dough onto the pie dish. You can do this by rolling up the dough on a rolling pin and then carefully unrolling it over a pie dish (see pictures in the post for guidance).
- DO NOT stretch the dough to fit it inside the pie dish. This is crucial and a common beginner's mistake. Instead, carefully lift the pie crust and let it gently fall onto the pie dish. Use the back of your fingers to gently press the dough into the bottom of the pie dish, so that it fits neatly in the dish.
- There should be an overhang over the pie dish rim. Using scissors or a sharp knife, cut the excess pie crust, leaving at least a 1 inch (or up to 1.5 inches) overhang for single crust pies. Or a 0.5 – 1 inch overhang for double crust pies.
- For single crust pies – Roll the dough overhang under the pie crust to form a thick border. This should be flush against the rim of the pie dish.
- For a fluted crimped edge – See attached video clip for guidance. Hold your thumb and index finger on one hand parallel to each other, and rest the tips of those fingers against the outside edge of the pie border. Then using the index finger or thumb on the other hand, gently push the inside edge of the pie border between the two fingers on your other hand, to create the crimped edge. Repeat this all along the pie border to form a fluted pie crust edge.
- Cover the pie crust loosely with plastic wrap and let it rest in the fridge for at least 45 minutes. If the butter softens at any stage, refrigerate the crust.
Blind baking pies
- Preheat the oven to 350°F / 180°C (conventional oven). Place the rack in the lower third of the oven, and place a pizza stone OR baking tray on the rack. Let the oven preheat for at least 30 – 45 minutes.
- Take a large piece of foil or parchment paper (large enough to fit inside the pie plate), and gently crumple it, making sure not to tear the foil / paper
- Then unfold the foil / paper carefully, and smooth it out. The foil / paper should now be flexible enough to fit inside the pie plate, on top of the chilled pie crust. Make sure the foil / paper is touching the whole surface of the pie crust, and loosely covers the border of the pie crust as well.
- If needed, use two pieces of foil (overlapping) to make sure the bottom and sides of the pie crust are fully covered.
- Fill the pie plate with sugar or rice (not both!), or ceramic pie weights. Make sure the weights come at least ¾ of the way up the pie plate.
- Transfer the pie plate into the preheated oven, on top of the baking tray or pizza stone. Bake for about 60 minutes, rotating once halfway through baking time, if needed.
- After 60 minutes, the bottom of the crust should start to caramelize and turn golden brown in color. The sides and top of the crust will still be very blonde in color (i.e. only have a little bit of color).
- Remove the pie plate from the oven and then VERY CAREFULLY, remove the foil / paper from the pie plate along with the baking weights (making sure not to spill anything!). Immediately transfer the weights into an empty bowl or plate. Be careful with this step since the foil will be hot, and you need to hold it firmly to prevent any tearing and spilling of contents.
- For par baking – Return the blind baked pie crust to the oven and bake for a further 5 – 10 minutes until the bottom of the crust looks matte or dry, and the sides have a little golden brown color.
- For a fully baked pie crust – Return the blind baked pie crust to the oven and bake further for about 15 – 20 minutes, until the crust turns golden brown. For a shiny finish, brush an egg wash all over the pie crust before the last 5 minutes of baking. Then bake for the last 5 minutes, until the crust is golden in color and shiny.
- For a double crusted pie crust – Roll out the second portion of dough until it's about 3 mm in thickness. Fold this in quarters and cover it in plastic wrap, and then keep it in the fridge with the pie plate until the filling is ready.
- Fill the pie plate with your filling and cover the pie with the second rolled out pie crust. You can either keep the top crust whole, or cut out shapes from it as well. You can also cut the second dough into strips, so that you can form a lattice on top.
- Next brush the bottom border of the pie crust with a little water and then press the top crust down so that it sticks well to the bottom crust.
- Cut the excess dough from the top crust leaving the same 0.5 – 1 inch overhang. Roll this overhang under the pie crust to form the same pie crust border and crimp it with a fork OR create a fluted edge.
- Refrigerate the pie for at least 30 minutes, before baking according to the pie recipe instructions.
Nutrition Information:
“This website provides approximate nutrition information for convenience and as a courtesy only. Nutrition data is gathered primarily from the USDA Food Composition Database, whenever available, or otherwise other online calculators.”
Leave a Review