
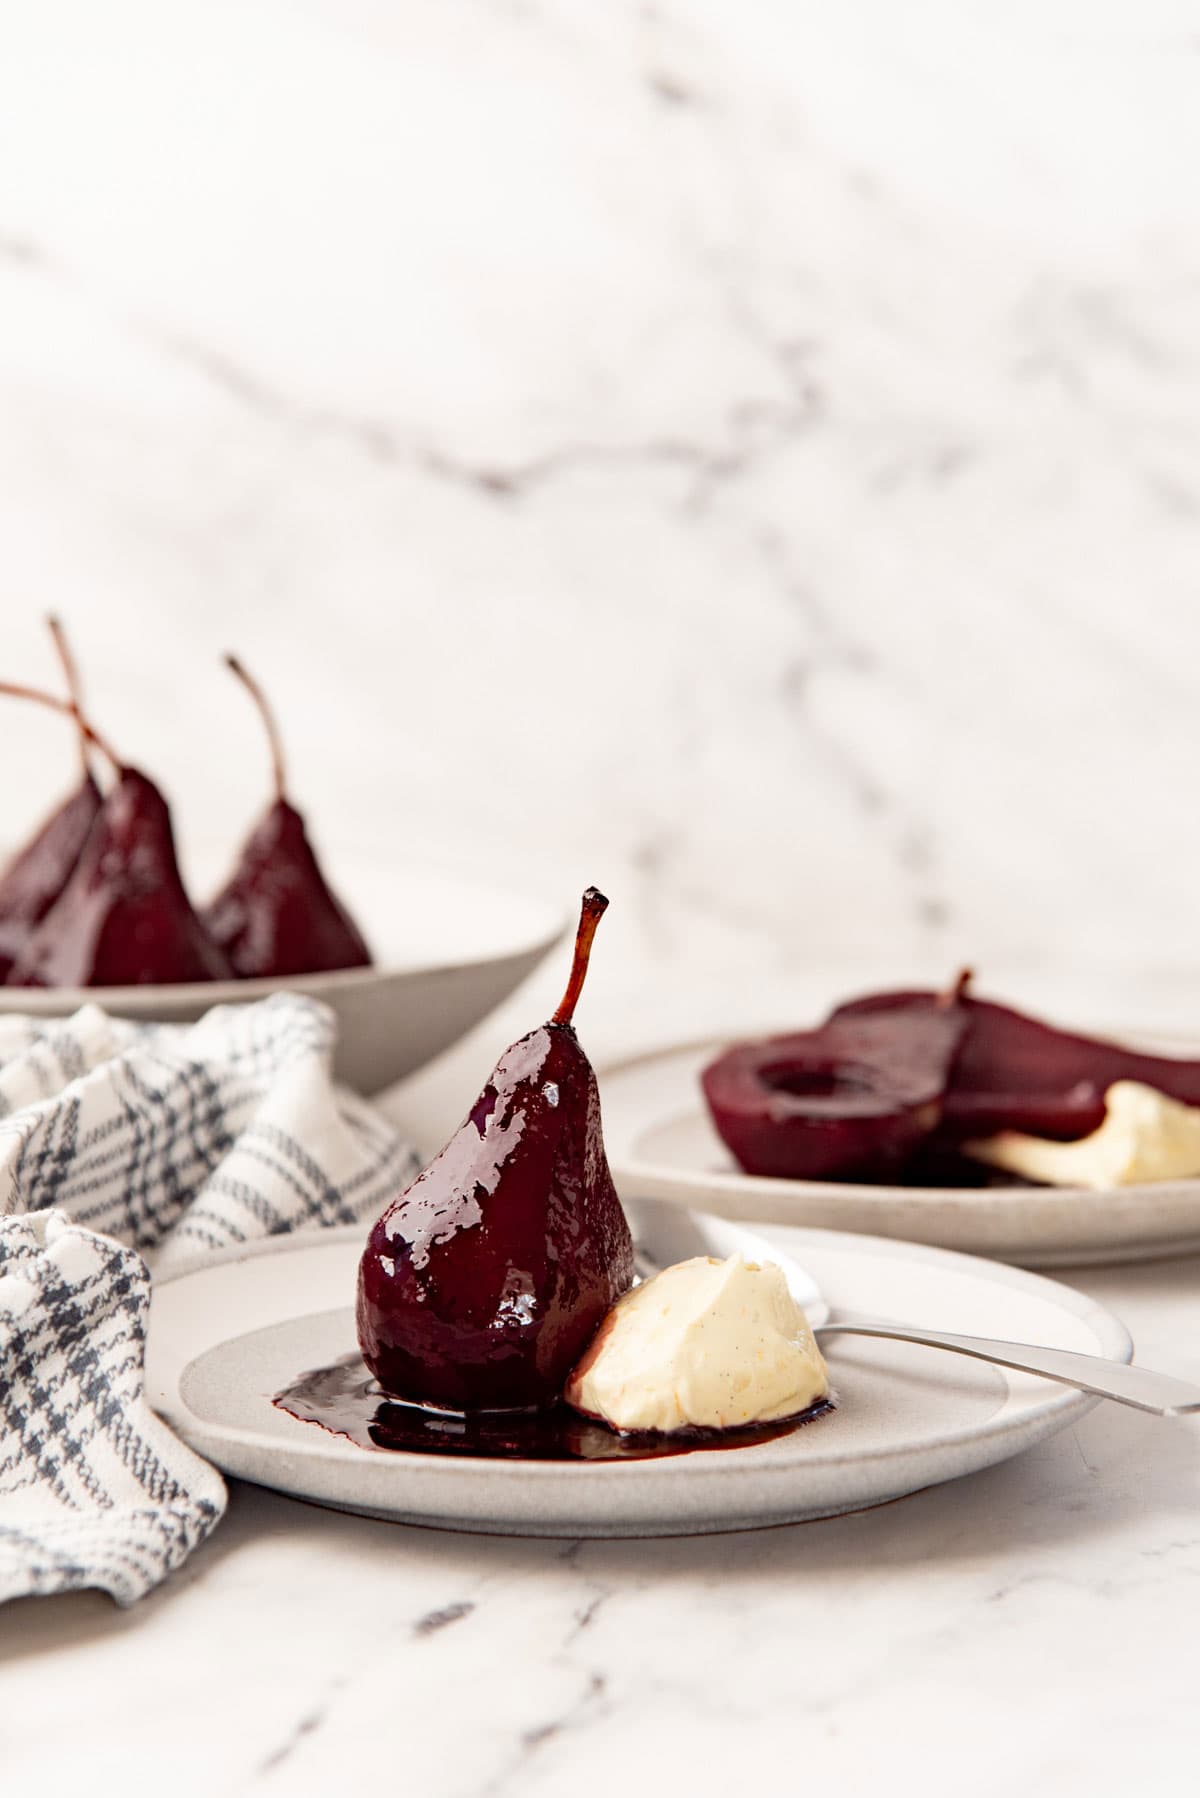
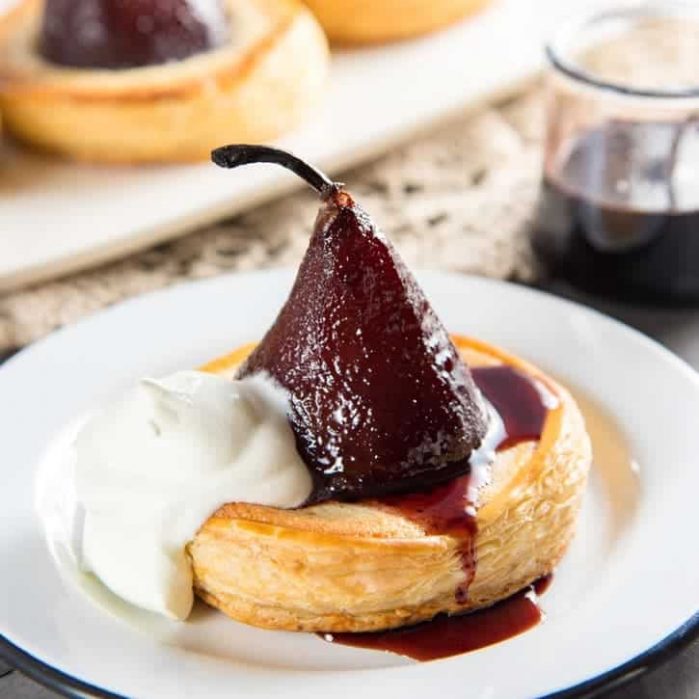
These red wine poached pears enhance the natural sweetness of the fruit with delicious red wine and beautiful spices. A simple yet decadent and elegant dessert.
Serve these poached pears with some mascarpone cheese, or whipped cream, or a scoop of vanilla ice cream for an impressive, holiday-favorite dessert.
I remember eating my first poached pear when I was little, and wondering whether those gorgeous deep red pears were doused in the same candy as candy apples. I wasn’t too happy that they weren’t crunchy like candy apples, but the taste more than made up for it!
Flavored with wine and spice flavors, and served with more of that delicious wine syrup and a generous serving of mascarpone cheese on the side, this dessert is a great finish to any meal.
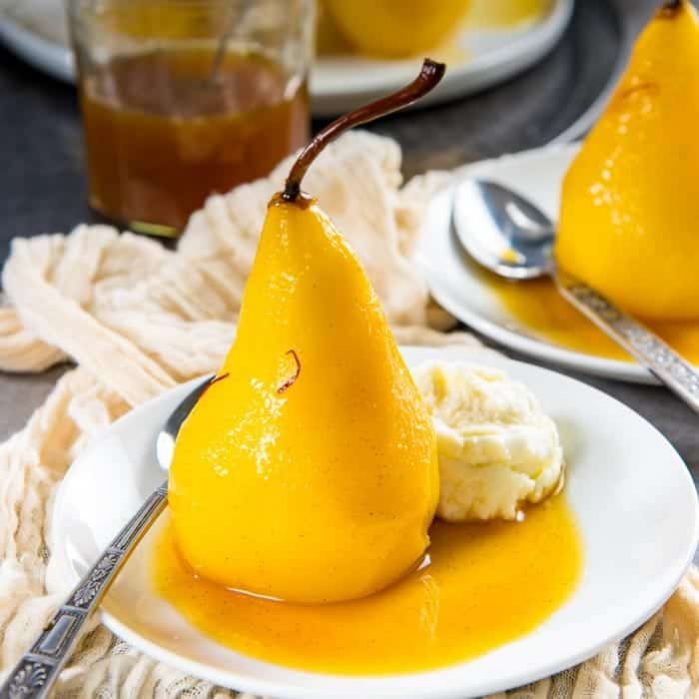
Alternatively, you can make these saffron poached pears for another exquisitely flavored non-alcoholic option, with a strikingly beautiful yellow hue.

What I love about these poached pears
- Super simple recipe, with show-stopping results!
- The pears can be poached whole, OR cut in half to poach them even faster.
- The red wine is flavored with the classics, such as cinnamon, cloves, and orange, but I add more fruits to make the pears taste even better.
- You can make it ahead of time which also allows the pears to absorb even more flavor.
- You can make it non-alcoholic too, by poaching in other liquids with maximum flavor! I share those substitutes here too. So the recipe is very versatile.
- The wine is not diluted with water while poaching, so the pears absorb tons of flavor!
- This is a family recipe that’s older than I am! I’ve made some adjustments over the years to perfect the flavor ever more!

What is poaching?
In cooking, poaching refers to the process of cooking food that’s submerged in a liquid. Poached eggs where eggs are cooked in simmering water, for example.
Poaching liquid is the liquid in which the food is cooked in. While this can simply be water, or salted water, you can change the poaching liquid to add more flavor to the food.
Like here, where pears are gently simmered (poached) in red wine and other spices and flavors to make a delicious, complex, yet very easy dessert.
Red wine poached pears
Red Wine Poached Pears are a classic French dessert and very underrated in my opinion. It’s such a simple dessert, yet delightfully flavorful and very elegant and impressive.
They have a great balance of sweet, spice, and fruity flavors, and the deep red color turns this into a beautiful centerpiece dessert too.
Plus, making red wine poached pears (or white wine poached pears) is super easy. Here, I’ll show you how to make this easy dessert step by step, with additional suggestions to really amp up the flavor!
Ingredients and substitutions

Red wine poached pears
- Bosc pears
- Red wine
- Whole cloves
- Cinnamon sticks
- Star anise (optional)
- Orange peel and juice
- Berries (raspberries, blackberries, or strawberries)
- Sugar, maple syrup, or honey
To serve (optional)
- Mascarpone cheese (or labneh or creme fraiche)
- Orange peel
- Sugar
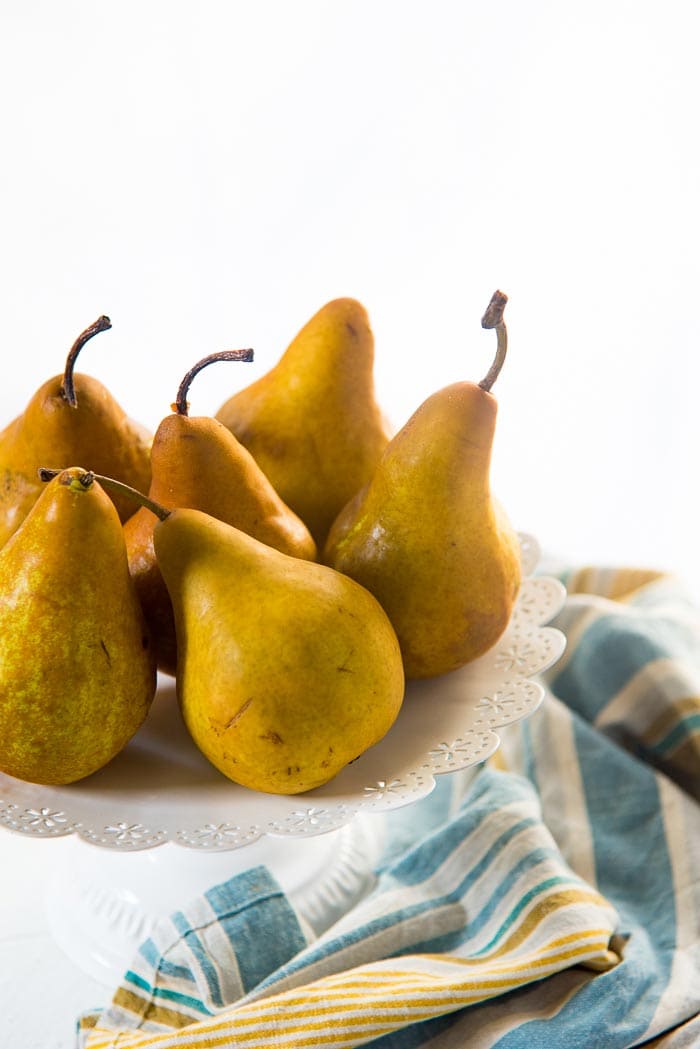
Choosing the perfect pears to poach
I prefer Bosc pears. It’s a great choice because bosc pears retain their shape well while being cooked.
Bosc pears are crisp and mildly sweet, making them the perfect canvas for all the flavors in the poaching liquid.
Other pear options
- Anjou pears – They too have a mild flavor that doesn’t interfere with the flavors of the poaching liquid. And more importantly, they don’t become mushy while being poached.
- Asian pears – They are almost like a cross between a pear and an apple in terms of taste and texture. They are also crisp and sweet, and poaching these would again give you something resembling a poached apple and pear in terms of flavor.
Which pears to avoid
Avoid Bartlett pears at all costs. Bartlett pears are delicious to eat, but they bruise easily if handled too much, and warming them up will turn them to mush pretty quickly.
They are perfect to make pear sauce or pear butter, but they are a no-go for poaching.
Wine
Cook with a wine that you like to drink. And not too expensive. That goes for both red and white wine.
As the pears simmer, the wine will start to concentrate in flavor and infuse more flavor into the pears. That’s why it’s important to use a wine that has good flavor. However, you can still certainly get a cheaper wine and adjust the flavor with added sugar, orange juice, berries, and spices. Ultimately, the red wine will be served as a syrup at the end, so make sure the poaching liquid tastes good at the beginning.
I use a Cabernet Sauvignon or a Merlot when I make these red wine poached pears, but a nice red wine blend will work too. The drier the red wine, the more sugar you may need to add for sweetness.
If you don’t want to use alcoholic liquid, you can also use non-alcoholic options.
Spices and other flavors
I’ve made these red wine poached pears with all kinds of spices. Seriously, there’s only very few that won’t work.
Poached pears are quite versatile, and it’s mostly about choosing what you like. But don’t be afraid to try new spices and flavor profiles that you’re not familiar with either.
For red wine poached pears, I usually go with cinnamon, star anise, cloves, orange peel, and vanilla. It’s a great combination of spices. It’s like poaching the pears in mulled wine.
I also love adding berries to the poaching liquid, because the added fruit adds more sweetness and flavor to the wine and subsequently the pears.
Sugar
The pears can be poached without sugar, if you don’t mind yours pears not being too sweet. Not adding sugar will be an issue if your pears are not ripe enough though, and rely on the sweetness of the red wine to sweeten.
Adding sugar also helps to create the lovely sweet red wine syrup at the end when you serve this dish. The sugar helps to create a thick syrup without having to reduce the red wine too much.
How to make red wine poached pears (step by step overview)
Step 1 – Choose a pot to poach the pears in
The pears should be mostly submerged in the red wine while poaching, so use a pot that will fit the pears fairly snugly (image 1). Whether the pears are poached whole or halved. Ideally the pears should not be touching each other either, if you’re poaching whole pears.
Use a non-reactive pot. I usually use my stainless steel pot for this. But a non-stick or enamel pot works too.
Step 2 – Place all the poaching ingredients in the pot
This includes the red wine, berries, spices, orange peel, orange juice, and sugar (image 2). Stir and heat over medium heat until the liquid starts to boil.

Step 3 – Prepare the pears
While the wine is heating, prepare the pears. You could also prepare the pears ahead of time, but peeled pears can discolor. Therefore keep the pears submerged in cold water with lemon juice to prevent oxidization (IF you prepare the pears ahead of time).
Peel the pears, but keep the stem intact if possible (image 3). Make sure the whole peel is removed, as the wine won’t infuse the pear in areas covered with skin. Take care to peel the bottom of the pear as well. You can also cut a small piece of the bottom off the pear to make the bottom flat. This will make it easier for the pears to sit up in the pot.
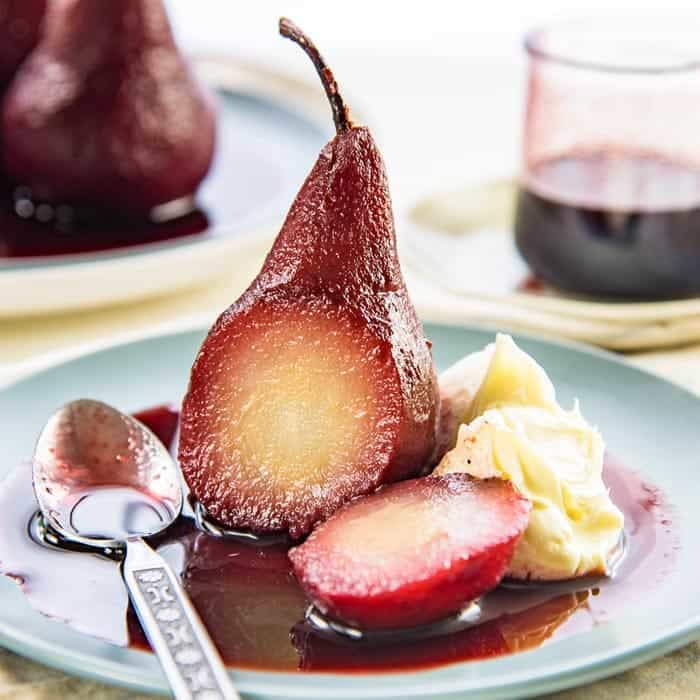
If you prefer to poach halved pears, cut the pear in half lengthwise. You can remove the stem altogether, or keep it on one half. Use a teaspoon or melon baller to remove the core of the pear of each half (image 4). Using a melon baller will keep the pear halves looking neat.
Step 4 – Place the pears in the simmering liquid
When the wine is starting to boil, lower the heat and place the lid on the pot and let it simmer while you get the pears ready.
Lower the pears carefully into the simmering red wine liquid (images 5 – 6). I previously used to strain the poaching liquid to remove the berries, but now I skip this step and note that it’s not necessary. It actually adds more flavor to the red wine!
Make sure the pears are mostly submerged in the poaching liquid (image 7). Cover the pot with the lid and let the pears poach. Adjust the heat so that the wine is at a gentle simmer.

Step 5 – Poach the pears
Some recipes call for adding extra water so that the pears are fully submerged. I prefer not to add any extra water so that the flavor and color is not diluted.
This results in the pears only being about 75 – 80% submerged in the liquid (in the correct-sized pot) (image 8). While the pears are poaching, turn and flip the pears over every 5 – 10 minutes so that all sides of the pears are poaching evenly.
The pears will take anywhere between 20 – 40 minutes to poach. The time will depend on,
- The size of the pear
- How ripe the pears are to start with. Ripe pears will cook faster, slightly unripe pears will take longer.
- If the pears are poached whole or halved
Do not be tempted to increase the heat, so that the wine is boiling. The key is to gently simmer the pears, so that they poach evenly. Higher heat will cook the pears too quickly on the outside, resulting in a mushy pear, while not softening or infusing the flavor on the inside.
The pears are done poaching when you can insert a skewer through the pear with very little resistance.

Step 6 – Allow the pears to cool down
I prefer to let the pears cool down in the poaching liquid. This allows the pears to continue to infuse with the flavor AND intensify in color as well. The pears are be placed in the poaching liquid in the fridge until the pears cool down OR even overnight.
But if you’re in a hurry, you can remove the pears from the poaching liquid and store them in the fridge to cool down as well.
Step 7 – Make the red wine syrup
Once the pears are removed from the poaching liquid, strain the red wine to remove the spices, berries, and peel (image 9). Gently press the fruits to release some of the juices, but do not let the pulp pass through.
Discard the spices and fruits, and return the liquid back into the pot. Heat the red wine liquid till it comes to a simmer, and continue to cook until you have a thick consistency (images 10 -12).
The syrup is best served cold or at room temperature, so allow the syrup to cool down.

Step 8 – Serve
Serve the poached pears with the red wine syrup. When I was little, I remember the poached pears being serve on a large flat bowl or platter, with the syrup at the bottom of the platter. But I have also served the pears on their own, with the syrup in a jar on the side as well.
Serve the poached pears on their own. Or, serve alongside a scoop of ice cream or a dollop of mascarpone or whipped cream.

My best tips for success
- Choose the right pot for poaching the pears, so that you don’t need to add any water to submerge the pears in the liquid. More on this below.
- If you’re short on time, cut the pears in half before poaching them. Pear halves will poach faster.
- Use the right type of pears for this recipe. Bartlett pears will become mushy and turn into pear sauce instead!
- Make sure the pears are peeled properly. To help the whole pears stand upright, create a flat bottom on the pears. The stem isn’t essential, but it acts like a little handle making it easy to pick them up (also nice for aesthetics).
- Choose pears that are ripe, but not overripe. Ripe pears are sweet on their own, and pears will taste better with less added sugar. Plus, the pears will poach faster too.
- If your pears are on the unripe side (the flesh is not as juicy when you peel the pears), you may need to add some extra sugar to sweeten the pears, and cook them for longer to get the same poached consistency.
- You can absolutely add liqueur to enhance the flavor. Raspberry liqueur and black currant liqueur are two of my favorite additions. To maintain the flavor of these liqueurs, they can be added directly to the red wine syrup at the end. This will also make the red wine syrup more alcoholic.
- Add fruits to enhance the flavor of the poaching liquid. I like to add raspberry or blackberry or cherries that complement the flavor of the red wine. You can also add apple cider (with white wine), orange, cherry, or pomegranate juice.
- Gently flip the pears every 5 – 10 minutes when poaching, so that the pears poach evenly.
- Once the pears are poached, be very gentle when handling them. The flesh is very soft, and spoons will leave marks on the pears.
- Plan ahead. These pears can be stored in the fridge for up to 4 – 5 days, if stored in an airtight container. I prefer to let the pears cool down in the poaching liquid. You can skip this if you’re short on time, but I do recommend this step.
- The amount of red wine syrup you end up with will absolutely depend on how much sugar is in the liquid. If there is less sugar, the red wine must be reduced more to become more syrupy. If there is more sugar, the wine will not have to be reduced as much because of the higher sugar concentration.
- Serve the pears cold, or at room temperature for best flavor!

Choosing the right saucepan for poaching pears
The poaching liquid for this red wine poached pears recipe is good for a maximum 6 whole pears. But you can just as easily poach less pears in this red wine mix.
It’s important to use the right saucepan for the job though. The pears placed upright must fit snugly in the saucepan with just some space in between the pears, and with wiggle room for the pears to be at least partially submerged even at an angle, or upright.
I always poach the pears while they are sitting upright first, and then have them submerged at an angle in the red wine mix so that the tops of the pears get cooked.
Usually, I have the pears angled towards the middle, and then rotate them every few minutes to make sure the whole pear is poached well and flavored with the wine and spices, and colored evenly.
Since it’s red wine, it’s easy to tell which parts of the pears have been poached or not. And since the bottom of the pear is plumper, I poach the pears while keeping them upright for a little longer.
Recipe variations
These pears are poached in mulled wine. But the red wine can be swapped out for white wine as well.
You can certainly poach the pears in 100% liqueurs or liquors as well. But because of the high volume of liquid I will need, I prefer not to use expensive products to poach the pears. Instead, you can add a small amount with the wine, for more flavor.
- White wine and gin
- Champagne and tequila (reposado)
- Red wine and aged rum
Try different sweeteners
A great way to enhance the flavor of these red wine poached pears is by changing the sweetener.
I use white sugar for this recipe, but you can add brown sugar, maple syrup, or honey as well. While you can use sugar substitutes to add sweetness, they may not be as successful in creating the syrup at the end. So, use sugar substitutes with caution, as I cannot guarantee how successful the syrup will be.
Non-alcoholic poached pears
- Non alcoholic red or white wine – This will give you the closest flavor profile to the current recipe.
- Cherry or cranberry juice – With added sugar and spices.
- Apple cider – Apple cider or juice is also a great option for poaching pears. Add spices to make the flavor profile more interesting.
- Tea – Brewed light teas like earl grey or breakfast tea is good. Don’t use teas like Assam or Ceylon BOP, as these will have a much stronger flavor and tannins. I personally would use a lovely green tea, oolong tea, or a very fragrant jasmine tea.
- Flavored water – Just like my saffron poached pear recipe, you can use water that has been flavored with honey, saffron, and other similar spices! Rose water or orange blossom, along with other fruit juices can work too.

What to serve with poached pears
Since the liquid is being cooked for a while, the alcohol in the red wine will be mostly cooked out too, so kids can in theory enjoy it as well. Unless, you add liqueur to the syrup at the end.
I certainly loved eating red wine poached pears when I was a kid, and never got drunk. However, that’s a decision I will leave to your discretion.
These poached pears can be served on their own. But you can absolutely serve them with other accompaniments too. Here are some of my favorite serving suggestions for poached pears.
- Dollop of mascarpone – lightly sweetened. I like to add a little orange zest and vanilla as well.
- Scoop of ice cream
- Dollop cream chantilly
- Lightly sweetened labneh
- Sour cream or greek yogurt
I also have had readers let me know that they loved serving their poached pears with,
- Sponge cake
- Angel food cake
- Ricotta with honey
Or you can also incorporate poached pears into other desserts like pies and tarts, like these chocolate stuffed poached pear tarts.

Storage tips
These red wine poached pears can be made 1 – 2 days ahead and stored in the fridge. If I have the time, I prefer to keep the pears in the poaching liquid overnight, because the liquid will continue to flavor the pears even more as the pears cool down.
Then this gorgeous poaching liquid can be simmered even more to make a syrup which you can pour over the pears when serving.
To store the pears in the fridge, place the poached pears in an airtight container. Either lay them on their side or leave them upright, but make sure not to squash them, as they are very delicate. The pears can be stored in the fridge for up to 5 days, if stored properly.
I do not recommend storing these in the freezer, as the pears can change in texture when thawed out.
Commonly asked questions
Ideally, you don’t want pears that are overripe, because they’d be too soft to withstand the hot poaching liquid. You CAN poach overripe pears for a shorter time, but that doesn’t give enough time for the pears to really absorb all the flavor.
Absolutely!
In this post, I share images of whole poached pears and pear halves. The pear halves were poached in the same liquid after I poached the whole pears.
The only problem would be that the liquid does evaporate, and the wine amount will be less after poaching pears the first time. So there will be less to use for the second time. More wine can be added to compensate for the loss of liquid, or a little extra water can be added in this case as well.
But I don’t recommend storing the poaching liquid long-term and and reusing it multiple times.
The time it takes for the pears to be tender will vary depending on the pears. If your pears were unripe, or large, they will take longer to poach and soften.
If you want your pears to poach faster, then I recommend cutting them in half (and removing the core), or to poach pears that are perfectly ripe.
Looking for more recipes?Sign up for my free recipe newsletter to get new recipes in your inbox each week! Find me sharing more inspiration on Pinterest and Instagram.
Red Wine Poached Pears
Ingredients:
Red wine poached pears
- 3 – 6 medium sized bosc pears ripe, but not overripe (firm with just a little give)
- 480 – 600 mL medium bodied red wine 2 – 2.5 cups (see recipe notes below)
- 1 orange peel from 1 medium orange
- 8 – 10 whole cloves
- 1 stick cinnamon
- 1 star anise I do not add this here, but this can also be added to the red wine
- 50 – 100 g sugar ¼ – ½ cup (see recipe notes below)
- 120 mL orange juice ½ cup. pomegranate juice, cherry juice, or apple juice
- 2 tsp vanilla extract
- ½ cup berries strawberries, raspberries, blackberries OR cherries, OPTIONAL but highly recommended (can be frozen berries as well)
Mascarpone (optional)
- 226 g mascarpone chilled (substitute with labneh, creme fraiche, cream cheese, or sour cream)
- 10 – 20 g honey or maple syrup, to taste
- 1 tsp vanilla extract
- 2 tsp orange zest
Instructions:
- Make sure to use a non-reactive pot that will comfortably fit all the pears that you'll be poaching, with enough wiggle room for the pears to be submerged at an angle as well.
- Simmer poaching liquid – Place the wine, spices, peel, juice, vanilla, and berries in a saucepan.480 – 600 mL medium bodied red wine, 1 orange peel, 8 – 10 whole cloves, 1 stick cinnamon, 1 star anise, 120 mL orange juice, 2 tsp vanilla extract, ½ cup berries
- Add about ¼ cup / 50 g of the sugar.50 – 100 g sugar
- Bring the red wine to a simmer at medium – medium high heat while stirring to dissolve the sugar. When the red wine is starting to boil, reduce the heat to low.
- Prepare the pears – When the red wine is close to coming to a simmer, peel the pears. If you peel the pears ahead of time, keep them submerged in cold water and lemon juice to prevent browning.3 – 6 medium sized bosc pears
- Peel the pears and make sure there are no bits of the peel on the pears. The pears will not pick up the red color if the peel / skin is still present. Cut the bottom of the pear to be flat, so that the pears will sit upright while poaching. Try to preserve the stem of the pear.
- For halved pears – Cut the pears in half lengthwise. Use a melon baller to remove the core. Cut off the stem of the pears (optional).
- Poach the pears – Lower the peeled pears into the simmering poaching liquid. Place the lid on the pot and lower the heat so that the liquid is at a gentle simmer.
- Poach the pears in the liquid for about 25 – 30 minutes, but rotate the pears every 5 – 10 minutes to ensure they poach evenly on all sides, including the top. The thick parts of the pears will need to be submerged for longer as they will need to cook longer. Pear halves will be done the fastest.
- The pears are done when a skewer or thin knife blade goes through the pears with very little resistance. The cook time will vary depending on the size of the pears, and how ripe / unripe they are at the start. For unripe or large pears, the cook time can also be up to 40 minutes.
- When the pears have been poached, keep them upright in the poaching liquid, and remove the saucepan from the heat and allow the pears to cool down in the poaching liquid. While the next step is optional, and you can remove the pears from the liquid if you're short on time, I highly recommend letting the pears cool down in the red wine so that the pears absorb maximum flavor.
- When the pears have cooled down, place them in the fridge to chill. You can also let them chill overnight. Keep the pears in the liquid with the lid on if you like, OR place them in a container without the liquid, with a lid or cover.
- Making the red wine syrup – Once the pears are removed from the cooled down poaching liquid, strain the poaching liquid to remove the berries and spices. Press down gently, but make sure not to get any pulp from the fruits. Discard the fruits and spices.
- Place the strained liquid in the pot. Heat over medium heat and bring to a boil. Adjust the heat to gently boil the red wine liquid until it reduces to a thin syrup. Taste the syrup and add more sugar IF you want. The syrup will also thicken more as it cools.
- The cooking time depends on how much liquid is left and how much sugar is in the liquid, so keep an eye on it. If the syrup is too thick, add a little water to thin it out.
- Serve the pears on a serving dish that can also hold the syrup. Brush the pears with a little of the syrup so that they are shiny. This is optional. Serve the syrup in a jar or in the serving dish.
- To serve – Place a pear on a plate with some syrup spooned over. Serve with a dollop of mascarpone.
Mascarpone (optional)
- Place all the ingredients in a bowl and mix until everything is well-mixed and smooth. Taste and add more honey to your taste. Keep it chilled until the pears are ready to be served.226 g mascarpone, 10 – 20 g honey, 1 tsp vanilla extract, 2 tsp orange zest
Tips & Tricks
Note about the wine
I prefer to use a medium or full-bodied red wine that I enjoy drinking. Cabernet sauvignon, merlot or syrah will be first on my list. But you can use a red wine blend as well, if you like.Note about the sugar
Adding a little sugar can help enhance the flavor of the pears. You can add more sugar if you want your poached pears to be sweeter, OR if the red wine you use is very acidic and the pears are unripe.Note about chilling the pears
The poached pears can be chilled overnight in the poaching liquid. OR you can remove the pears and store them without the liquid in a separate container as well. Keep the pears covered to prevent them from drying out.Nutrition Information:
“This website provides approximate nutrition information for convenience and as a courtesy only. Nutrition data is gathered primarily from the USDA Food Composition Database, whenever available, or otherwise other online calculators.”
![[Msg 4 21+] Red Wine marinated Steak Sandwiches with a Red wine Glaze, Grilled Onions, Arugula and Aged Cheddar. Red wine marinated, succulent, perfectly grilled steak, sliced and piled on toasted bread topped with a buttery red wine glaze! A Perfect Picnic Sandwich! REPIN to save. CLICK to get the recipe now. #TheFlavorBender #BlackBoxSummer [ad]](https://www.theflavorbender.com/wp-content/uploads/2016/04/Red-Wine-Marinated-Steak-Sandwich-1393-Copy-2-699x699.jpg)
John doe says
This was the best poached pair recipe I have found
Sandy says
I’m wondering if I wanted to store the pears for a few days in the fridge, would I leave them in the poaching liquid or separate them after a day
Dini says
Hi Sandy,
You can leave the pears without the poaching liquid for upto 3 – 4 days. The pears will dry out on the outside slightly, so make sure they are stored in an air tight container. Once the syrup is poured over/ brushed over the pears before serving, they wont look dried out.
I hope that helps!
Claudia says
Delicious! Came out perfectly and your well written detailed instructions are the difference! Thank you so much
steve taylor says
You can add all the alcohol you want, but there won’t be any alcohol left in the finished dish as it all evaporates during the cooking process.
Dini says
Hi Steve
I’m not sure what your question is here unfortunately?
Red wine in this recipe is for the flavor. The pears are poached in the red wine, BEFORE any alcohol is evaporated, so there could be some alcohol in the pears. However, the syrup may not have alcohol, but will have the flavor of red wine in it. I hope that helps!
Ashleigh McGeer says
Oh my goodness! Delicious
Sandhya Jaideep says
This recipe turned out really well with Bosc pears. I added a generous amount of orange peel while poaching and served with ricotta cream and a drizzle of the red wine syrup. It was impressive, yet light. 😉
Suzanne says
I don’t know if my pears were ripe enough because they still feel very hard after poaching the specified time. And they are not very dark red like yours. Should I potentially cook them a little bit to soften or just leave in the liquid longe? Not serving them for a day. Thanks!
Dini says
Hi Suzanne
The pears should be tender after poaching. A knife should easily glide through the flesh.
If it’s not tender, then you can cook them for longer. Unripe pears can also take a longer time to poach than ripe pears. If your pears are unripe, a little extra sweetness might help make the pears taste sweeter too.
Hope that helps
Suzanne says
Thank you, I’ll let them simmer a little bit longer and then just left them soaking in the liquid overnight. I pierced one of them with a sharp knife and it is definitely softer, but not soft.
kozy says
I LOVE the detailed insights and instruction, it really helps when I understand WHY I am doing what before I do it. THANK YOU! I added a star anise and shredded some dried-up-old fresh ginger (never throw it out, good for tea as well), and halved, cored, and trimmed my Bosc b/c they were getting near the end… this all worked brilliantly!! THANKS again! xo
Nick says
Delicious. Made as printed, then made a second time, with nutmeg and Pimen de Espelette (a mild Spanish/Basque spicy red pepper). A bright alternative to the cloves and cinnamon. Enjoyed both very much.
Adrienne says
Can you
Please tell me. When pears go red? Mine have not gone red!
Richard says
I think the higher the alcohol in the wine the stronger the red color. I believe makes a more beautiful contrast with the center or the pear.
Snowman says
The deep red color in a wine comes from the juice remaining in contact with the grape skins for a longer period of time. Winemakers call it cap management. They will allow the skins to float to the top of the fermenting tank and then push the skins back down into the juice.
Lynette says
I’m going to try it
Lance Brilliantine says
Delicious. I like to add some port wine to the mixture, and serve the pear with pana cotta. It works very well!
Colette says
Wow! So delish with crème fraiche and the syrup. Used Cabernet and fresh cherries from a neighbor’s tree. I’ll make often
Ivan Andrei says
I tried this recipe and it was divine, a bit too sweet for our taste but I think it was because I used the orange juice with the canned cherries, I might need to adjust the sugar next time I make it again (which I definitely will!!) the wine I used was the Cabernet Sauvignon Merlot by Willow Bridge estate.
Dini says
Hi Ivan
Canned cherries contain sugar as it is with syrup, so the pears would have been too sweet if you added canned cherries as well as the sugar indicated in the recipe. If you are adding any other sources of sugar, then I do definitely recommend reducing the added sugar in the recipe.
But I am glad that you still enjoyed it.
Capt flip says
Loved it
Lars says
My sister gave us pears for Christmas this year, and so I decided to make your recipe. I did not have cinnamon sticks, and so I used two teaspoons of ground cinnamon instead and let that settle out at the end. I used more orange peel plus the juice of two naval oranges from my back yard.
Since I used ground cinnamon, I added a bit more of the coconut sugar to counteract the bitterness of the cinnamon, but that was probably not necessary.
I have a lot of leftover syrup, but I love it so much that I will find uses for it. It reminds me of an expensive Balsamic vinegar and a bit like pomegranate molasses.
Dale LeFebvre says
These are the most elegant and delicious ending to your dinner party and anyone can master this recipe…. Cook with love and you won’t go wrong…. Enjoy!!